
Q&A: Common Questions about Quilting at Doodle
Q&A on Doodle Quilting Studio
Well it seems to be the season for new folks joining the quilting family at Doodle! Or some of you coming back after building up a pile in preparation for the Holidays! So, I wanted to just go over a few common questions we get at Doodle - and give you their answers! If you have more that we missed here, leave a comment and we’ll get it answered asap!
I’ll include a few links throughout to places on our website where you can find more information on some of the questions and answers below!
Q: What services does Doodle offer?
A: At Doodle we offer edge-to-edge quilting, which means that we are quilting one design from one side of your quilt to the other. These types of designs are run with our computerized longarms. So, while they are set up and managed by us (the humans), the work of stitching is done by our automated machines.
We also offer prep and finishing services such as: piecing quilt backs, cutting, prepping and attaching your binding, finishing your binding (by machine) and creating a custom embroidered label for you quilt with the option for us to stitch it onto you quilt once the quilting is finished!
You can find more information on these services here: Getting Started with Doodle Quilting Studio
Q: How does Doodle charge for quilting?
A: At Doodle we charge by the square inch for edge-to-edge quilting. We offer designs in a tiered system. So, our economy designs (most basic, simple textures, etc.) are $.03/per square inch. The tiers go up to Standard ($.035) and Premium ($.04) from there - these are determined by a few factors such as detail of the design and/or density of the quilting. You can view a preview of the designs that meet each category on our website here: Edge-to-edge Quilting Designs.
If you are looking for an estimate on how much your quilting will cost, you can use our handy calculator here to find out: Quilting Calculator.
Q: What are my batting options? Can I bring my own batting?
A: We have quite a few battings to choose from at Doodle. We are happy to give recommendations on which might be right for your quilt based on the recipient, use, destination, etc. We have the following battings on hand:
Quilters Dream Wool
Quilters Dream Puff
Winline 50/50 Bamboo/Cotton
Winline 6oz 100% Bamboo and Winline 4oz 100% Bamboo
Dream Cotton (Natural and White)
Quilters Dream Bamboo (previously Orient)
Winline 100% Cotton
You are also welcome to bring us batting if you have some already. We encourage you to use high quality batting for the longevity and integrity of your quilt.
Q:What if I only have a quilt top? Can you help me?
A: If you only have a quilt top that is A-OK with us! We have a selection of extra-wide (108”) backing for you to choose from, as well as a selection of pre-made bias bindings. So, feel free to stop by with your quilt top and let us help you sort out the rest!
View our selection of wide-backs and bindings on our website: DQS Fabric Shop
Q: How do I get my quilt to you?
A: Doodle is what I like to call an “open working studio” meaning that we spend most of our time working on projects for folks without other people in the studio, we are open for you to come on in. We have in-person hours Monday through Friday and Sunday from 11am to 3pm.
You can also mail in quilts to our studio if you are out of town or just can’t get in to us. You can find out more about our Mail in Services Here!
Q: What is the largest quilt you can accommodate?
A: We can quilt a top up to 120” in width! We are not limited by quilt length. Your backing fabric can be up to 130”, which is the max our largest frame can handle.
Q: What is the smallest quilt you can accommodate?
A: We can quilt one block if you’d like (and have done that before). We do have a $50 min fee so we recommend bringing in a few small things at one time and quilting them on a single backing fabric to maximize the value of our time and your money!
Q: What thread colors do you offer?
A: So many! We have a full Rainbow of thread colors. We use Isacord 40wt Poly in our studio and it comes in hundreds of colors so we’ll be sure to find just the perfect shade for your quilt! We also have a small selection of variegated threads - however, it can be a challenge to stock variegated threads that work on specific colors of quilts. The majority of our variegated threads are some sort of rainbow or 3-color variation.
Q: Can you quilt with bag making foam like Soft & Stable?
A: Yes! We love to quilt on foam - it gives such a great texture and is a fun alternative to grid or line quilting to get cute designs for your quilted bags!
Q: How do I know how to prepare my quilt top/batting/backing for Doodle to quilt?
A: We are always happy to offer advice on how to prepare your quilt and other pieces for quilting at Doodle. We have written and video resources for you and if you still have more questions after reviewing those please feel free to stop by the studio in person or give us a call (907.764.4086) or email hello@doodlequiltingstudio.com.
Hopefully this quick Q&A helped answer some of your most burning questions about Doodle! One of our biggest goals at Doodle is to help quilters learn - we feel like there are always ways to improve our quilting (and ourselves) and we want what we do to make your beautiful work even more amazing!
Please let us know if you have any other questions I may have missed here and we’ll get them answered as quickly as possible!
Happy Quilting! :) Enjoli

Must Haves for Longarm Quilters
Hey Quilters!
Remember me, Enjoli? I’m still here.. just working away, lost in all the quilty goodness! The last few weeks I have been to Nashville, Paducah and Boise for Bernina! It has been so fun to meet other quilters - new and experienced long armers and those shopping for a machine!
BUT, today I want to chat with you about some MUST HAVES once you have made that longarm purchase! I’ll even share a few things that you think you might need right away but probably don’t!
So, the MUST HAVES:
pins (or other loading system - such as magnets or red snappers) and pin bowl; these are of course vital in order to actually load your frame and start quilting. Pins are probably the most accessible way to get started, as you can find the “corsage” pins quite a few places. My favorite pins are actually the “longarm quilting pins” from Handi Quilter. I also love my magnetic pin bowl for holding my pins - and BIG bonus it magnets to my frame rails so it will hold there while I load my fabric onto my frame.


My extra bobbin storage system - I even labeled the boxes with my Cricut so I knew what thread was on them at a quick glance.
basic selection of thread; so I do mean basic, like a few spools of a few different types of thread (different weights, substrates, etc.) that you can test out and try to see how they run through your machine and if/how much you’ll need to adjust tension for different kinds of thread. I recommend getting shades of grey, white and/or beige. These colors are typically the most versatile so they won’t be wasted by you never using them again.
ruler work foot/tray (if you want to do ruler work); this is a serious MUST HAVE if you want to do ruler work - as in it is very dangerous to try ruler work with out them. The ruler foot is specially designed to ride along the thick ruler work rulers, and the tray give you the extra surface you need to lay down the rulers.
small snips; these will be your best friend for clipping thread tails. I hang these on one of my spool pins so that I can just reach up and grab them whenever I need them.
extra bobbins; let’s be honest these are going to save you time from having to empty bobbins (so this is mostly a must have due to the sanity saving factor)
laser light (if not included with your purchase); this is for pinpointing the needle placement, so it will show you exactly where your needle is going to land into your fabric. This is super helpful whether you’re doing free motion quilting or quilting with automation.
Freemotion application: knowing where to drop your needle to bring up your bobbin thread - start a design, etc.
Qmatic (automation) application: helping you find a point when realigning to advance your quilt or dropping markers, marking boundaries, etc.
The Big Book of Longarm Quilting from Bernina; this is going to be an amazing resource whether you're doing free motion or automated quilting. This book will be that resource that you can always look back to to remember all the little details while learning your new machine.

The ruler work foot I’m using here is the #72 Foot, but you can also use the #96. The required tray is clipped onto the machine underneath the quilt. Plus a portion of my rulers here!

This book is going to be such a great reference for you as you get started on your longer journey. It has information on free motion, computerized, rulerwork, etc.
and the Nice to Have but Not Required (right away):

These are the Tula brand tweezers - so not only are they helpful, but they’re pretty!
batting (by-the-roll) and batting scissors; ok to be honest this is going to be nice to have whether you’re quilting for yourself or as a business BUT especially if you’re running a business. Batting on the roll is going to have way less creases than packaged batting - and is typically a little cheaper. You’re not pay for packaging right? And batting scissors - ok so what are those? Those are special scissors that come down from the handle to a flat edge - this means they don’t snag on your batting as you’re trying to cut through it.
a variety of different threads to experiment with; when you’re first getting going with a new longarm machine it can be tempting to buy all the threads and all the colors! Trust me I get that (and still have threads that I bought early one that I’m not using) and don’t want to stop you from buying the pretty colors! So, it is nice to have a variety of threads to play with - but what I mean is different weights of thread (and ok, pretty colors too) so that you can get a feel of how your machines runs them all.
Plus - download this AMAZING resource to use with your Bernina QSeries Longarm: Home Machine Thread Reference Guide
batting bar for your frame; this will allow you to store your batting up off the floor under your machine which will keep it clean(er) and out of the way.
tweezers; these are great for when you have a thread stuck somwhere in your machine, or even on your quilt. I have even use them to pull thread tails if I’ve had to take stitches out.
natural fiber paintbrush; you can pick this up at any hardware store, but this is great for doing a quick dust and clean out of your machine - especially the hook area. I like to get a nice wide 2-3” brush so that it will catch everything in one pass.
Super Nice & Kinda Splurgy, but also worth every dollar:

The Daylight Quilta light, mounted to my front handlebars - it has 3 settings so you can dim if needed.
Quilta-light from Daylight; I LOVE this lamp! I have it on two of my machines and the only reason I don’t have it on the other two is because one has a custom made light bar and the other is right under a huge bay of windows!
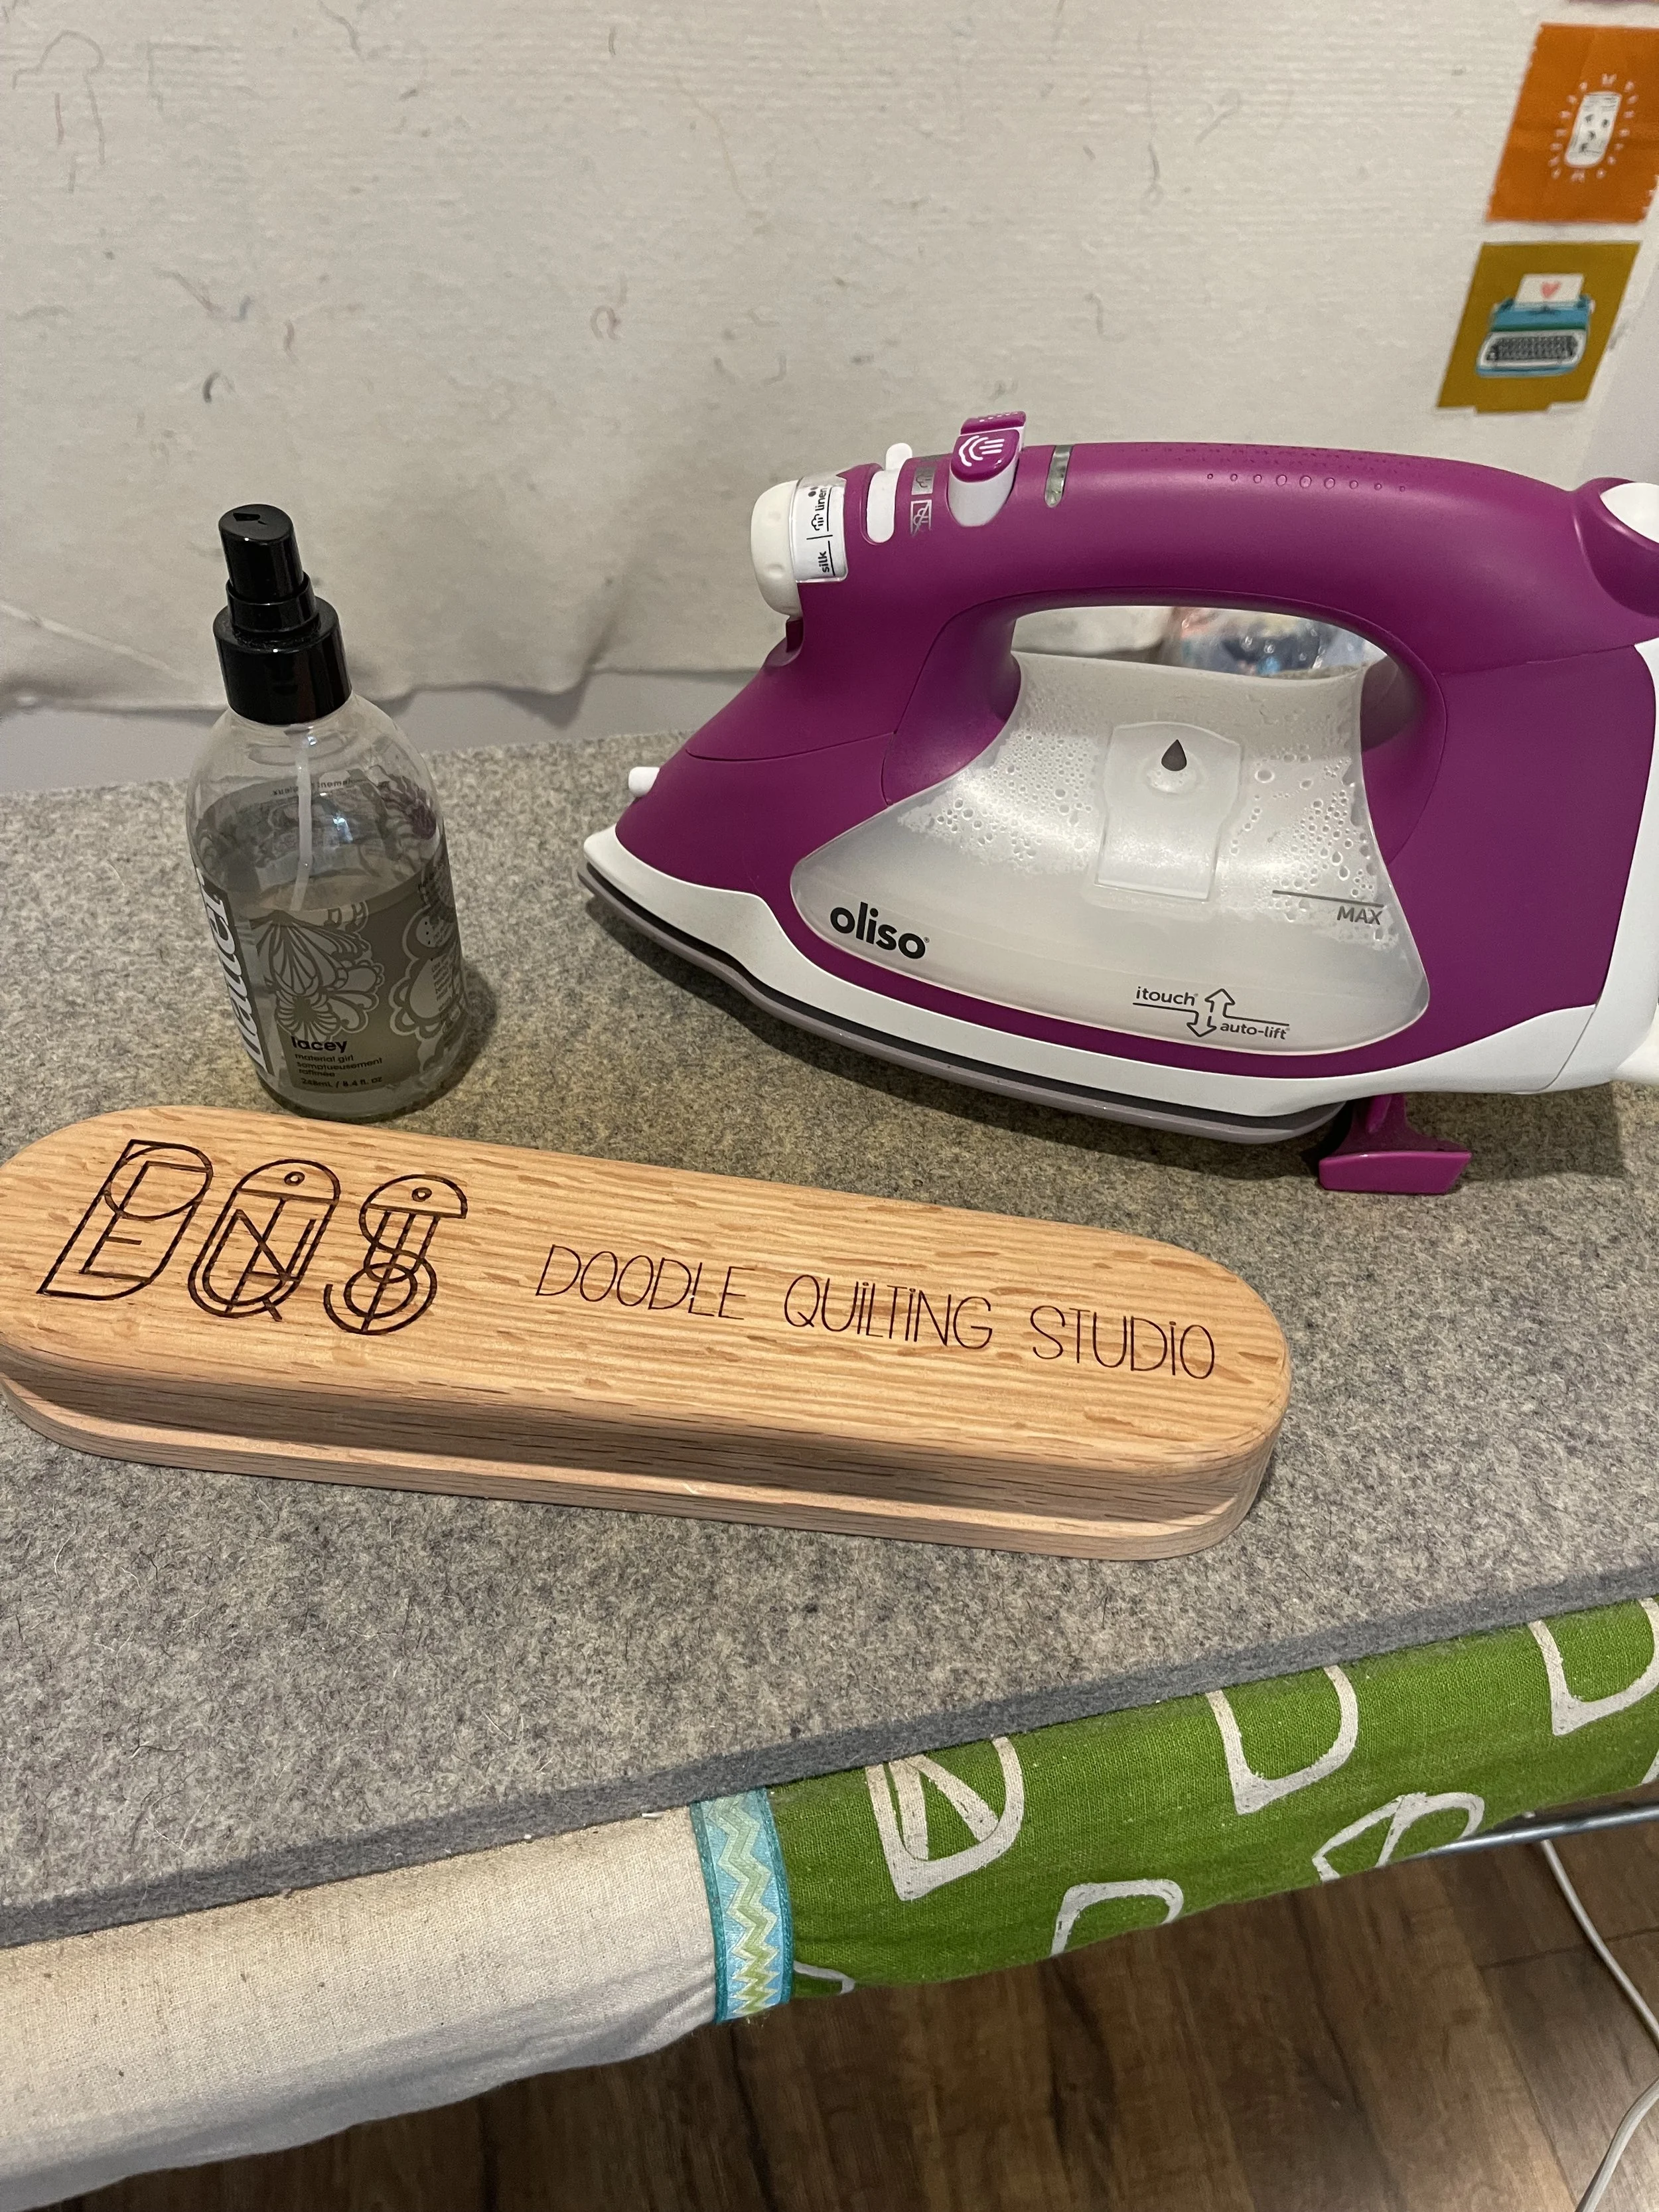
Laura Star Lift; ok so this is a a higher dollar splurge BUT if you hate ironing large quilt backs on your regular ironing board… LET. ME. TELL. YOU! This is a GAME CHANGER!! Like seriously, no joke you will be happy to spent your money on this. Ok.. so what is it?!
This system is a high power steam iron (basic description, but basically what you need to know for this purpose) that will save you SO much time getting those deep creases out of your wide backs.
Check it out here (and keep an eye out for a video from me on how I use this very soon).
I hope this list helps you gather some helpful supplies for your longarm journey! If you have any other things you found you couldn’t live without or were just helpful, let me know in the comments so I can update my list!
Happy Quilting,
Enjoli :)

"Quilting Wonky-ness": what is it and how do we fix it?
Hey Quilters!
Well it has been awhile! So much has happened since my last blog post - got a contract job with Bernina, opened up a DQS location, added employees to help me.. it’s been a bit of a whirlwind! BUT, I am back and hopefully going to get into a grove with this whole blog thing again!
This weekend I worked on and finished a very large quilt (96x96), which if you’ve made one that size you know adding those borders/rows together can be challenge. As I was building it I realized that somewhere along the way my quilt became a little wonky - like my top/bottom/middle weren’t exactly the same size anymore. I have noticed this as an issue while working on quilts at the studio and have realized that maybe some discussion on the why and how this happens would be helpful. I didn’t even realize that I had gotten my pieces so off course until I needed to add a border that had a specific measurement and was “supposed” to fit (and didn’t).
So, here are a few things that I have found can lead to “wonky-ness” in our piecing:
Inaccurate cutting - this can happen if we’re cutting long or large pieces, or if we have folded our fabric in order to cut layers at a time. Or if you’re trying to cut quickly (raises hand ;P ) and your ruler slips a little.
Inconsistent seam allowance - this one I have seen quite a bit where maybe you’re sewing quickly (yes, me again!) and things shift a little so you have more seam allowance in one place over another. Or you have a lot of small pieces going together to make up a larger strip and you get a little off - then it compounds to a bigger issue. Or you just don’t have the right foot on your machine for a consistent seam allowance. This one can really compound over time.
Poor pressing - ok i’ve also been a victim of my iron operating out of my control - crazy appliances! Pressing poorly can really make a mess of things, especially if a seam doesn’t get pressed fully over or open because it eats up more of your fabric.
Not checking sizes/squaring as you go - OK, so this is a BIG one and one that I fully admit to skipping in the past (and sometimes now - shh! do as I say, not as I do!). Sometimes the pattern writer does not give dimensions for sections as you go so you’re not quite sure how big they’re supposed to be. Sometimes you just want to get to the next step. Both of these can cause major issues when you are doing the final assembly of your quilt though.
Ok, so now we know where things can veer off course. How do we get them back in order so that our quilt comes out flat, square and less likely to make our longarm quilter (or ourselves) cry during the quilting process?
Take your TIME - take your time cutting, sewing and pressing. I know this seems “too simple” but I have been there. In my experience when I take the time to cut a single or maybe double layer at a time instead of stacking things up my cutting is so much more consistent. When I take the time to pin or clip or just in general make sure my pieces are lining up while I’m sewing I have much greater success with points matching or corners lining up. When I am pressing my pieces with my iron I try to be aware of not pushing or pulling or stretching my fabrics as I work.
Also, lets remember we are spending our hard earned money and time to make this quilt right? Let’s enjoy the process and give ourselves the time to create a quality end product!
NOTE: A few tools I have found helpful for pressing are a wool pressing mat, spray starch and a Clapper (a heavy wooden tool that you place over your seams to flatten them).
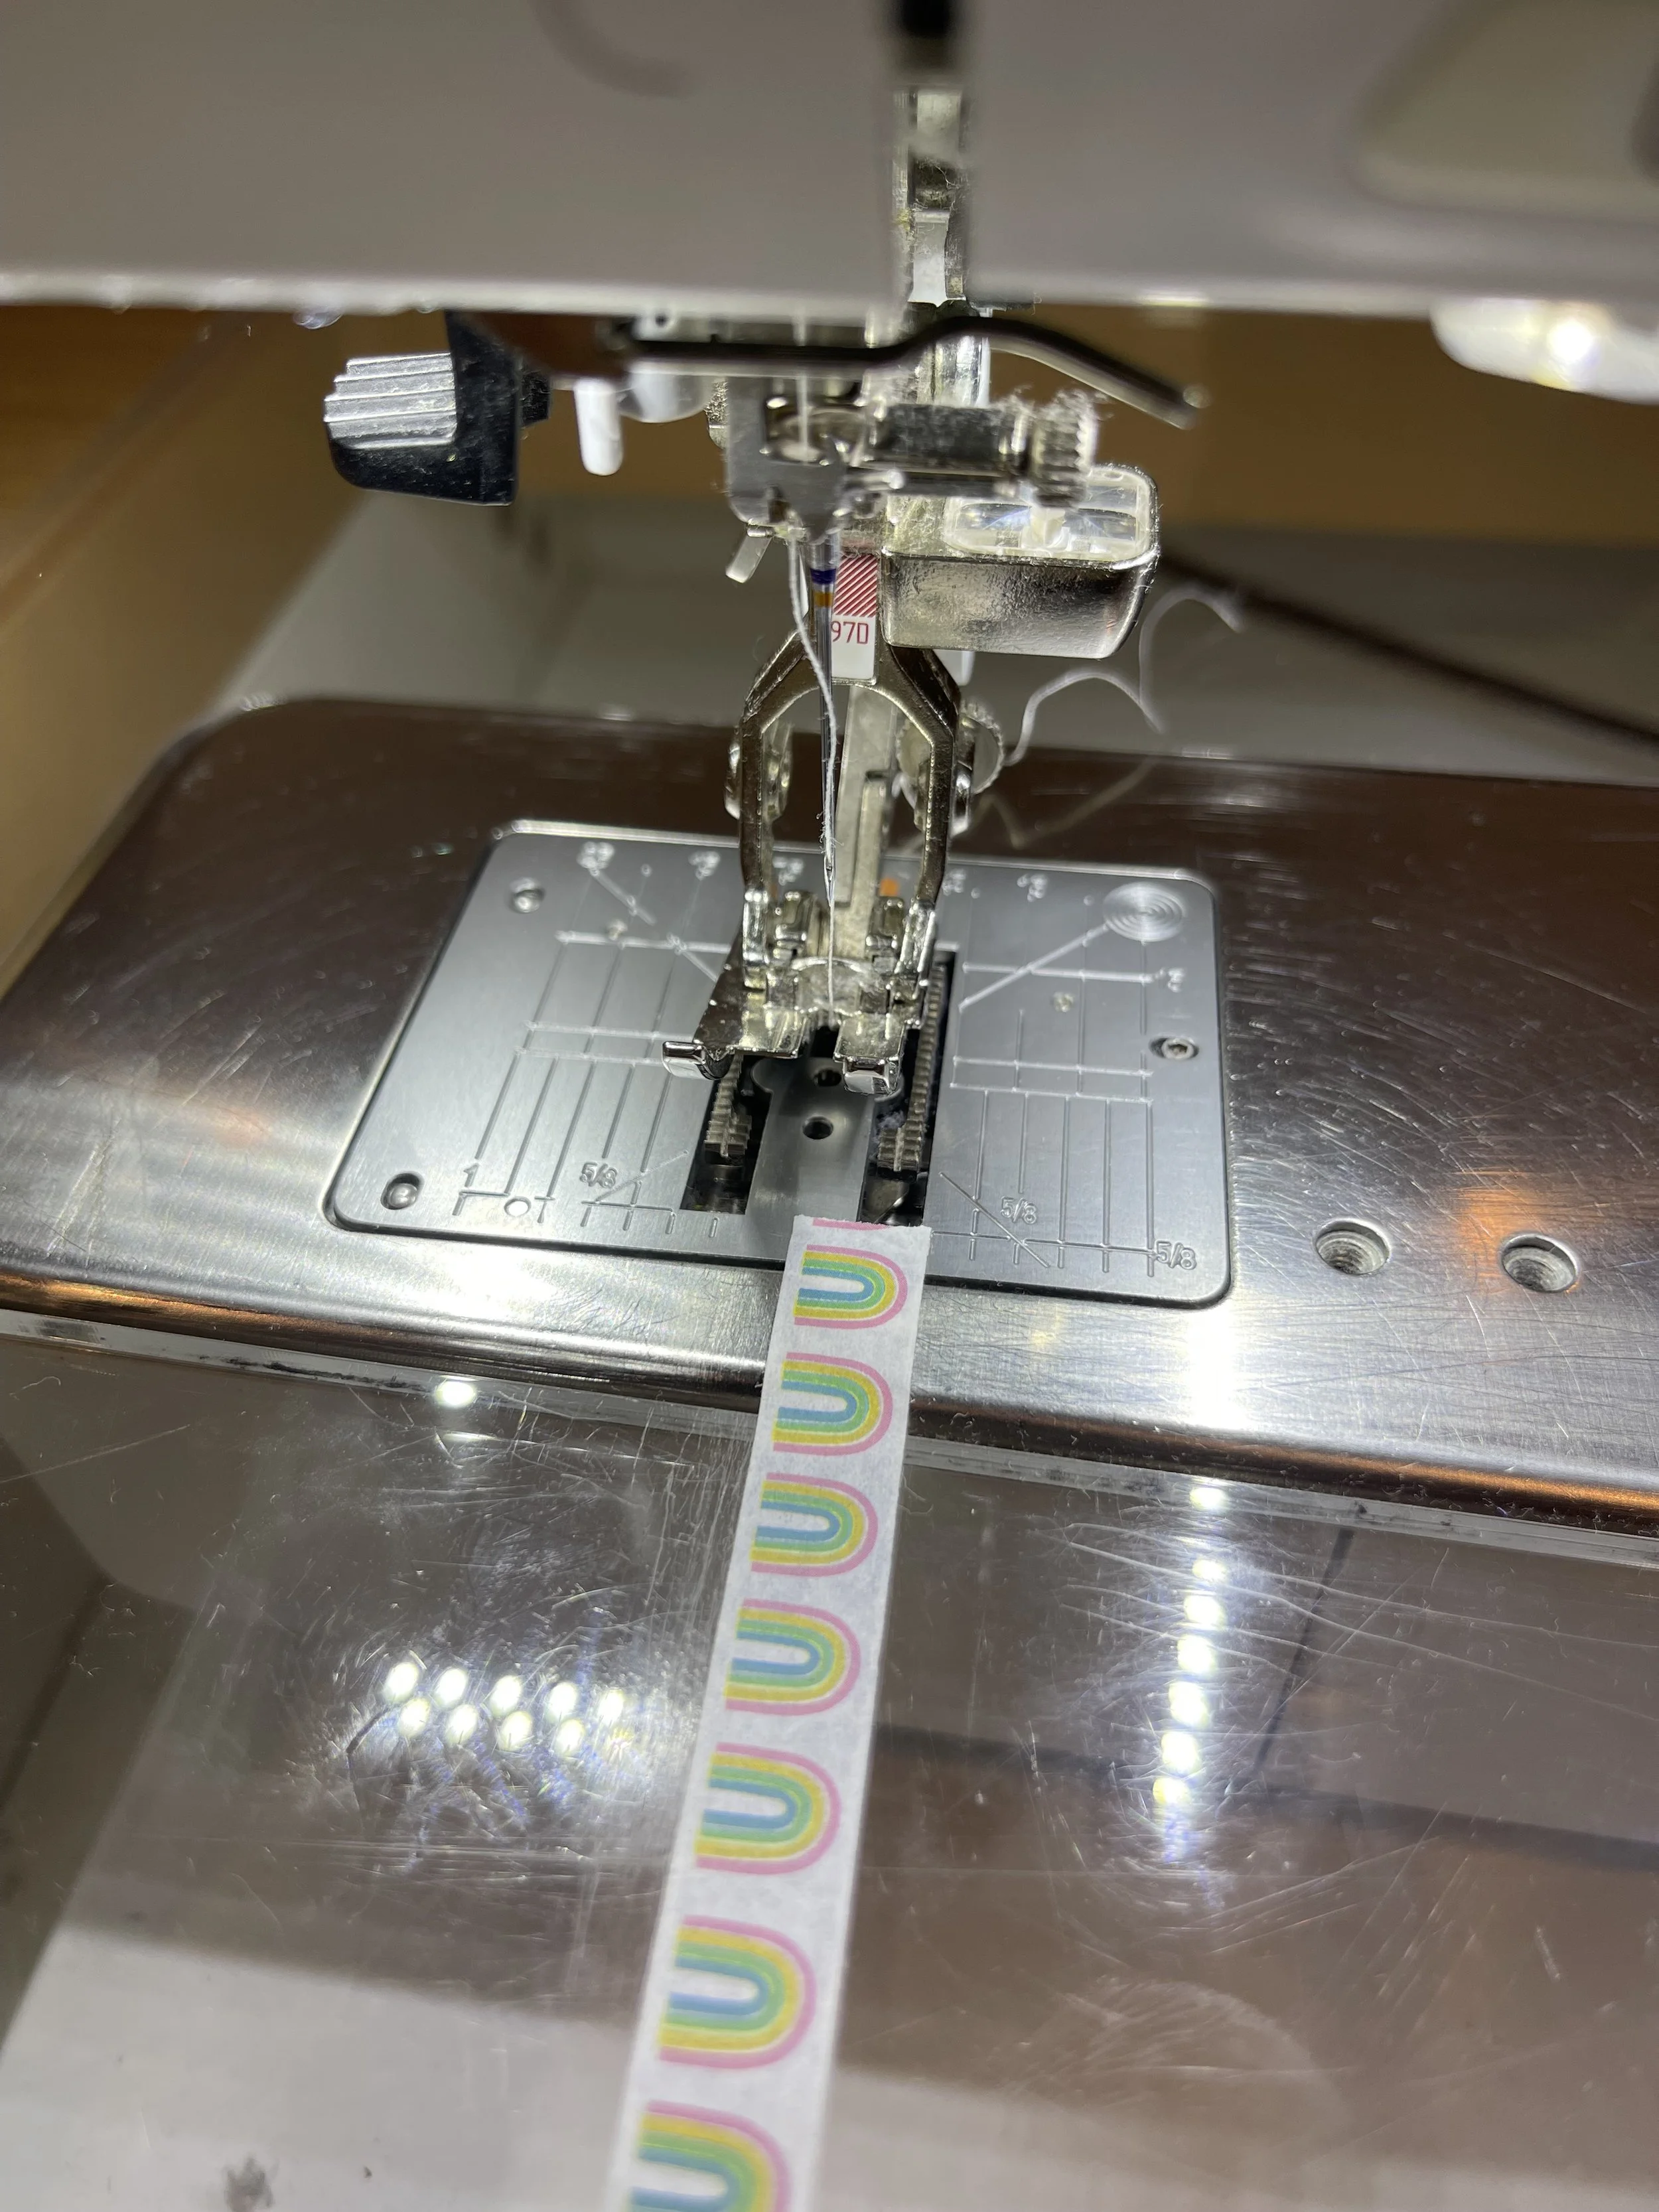
2. Set yourself up for seam allowance success - this can mean having a 1/4” foot for your sewing machine or marking your sewing tray with a pieces of washi tape at the 1/4” line. This insures that you know where you need to place your fabrics for consistent seam allowances. Almost every sewing machine brand has a specific 1/4” foot or quilters foot or something along those lines that is designed to do a 1/4” seam.
3. Squaring blocks as you go - Ok, I think this is SO important. In order for your quilt to come together flat and proper size you need to square up your blocks as you build your quilt. So, you sew up your blocks or block components (ie: HST or block element you’re going to build off of) and then you need to stop and square them. Measure them all, make them the same size (check if the pattern writer tells you the size they should be) and trim them down to be the same. Now if you end up with some blocks and are way too big or too small that could mean you need to go back and check that you cut the pieces all the same size and that your seam allowance was consistent.
A spinning rotary mat can help with the square process so nicely, no picking up your block to rotate it. Marking your ruler at your trim line can help you too so it is more obvious where you need to trim.
4. Measure your Borders - This one is probably the most obvious place where folks don't take the time to do properly. No lie, I’m right there with you! You’re at the end of the quilt, it is so tempting to just get those borders on and be done. BUT, this is where your longarm quilter is going to notice most often that your quilt is not square. When you just add your borders and cut off the extra you’re just compounding the issue if the middle of your quilt is not square. So, typically a pattern designer will tell you what size to cut your borders. If so what you can do is pin both ends and the middle and ease in any difference (hopefully not too much) to help get your quilt back to the size it is supposed to be.
Now, if you are way off (like I was on the quilt I just finished) you might have to be more creative on how you fix this. So, in my case my problem started with my log cabin like center which didn’t end up the right overall size, so my HST blocks that I added around it were too long. My remedy was to just trim a bit off my end HST block and shorten my end squares on the border I was attaching to it. Because my pattern was pretty forgiving it wasn’t super noticeable and it got me back on track so when I added the next border the measurements the pattern designer gave me fit how they were supposed to. So, let me back up. When I realized that my quilt wasn’t coming out “square” I measured my center points and did my “fixes” to get the next border to meet that measurement. Basically I had to figure out how to get some of the “extra” length out of the top and bottom edges of my quilt, which I did by making my next border the right size and easing it on to my wonky border.
WHEW - I really hope that made sense! ;P
Hopefully these tips can help you achieve the desired accuracy in your quilting leading to those beautiful flat, square and ready to quilt tops! This is one of those blog posts that I’d like to turn into a video tutorial at some point, so if you’d like to see that let me know and I’ll get to work. I always think about it when I come across a quilt that needs a little extra TLC while on my frame. One of these days I’ll just get the camera out and do a quick video on some of these tips!
I hope you’re all enjoying your weekend and getting some piecing, sewing or quilting in! We have a rare sunshine day here (though it’s only 45) so maybe I’ll venture outside for some Fall quilt photos?!
Happy Quilting,
Enjoli :)
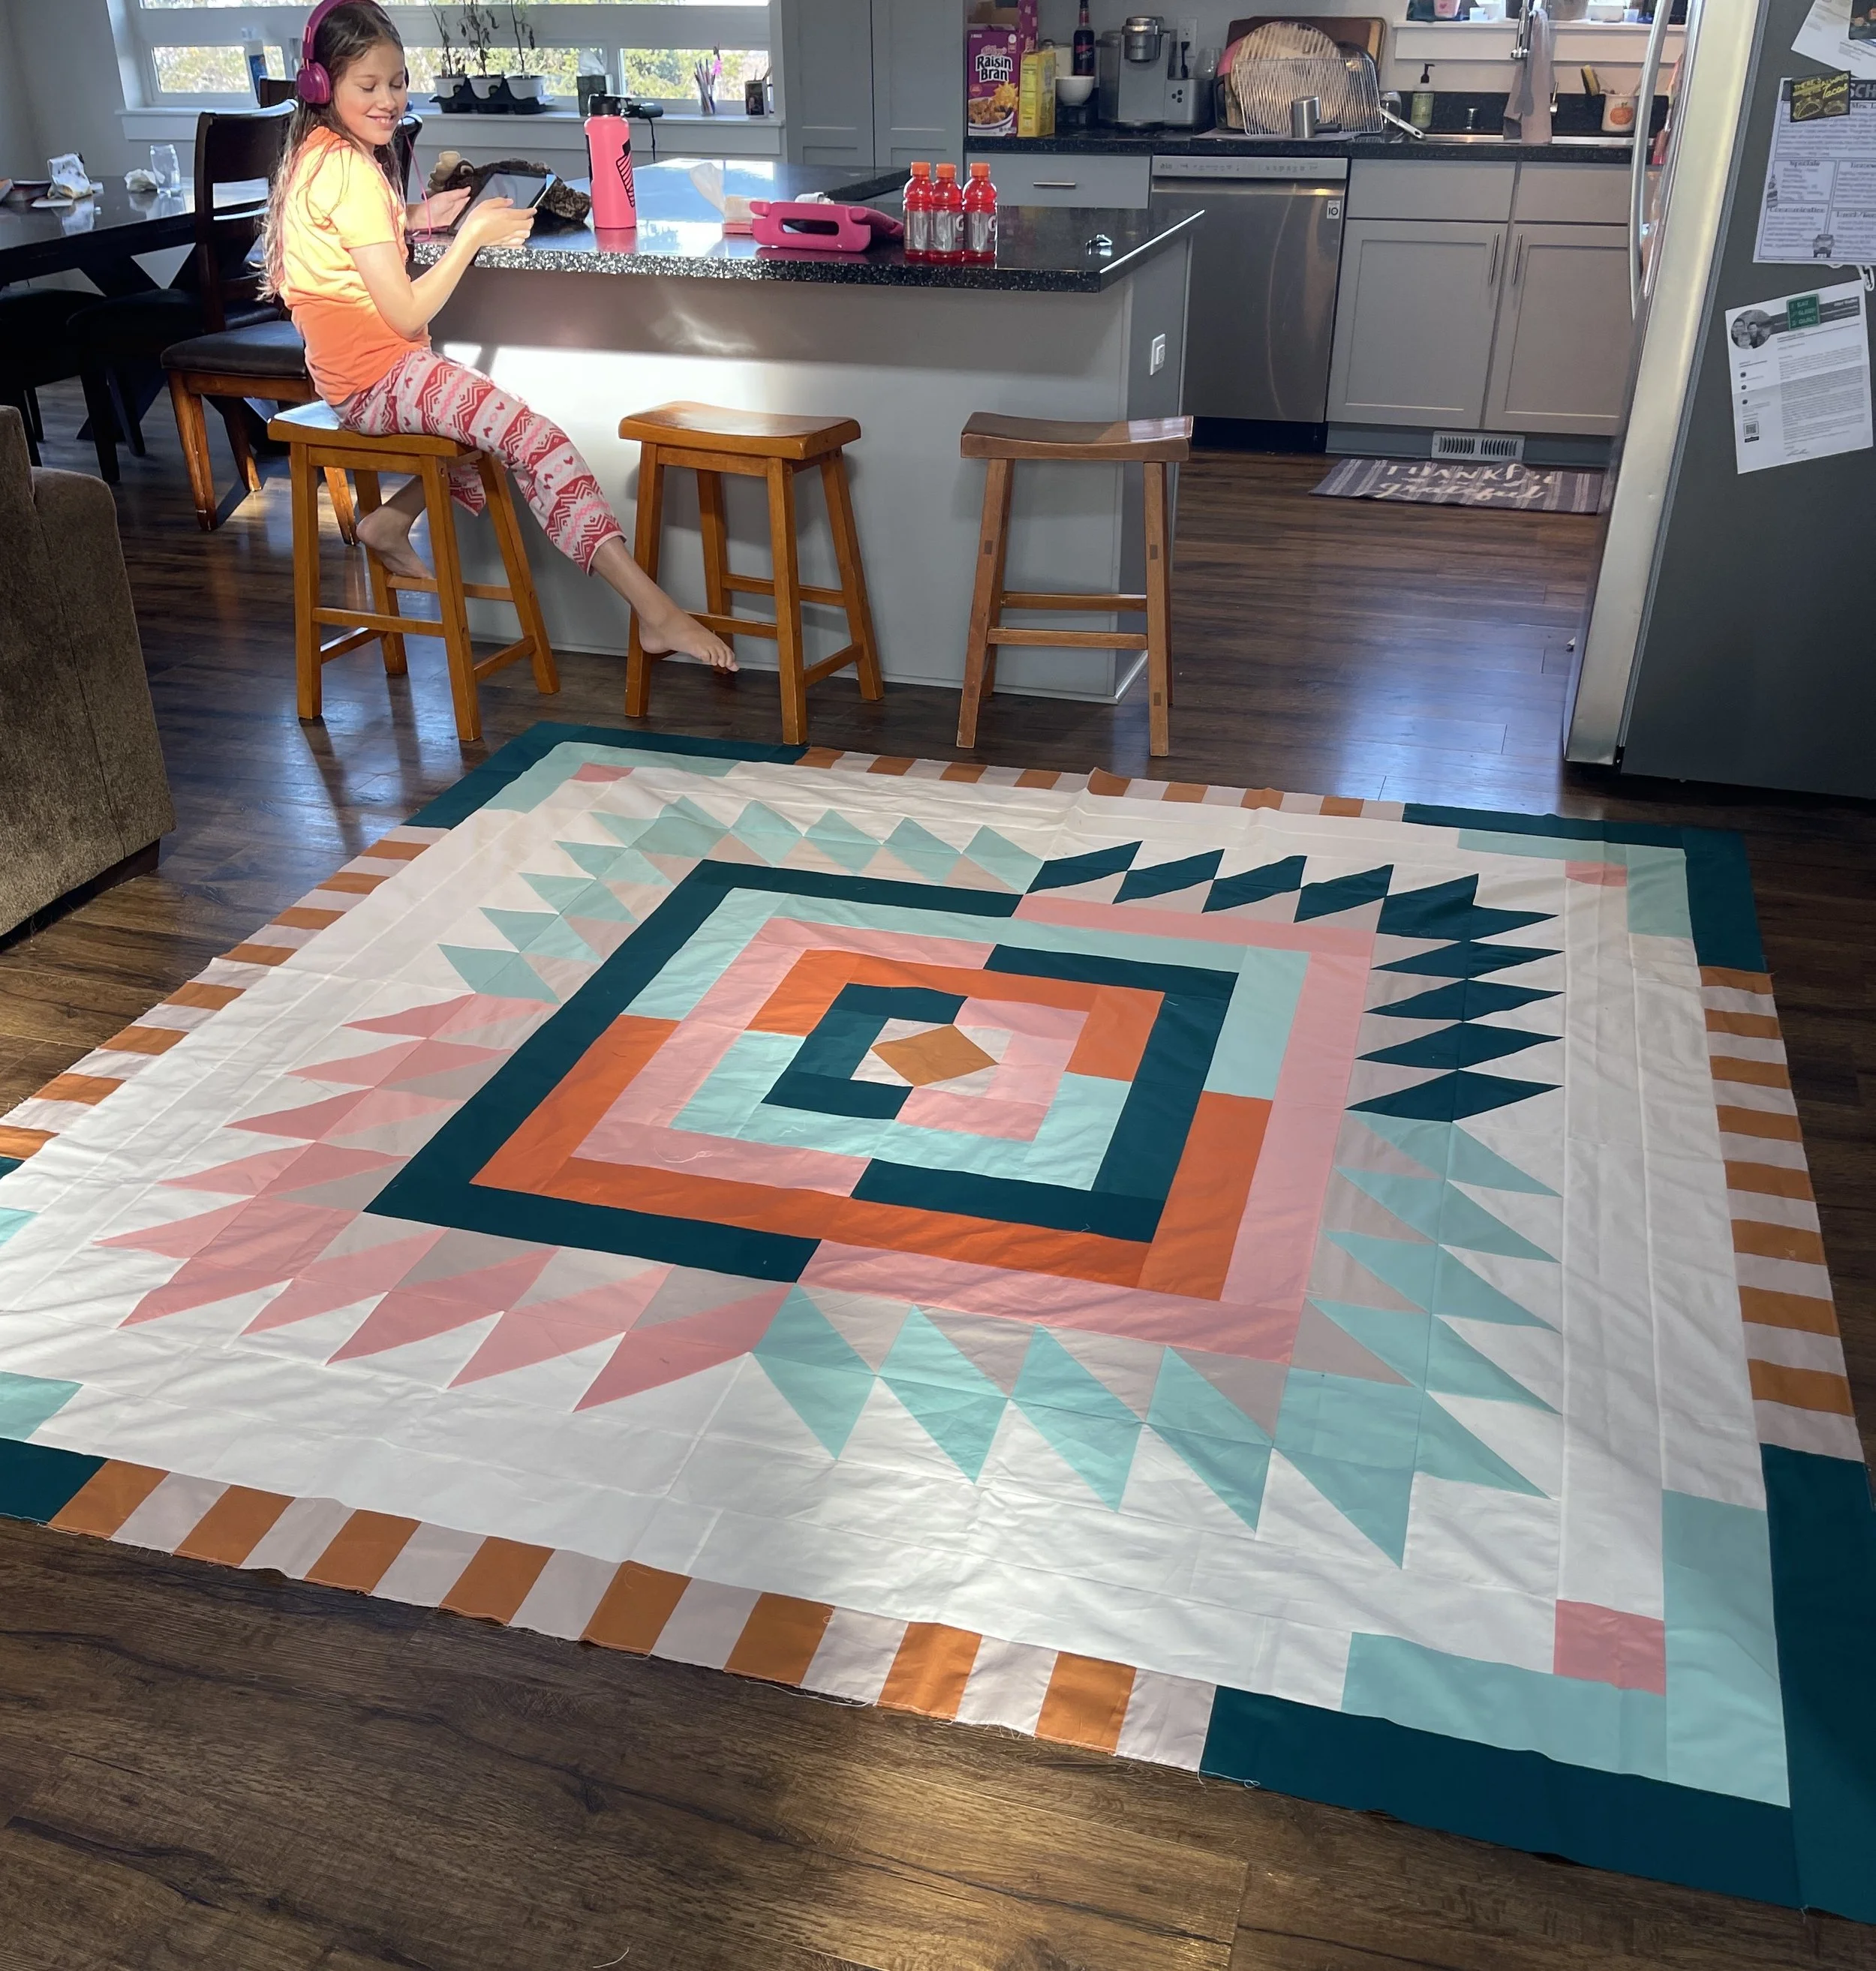
P.S: This is the quilt I finished! My helper wasn’t super helpful for this photo! ;P

How, What & Why of Purchasing a Longarm
Hey Quilters!
The most visited post on my Blog is the Machine Comparison post, which is a few years old now! The most common email I get (besides quilting service requests) is about what type, size and brand of Longarm people should buy!
As my friend, Angela Walters says, “I am only the expert of my opinion!” but here are a few of the most common questions/concerns to ask/consider when purchasing a longarm (in my opinion):
1) Preference/Type of desired quilting, etc. (Longarm, mid arm/sit down, etc.) - What kind of quilting will you be doing? Large quilts, wall hangings? Are you wanting to do only free motion quilting or do you want to run automation with your machine? Do you have any health restraints as far as ability to stand or sit for long periods of time?
Answering these questions is going to help you narrow down what type of machine to look for. For example, if you are wanting to do larger quilts a frame model machine is going to make your quilting easier and more manageable to handle those larger projects. With a frame you can load the individual layers and then quilt as you advance onto your frame. A frame model also allows you to run automated quilting with your machine - allowing for faster edge to edge quilting.
If you cannot stand for long periods of time or just prefer to quilt like you would on your domestic machine, a mid-arm/sit-down machine is going to be your bet. There are so many options in this range - with folding height adjustable tables and even hydraulic lift tables you have a lot of choices here. With a hydraulic table you can sit at it for awhile and then adjust it to stand. You are still moving your quilt under your needle, but the ability to sit or stand is great if your body needs to move around a bit.
Don't have the space for a large machine and frame? A table model might be a good option. BUT - there are frame models available out there too that can be set up on 5 or 7 foot frames, giving you the ease of a longarm without taking up as much space as a full frame model, which can be up to 13-14 feet long.
2) Dealer/Dealer Location - This is a BIG factor for me (again my opinion) - a longarm is a completely different beast than your domestic sewing machine. And if you’re using your machine to run a business, you WILL need to have access to support. Choosing a machine/dealer that is close to you or can get to you in a reasonable time is so important. More than that though - you’ll be developing a relationship with them for the long term. Make sure you get the right vibe from them and that they really listen to your needs when it comes to purchasing your machine. If you go in wanting a machine to just start with Free Motion and they sell you a fully automated machine you may end up way over your head and feel frustrated/guilty because you’re not using all of the features of your machine.
3) Other local/accessible support - Other accessible support is also something to consider. Is there a local group you can join of other folks that have the same machine? Or even other longarmers? These days Facebook groups have popped up for almost everything and the longarm groups there are fantastic. Check out social media to see if you can find resources/groups for the machine you want or already have. The information found there is invaluable.
Side note: if you are also looking to start a business, look for groups that have established folks that may be willing to help you get started. There is so much quilting business out there - plenty to go around for everyone!
4) Brand Delivered Education - This might be my second most important factor - how much education can you get from the brand company? Do they supply any education to you directly, through a dealer or virtually? When you are new to a longarm there can be a large learning curve - just trying to understand threading, needles and tension can be a hurdle. Longarm machines are quite different from our domestic machines (plus I think they have personalities) so you’ll want to have access to information on how to get started with your new machine.
5) Price - As much as we wish price wasn’t a factor, it is. So if you’re shopping in a price range, do some research to figure out how much machine you can get with your budget. Longarm/Midarm machines can range anywhere from $10k to $40k so do some looking to see what fits your needs/budget. The nice thing is that you can find some flexibility with putting a smaller machine head on a frame or starting out with a table model machine that can later be converted to a frame.
Side note: if you are looking to start a business with your set up, be sure that you think through the time/effort that will cost you when deciding between a table and frame model. A table model will still require you to sandwich your layers before quilting, where a longarm will allow you to load your layers and start without having to go through the sandwiching process all up front.
WHEW! I feel like that was a quick and dirty run though! I plan to do a video on this as well, but would love to hear your questions, comments or other suggestions for purchasing a longarm machine! Leave me a comment or send me an email and I’ll compile a list before I do the video! In the meantime…
Happy Quilting,
Enjoli :)
P.S: If you have been on my blog or any social media you know that I own a Bernina Q24 on a 13’ frame with Qmatic (Bernina’s automation) so I will of course encourage you to check out the Bernina Longarm line up. Bernina has so many options for sit-down and framed models that there really are options for everyone. AND, if you are in the market for a machine right now, Bernina has some AMAZING promotions going on with their Freedom Sale - https://shop.berninausa.com/longarm-quilting now through the end of August. If you have specific questions about any of the Bernina Longarm models, please reach out to me - I’m happy to answer questions and help you find your closest local dealer! :)
P.P.S: If Bernina isn’t your jam, that is ok too! I think if we’re lucky enough to have a longarm we should be happy - I am excited for anyone going into the longarm journey, no matter what brand they end up with!

Why I LOVE my Bernina Q24
Hey Quilters!
Well, it’s no secret that I LOVE my Bernina Q24 Longarm! I have been wanting to create this post (and accompanying video) for awhile and finally did it! There are so many reasons why I LOVE my machine, but I’ve listed out the major ones here.
Threading from the front - I’m short so having access to the top and bobbin threading is vital! I would not be able to reach the back or side back of my machine to thread it. I also have my machine against a wall on the backside so I’d be crawling behind it to thread every time if it was not up front!
On board bobbin winding - Umm.. yes so this is wonderful. I can wind a bobbin right on the front side of my machine. AND I can wind a bobbin while running my machine. AND I get adjustable speed for specialty threads, so I can slow down the winding speed if I need the bobbin to wind slower and not pull too much tension.
Regular sewing machine needles - Yah, THIS! Oh man this is so great because I can pick up needles at my Local Quilt Shop. PLUS I can use all types of needles. I can use topstitch, stretch, metallic, jeans, quilting… anything! This means I can match my needle to my fabric or my thread. THIS IS HUGE PEOPLE!!
Quick change presser feet - The presser feet on this machine require no tools! Yes, you did read that right - no screwdrivers PLUS you get access to ALL Bernina FMQ feet because of the quick change ease! SO GREAT!
Digital Tension - OK, Digital Tension is my JAM!! I freaking LOVE this feature. This is by far my favorite! No remembering which way you turned the dial or how many times. AND the machine will tell you (with a little yellow box) if you have altered your setting at all. This is a shout from the rooftops kind of feature, NO JOKE!! I LOVE LOVE LOVE this!!!
Savable settings - I can save 5 different thread settings right in my machine. I can save tension, SPI (stitches per inch) and speed for each thread I want to set. So for OMNI for example, I can set my tension (mine is 4.5), my SPI (10 typically, but can change it to 8 for certain things) and speed. The reality of this is that I don’t have to keep track of my tension numbers once I know them - I just choose the setting and GO!
Does it seem like I’m obsessed with my machine yet? It’s ok, I am! I LOVE quilting on this machine - and honestly, it makes it simple and fun to try new things with my quilting because I have so much flexibility with what I can do. I did make a quick (hah not really… its like 12 minutes) video on some of these points and why they are so awesome! Check it out below!
If you have any questions about my set up or the Bernina longarm please feel free to let me know. Shoot me an email at hello@doodlequiltingstudio.com and I’d be happy to answer any questions!
Happy Quilting,
:) Enjoli
“Life is too short to not be in love with your longarm” - Me

Troubleshooting Stitch Quality: Needles
You’re happily quilting along and all of a sudden your thread starts shredding.. or possibly even more aggravating, you start seeing skipped stitches. What the heck? Everything worked perfectly fine on the last quilt?!
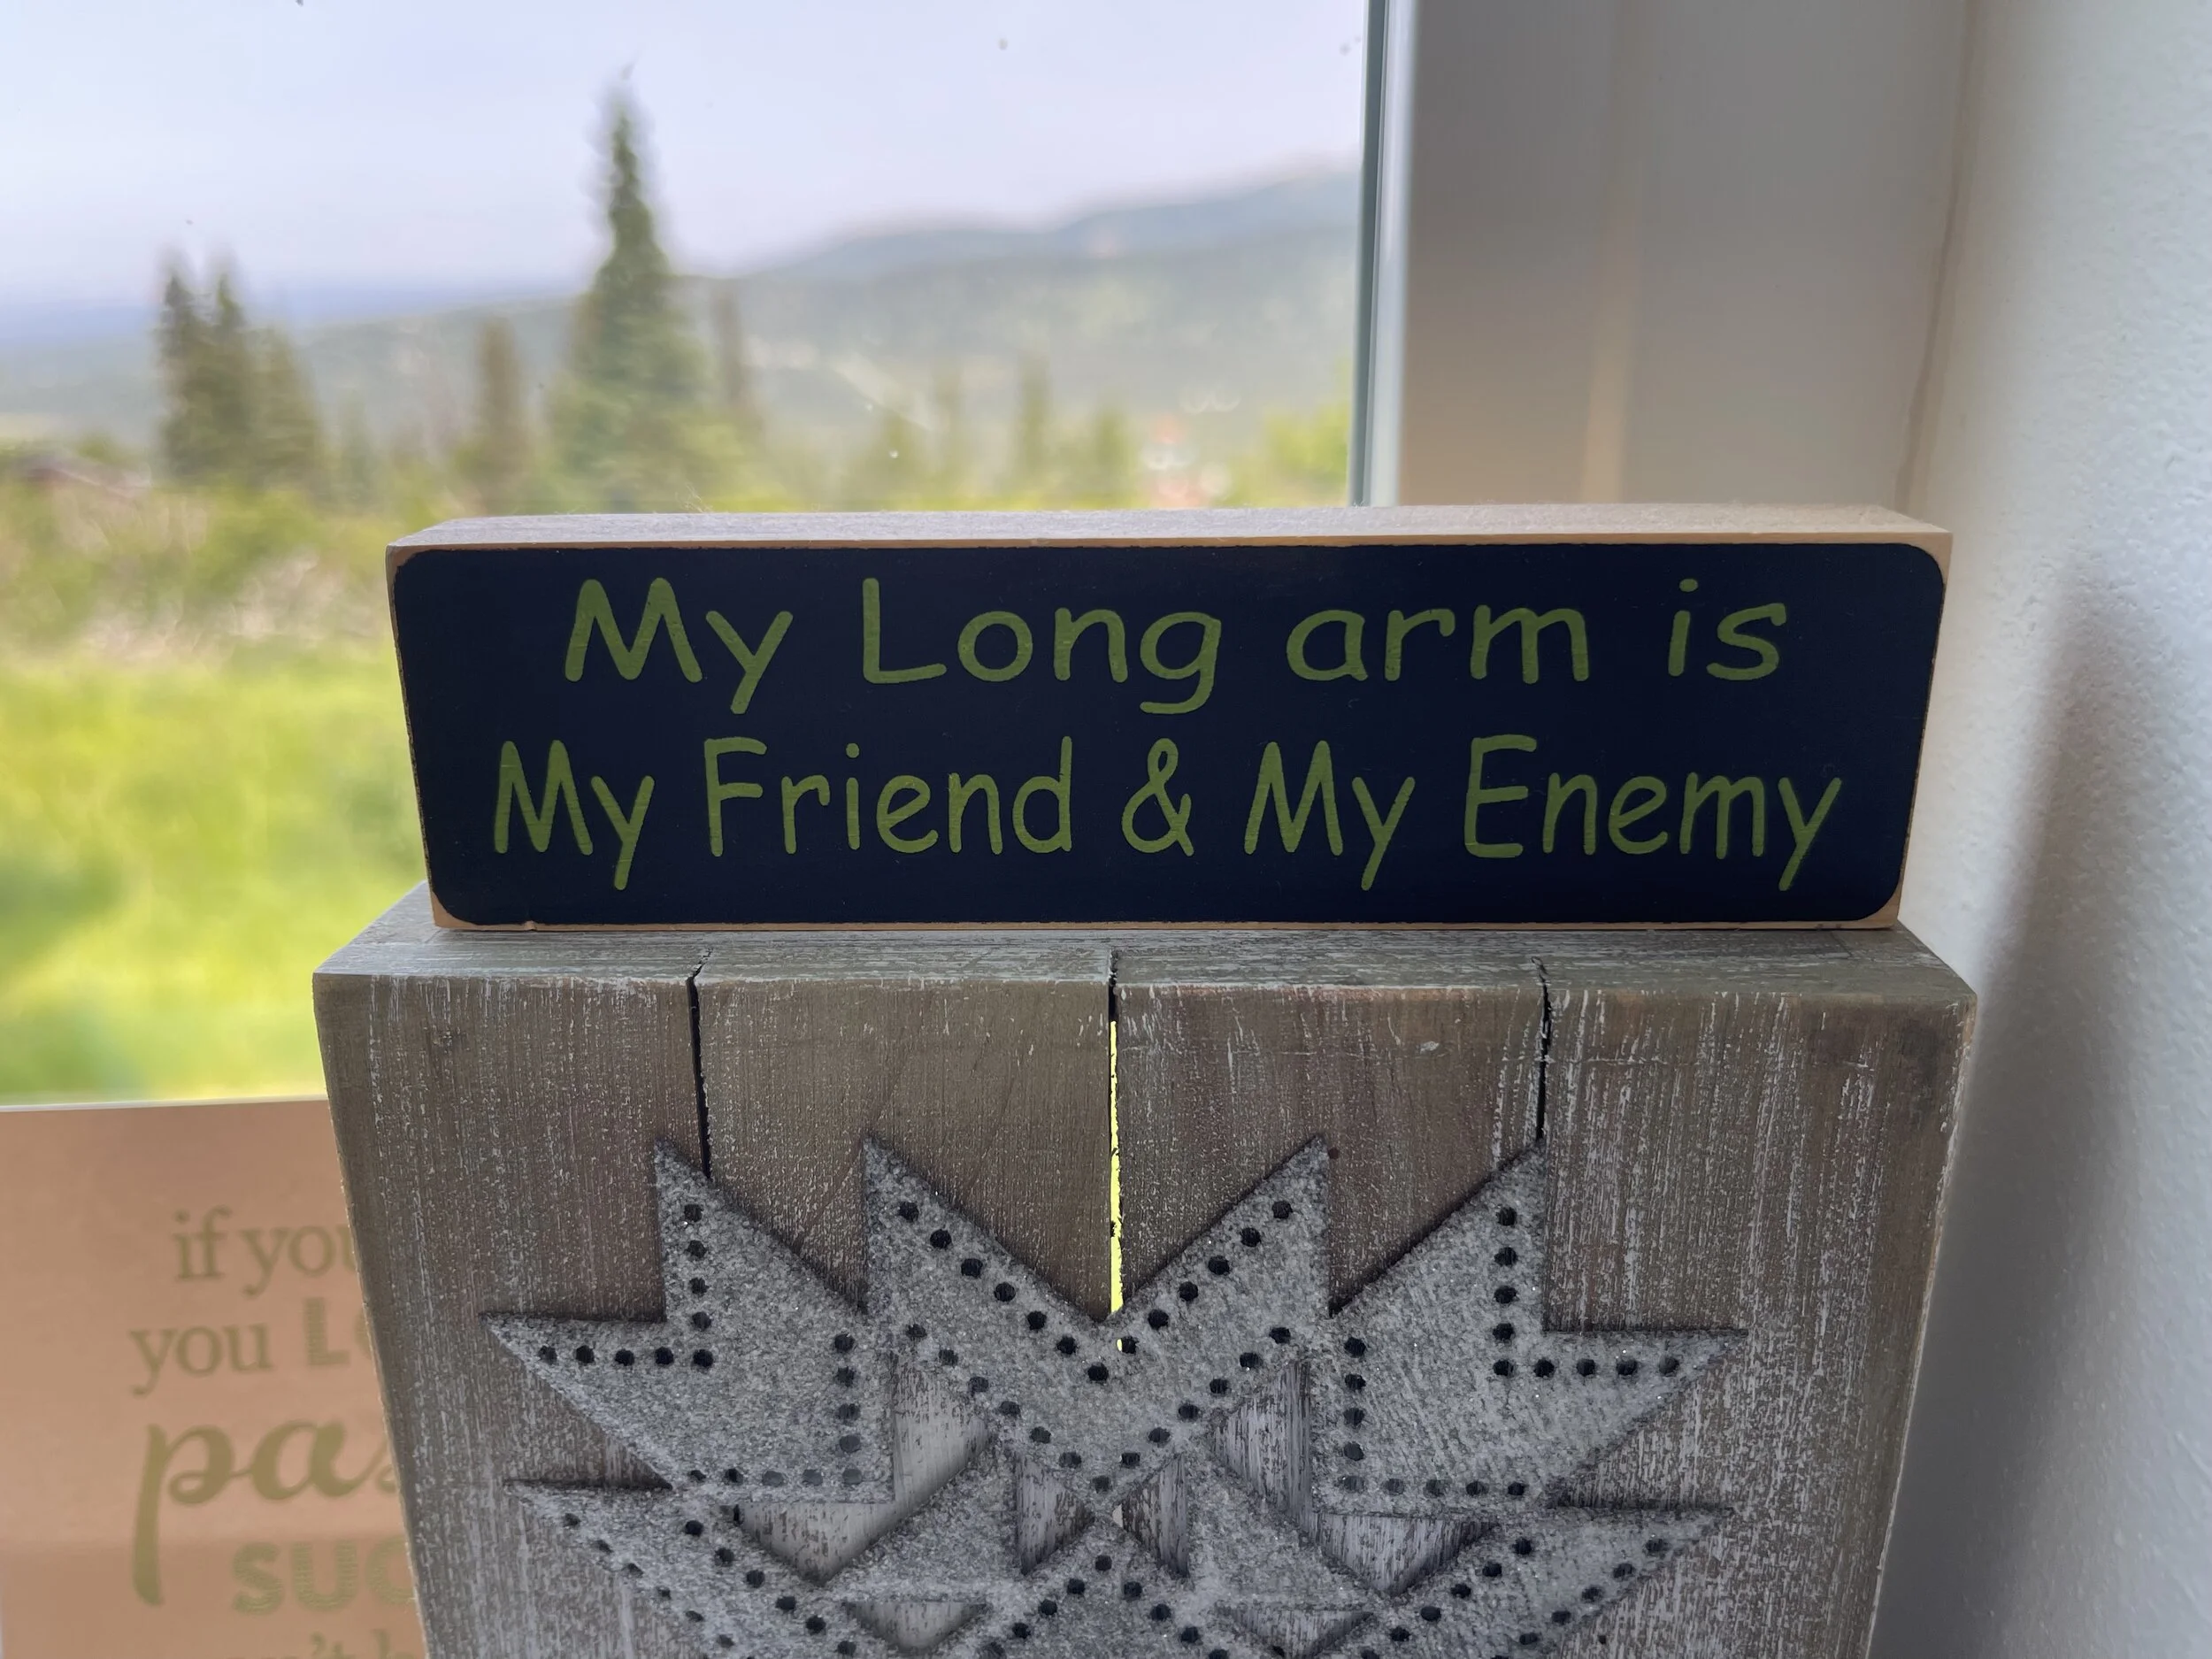
There are few things in life more frustrating than stitch quality issues while machine quilting. (Well that is possibly not true - but if you are a longarmer, you get it!) If you have experienced these issues the phrase, “My Longarm is my friend and my enemy” can quickly become your mantra.
One of the biggest benefits to owning the Bernina QSeries machine is that you can use ANY (flat back) domestic machine needle in your Longarm! This means that we have the flexibility to adjust our needle type to our fabric and thread. So, if I load up a T-shirt quilt on my machine I can put a stretch or jersey needle in to quilt with. If I am working on a jeans quilt, I can use a jeans or denim needle to quilt with. This possibility really opens up doors for creative freedom when we use our machines! This also means that we may have to do a little playing around with needle types for our various fabrics - but that’s ok! It’s ok because that means I have no boundaries to what I can do with my Longarm. I don’t have to accept defeat if one type of thread or fabric gives my machine trouble - I can simply try a different needle.
If you consider that every time we load a new project onto our frame (or under our needle) we have a new combination of fabric, thread and batting. So just because my cotton top, poly batting and flannel backed quilt quilted just fine last week with my SoFine 50, 90/14 topstitch needle with a thread tension setting of 3.75 worked beautifully - it doesn’t mean that it will magically work again on a new combination of materials. Some may find this daunting, but I happily accept the challenge because I know that my machine can handle whatever I throw at her!
I have owned my Q24 for 5 years and have always been able to find a needle that will do the job I want to do, no matter the thread I choose to run through it. That being said, you will have to do some experimenting to find the right combination for your machine. I have done a bit of leg work for you though - so if you are a fellow Bernina Qseries owner, check out the video below for my needle troubleshooting tips!
I hope this helps those of you that have been searching for some solutions to common stitch quality struggles. If you have a system other than the Bernina, I hope it will still be useful, however it may not be as specific to your machine or type of needle system. At the end of the day I always tell folks that if I am determined enough to use a specific type of thread or quilt through some crazy combination I will find a needle (and thread and tension setting) that will do the trick for me! Keep on experimenting until the magic happens!
Happy Quilting,
Enjoli :)

In Home Studio: Pro's & Cons
Well it has been about a year since I moved my studio into my home! I have to say, in some ways it has been better than I expected and in others I have been surprised by how I feel about it. How is that for not a straight answer?!
So, I figured this was a good opportunity to discuss the Pro’s & Con’s of having your studio space in your home. Let’s dive in!
PSA: These are of course my opinions and at no point did I poll anyone else on their in home studio, so it’s just me in the data pool - let’s see what happens. If you work in or have worked in a home studio and/or moved, I would LOVE your opinion, so leave a comment sharing your take!
the PRO’s:
SUPER flexible working hours - I can pop down to the studio and do a little work here and there. I can get a few minutes quilting in while I’m waiting for dinner to cook!
I can make a mess and don’t have to clean it up when I’m ready to shut down for the night - only I (and my family) see the “mess” of my creativity!
When my kids have an in-service day from school (or a suddenly “home-schooling” in the midst of a pandemic), I can still work without having to pack them up to go anywhere!
OH, how did I almost forget this one - I can work in my PJ’s!
My pup can “come to work with me”, though he is not super helpful and sleeps most the time - gotta get better help!
the CON’s
The pull to work is always just floating around in the back of my mind, and sometimes pulls me from time I could be spending with my family.
Because I have kids, the interruption count goes way up when I quilt while they’re home.
I am a fairly extroverted person, so it can get lonely at home, just me and the dog (who is most often asleep and not a good conversationalist).
Despite the draw of the studio, I do get pulled away by the many tasks of a household, feeling like I should be doing laundry or cleaning, etc.
Because of where I live, studio visits are a challenge, which means that I do drop off/pick ups at another location and costs time in travel that I could be quilting.
Phew! Pro’s and Con’s - this was an interesting exercise for me. Some of the things I thought I would love about it turned out not to be as great as I had imagined, while others turned into hidden benefits. The grass seems to always be greener on the other side doesn’t it? So, the question is, where do I prefer to work? What is the perfect studio set up? Completely private? Open to everyone all the time? A mix of both?
I think this would be different for each person, but seems to me I need a little bit of both. There are of course times where I have a deadline and need the ability to focus on a project to get it done on schedule, but there are certainly days where a more relaxed pace would be ok. And of course, there is the tiny fact that I do LOVE to talk about quilting as much as doing the actual quilting!
There may be some changes in store for Doodle - hopefully some exciting opportunities for growth as well as a “best of both worlds” solution to my Pro/Con dilemma! In the mean time, let me know what you think - would you love to work from home or have a studio open to others? How would you work best? And if you’ve run into this scenario, feel free to share some insight below!
Happy Quilting,
Enjoli
Why "Squaring" and "Pressing" is so Important
Hey Quilters,
I wanted to take a few minutes to chat about something that I feel like gets missed a lot during the finishing stages of quilt making: Squaring & Pressing.
Let me clarify - “Squaring” is referring to the squaring of your backing fabric to make sure that it can be properly loaded onto a quilt frame. “Pressing” refers to not just pressing your seams while you’re piecing the quilt, but giving your quilt top & backing a good press after you have finished them.
Both of these are especially important if you have pieced your quilt backing.
It seems that there is some notion (hah get it!) out there that Longarm Quilters can work miracles! Somehow folks think that we can take wonky, wavy bordered, ran-out-of-bobbin-and-didn’t-fix-it quilts and turn them into beautiful masterpieces without any extra work or effort on our part. As much as I would love to boast that those things are true, THEY ARE NOT!
One of the most discouraging things to a Longarmer is to open a client project and find that your quilt back has a million and one pieces - why you ask? Because that means it has a million and one seams - which means - it has stretch and tension going a million and one directions! Catch my drift?
Even if you properly Squared your backing and pressed the heck out of it - something with that many pieces may never lay flat so it’s going to be a beast to get straight on the frame. Not to mention, even if you think you’ve gotten it pretty good - there will always come a “saggy part”. Yep, It is as bad as it sounds! You don’t want them on your body, and you don’t want them in your quilt back!
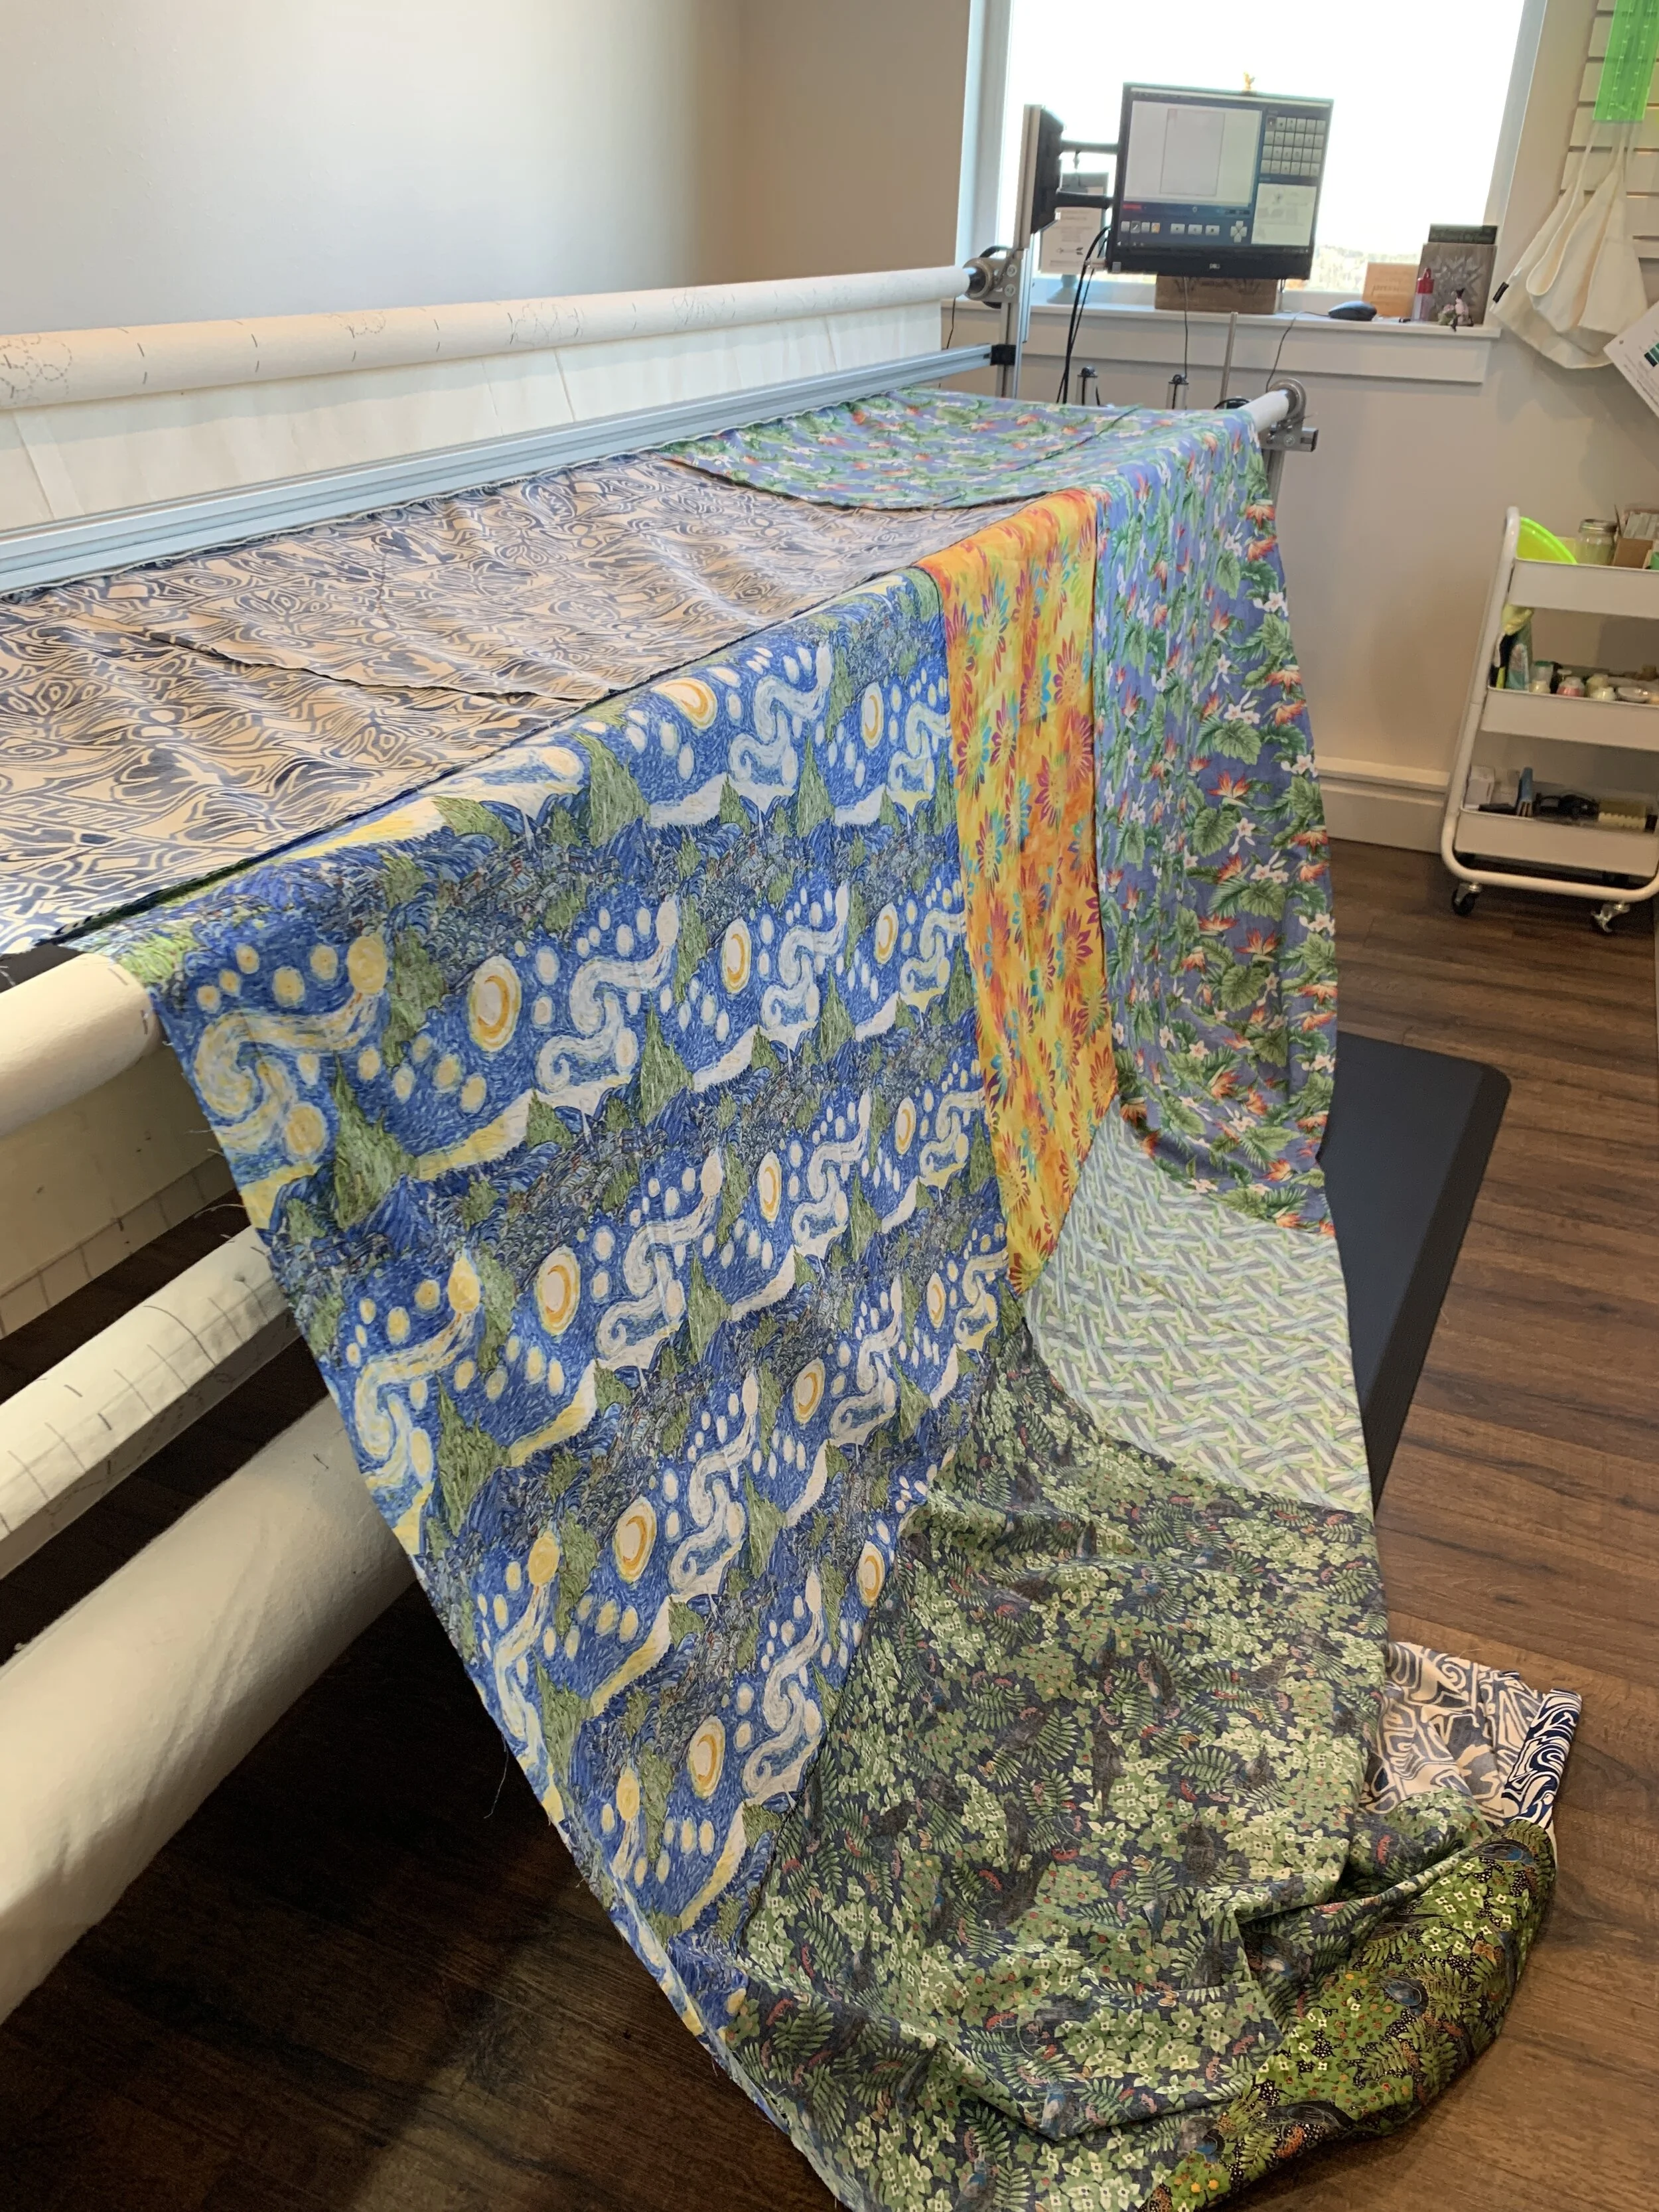
Here is what happens if you “use-up-all-your-scraps-for-a-back”:

It looks innocent enough - and hey, bonus quilt on the back with all those fabrics right?! Well… this is what happens when you roll up the backing onto a quilt frame with so many pieced sections.

There is only so much your longarmer can do to solve this problem. Be kind to them and either pick one direction for your seams or be like us lazy folks and buy extra-wide so you can skip the piecing all together!
The other problem created by this is that even if your quilter can get it more even, your quilt will still sag on the frame at times - which creates an issue with the quilting.

If you look toward the middle of the quilt above - you can see that there is some sag in the middle. This is because as you quilt and advance the poles are determining the tension not the seams. So..all those vertical seams are now pulled tight, where your horizontal seams are not - your quilt back is being pulled in all directions now and can’t get itself straightened out.
What happens as we quilt along then is that the areas where your quilt sags, the quilting becomes closer together. Even if your quilter is using a Digital system, the quilt has factors that the computer cannot control; the quilting becomes closer together as it pulls the backing up during the quilting process.
OMG does that mean disaster is coming? No, not really… but it does mean that your quilting won't be as consistent, and the issue could compound the further along the quilting goes. You can see how this would become an increasingly frustrating situation for the longarmer trying to do their best work on your quilt you so lovingly spent hours on hours making.
This issue of sagging also shows up when you have not properly “Squared” your backing fabric. If the edge of your backing that gets loaded to the rails of the longarm aren’t straight, you will get backing that looks like the picture above. So, how do we fix this?
There are a couple of ways actually:
Tear your backing to size. Typically when you tear a quilting cotton, it will tear on the straight of grain, which will give you a straight edge. To do this, make a small snip into the fabric, just deeper than the selvage and then RIP! (It will also feel really good if you have any lingering tension!)
*You will want to check with your longarmer specifically on if they prefer this or not.
Check out this tutorial from Sometimes Crafter on how to cut your backing straight - http://sometimescrafter.com/quilting/quilt-prep/ (Here is us for us visual learners, below!)

It seems like something so simple wouldn’t make that much difference, but let me tell you - square your quilt back and you’ll be your longarmers new favorite customer! :)
OK, let talk about “Pressing” - I will be the first to admit that I am a LAZY piecer, a self-proclaimed non-precision piecer as a matter-of-fact! :P There isn’t much I like less than having to Square blocks.. UGH! BUT - when it comes to your quilt being ready for a the quilter - follow Nike’s advice and “Just Do It”!
It might not seem like a big deal if you don’t quite get that seam pressed all the way over …
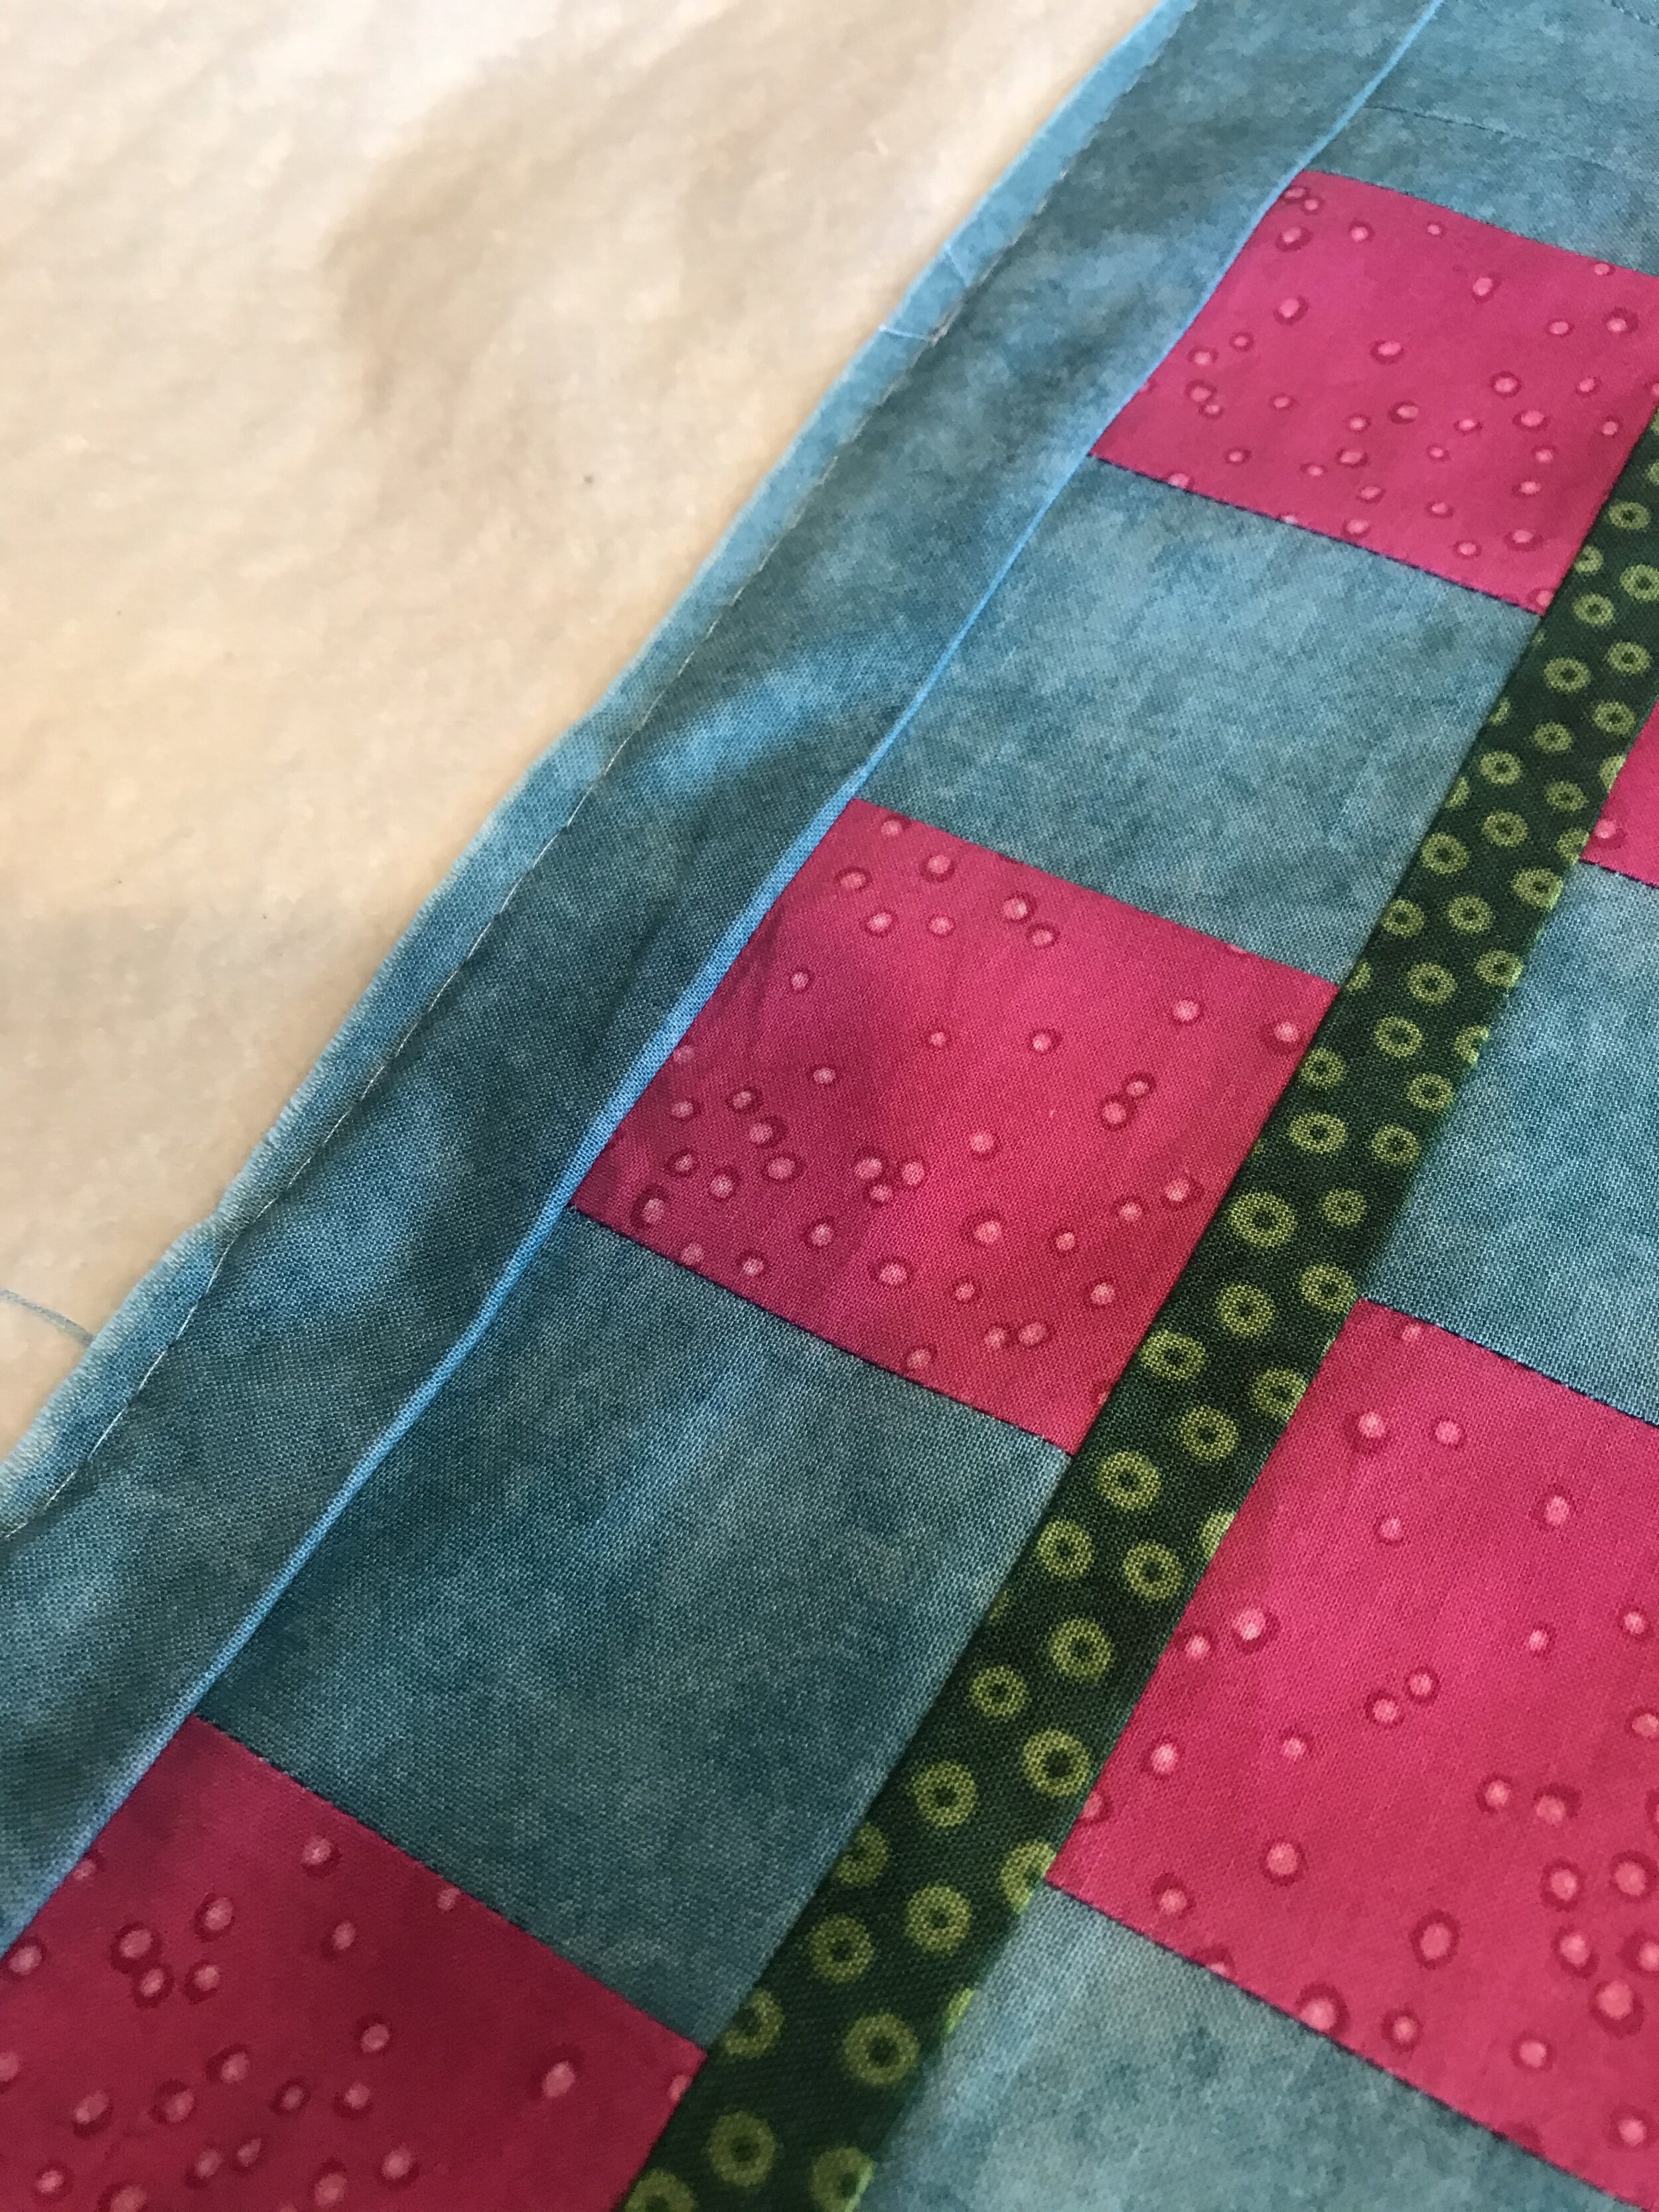
But, this is what happens when it gets quilted over…

The problem then becomes that you have small areas that looks like tucks due to the extra fabric that didn’t get pressed all the way over. This is a huge bummer for your quilter, because now they feel like this is a reflection on their work - don’t make your quilter feel bad.. press your quilt! Double check those seams and make sure things are laying nice and flat - allow your quilter to focus on what they’re good at, quilting. Don’t stress them out with wonky seams! And If you have a few of these show up in your quilt - take comfort in the fact that the first time you wash your quilt - those will likely disappear!
Hopefully this gives you some insight on why your longarmer may be asking you to do certain things to prep your quilt before you deliver it! A few simple things can really take your quilt to the next level!
Happy Quilting!
Enjoli :)
The Disclaimer:
Ok, so I know things get missed, and we all aren’t always on our game and honestly some of us (me) don’t always want to square blocks - but what we put into our quilts can really show when it comes to the quilting. I know longarmers as a group tend to take on the responsibility for the whole when quilting your quilt. Please understand, we are not miracle workers - if you leave holes in your seams, you’ll likely have holes in your finished quilt. Sometimes we catch things, sometimes we don’t. The way to make a really great quilt though is for the quilter and longarmer to work together - then AMAZING things happen!

What's on my Batting Rack?!
Ever wonder how much batting a longarmer really has? Is that like asking how many pairs of shoes a woman has? I don’t know, maybe it’s too personal? Even so, I'll admit.. I have some rolls.. rolls of batting! ;P
So, let’s see.. here is what I currently have:
Quilters Dream Cotton
Quilters Dream 80/20 (Cotton/Poly)
Quilters Dream Orient (Silk, Bamboo, Tencel & Cotton)
Quilters Dream Wool
Kyoto Bamboo/Cotton
Okay, so I don’t have THAT much - it could be worse, right?! One of you out there has more I’m sure (raise your hand, no judgment!).
I do use each of these battings, and actually for a variety of effects - I’ll divulge below!
Quilters Dream Cotton - I use this for your basic, quilt it, finish it, get it done quilt or if my client really wants a 100% cotton batting. This one quilts nicely, but doesn’t give a lot of dimension, as it is a fairly low loft batting.
Quilters Dream 80/20 - This batting is great for things I plan to put a lot of quilting on, and adds a little more loft and dimension to the quilting. I tend to use it more for wall hangings or things that are not going to be used a lot and well loved - only because I feel like it is a bit stiffer than the others.
Quilters Dream Orient - I LOVE LOVE LOVE this batting, it is low loft but packs a lot in the dimension department. Since this batting is a blend of silk, bamboo, tencel and cotton you get the dimension of a bamboo, the smoothness of the silk and the strength of the cotton and the combination is amazing. I use this batting when I want dimension but less bulk.
Quilters Dream Wool - This batting is a dimensional quilters GOLD! The wool is a high-loft batting so packs a punch in the dimension department, which means you get to see all the beautiful things you quilt. Despite having a bad rap for being squirrelly, I think the wool is very nice to work with. Often I will use the Orient as a base layer and then add wool on top, it creates an awesome effect.
Kyoto Bamboo/Cotton - This batting is a 50/50 Bamboo/Cotton which means it’s soft and sturdy! This batting is kind of a jack of all trades because you can get a nice drapey (this is a word, right?) quilt, but also a quilt with a lot of dimension - it all depends on how much quilting you put on it!
One other batting that I like, but don’t currently have in my stock is Warm & Natural - 100% Cotton. I do enjoy working with it, as it has a nice hand, and leaves your quilt soft and snuggly. I haven’t done a lot of “quilt-it-to-death” types of projects with it, but never say never right?!
There are lots of other battings out there, but these are the ones I have found the most success with and have experience with longevity. And I’ll tell you a secret: Sometimes I choose batting based on what I have that is big enough in my leftover piece pile! (Only on my own quilts of course!)
Try different battings and find out which you like and how they feel in your quilt - at the end of the day though, “a finished quilt is better than a perfect quilt top”. Thanks Angela Walters for the advice!
Happy Quilting,
Enjoli
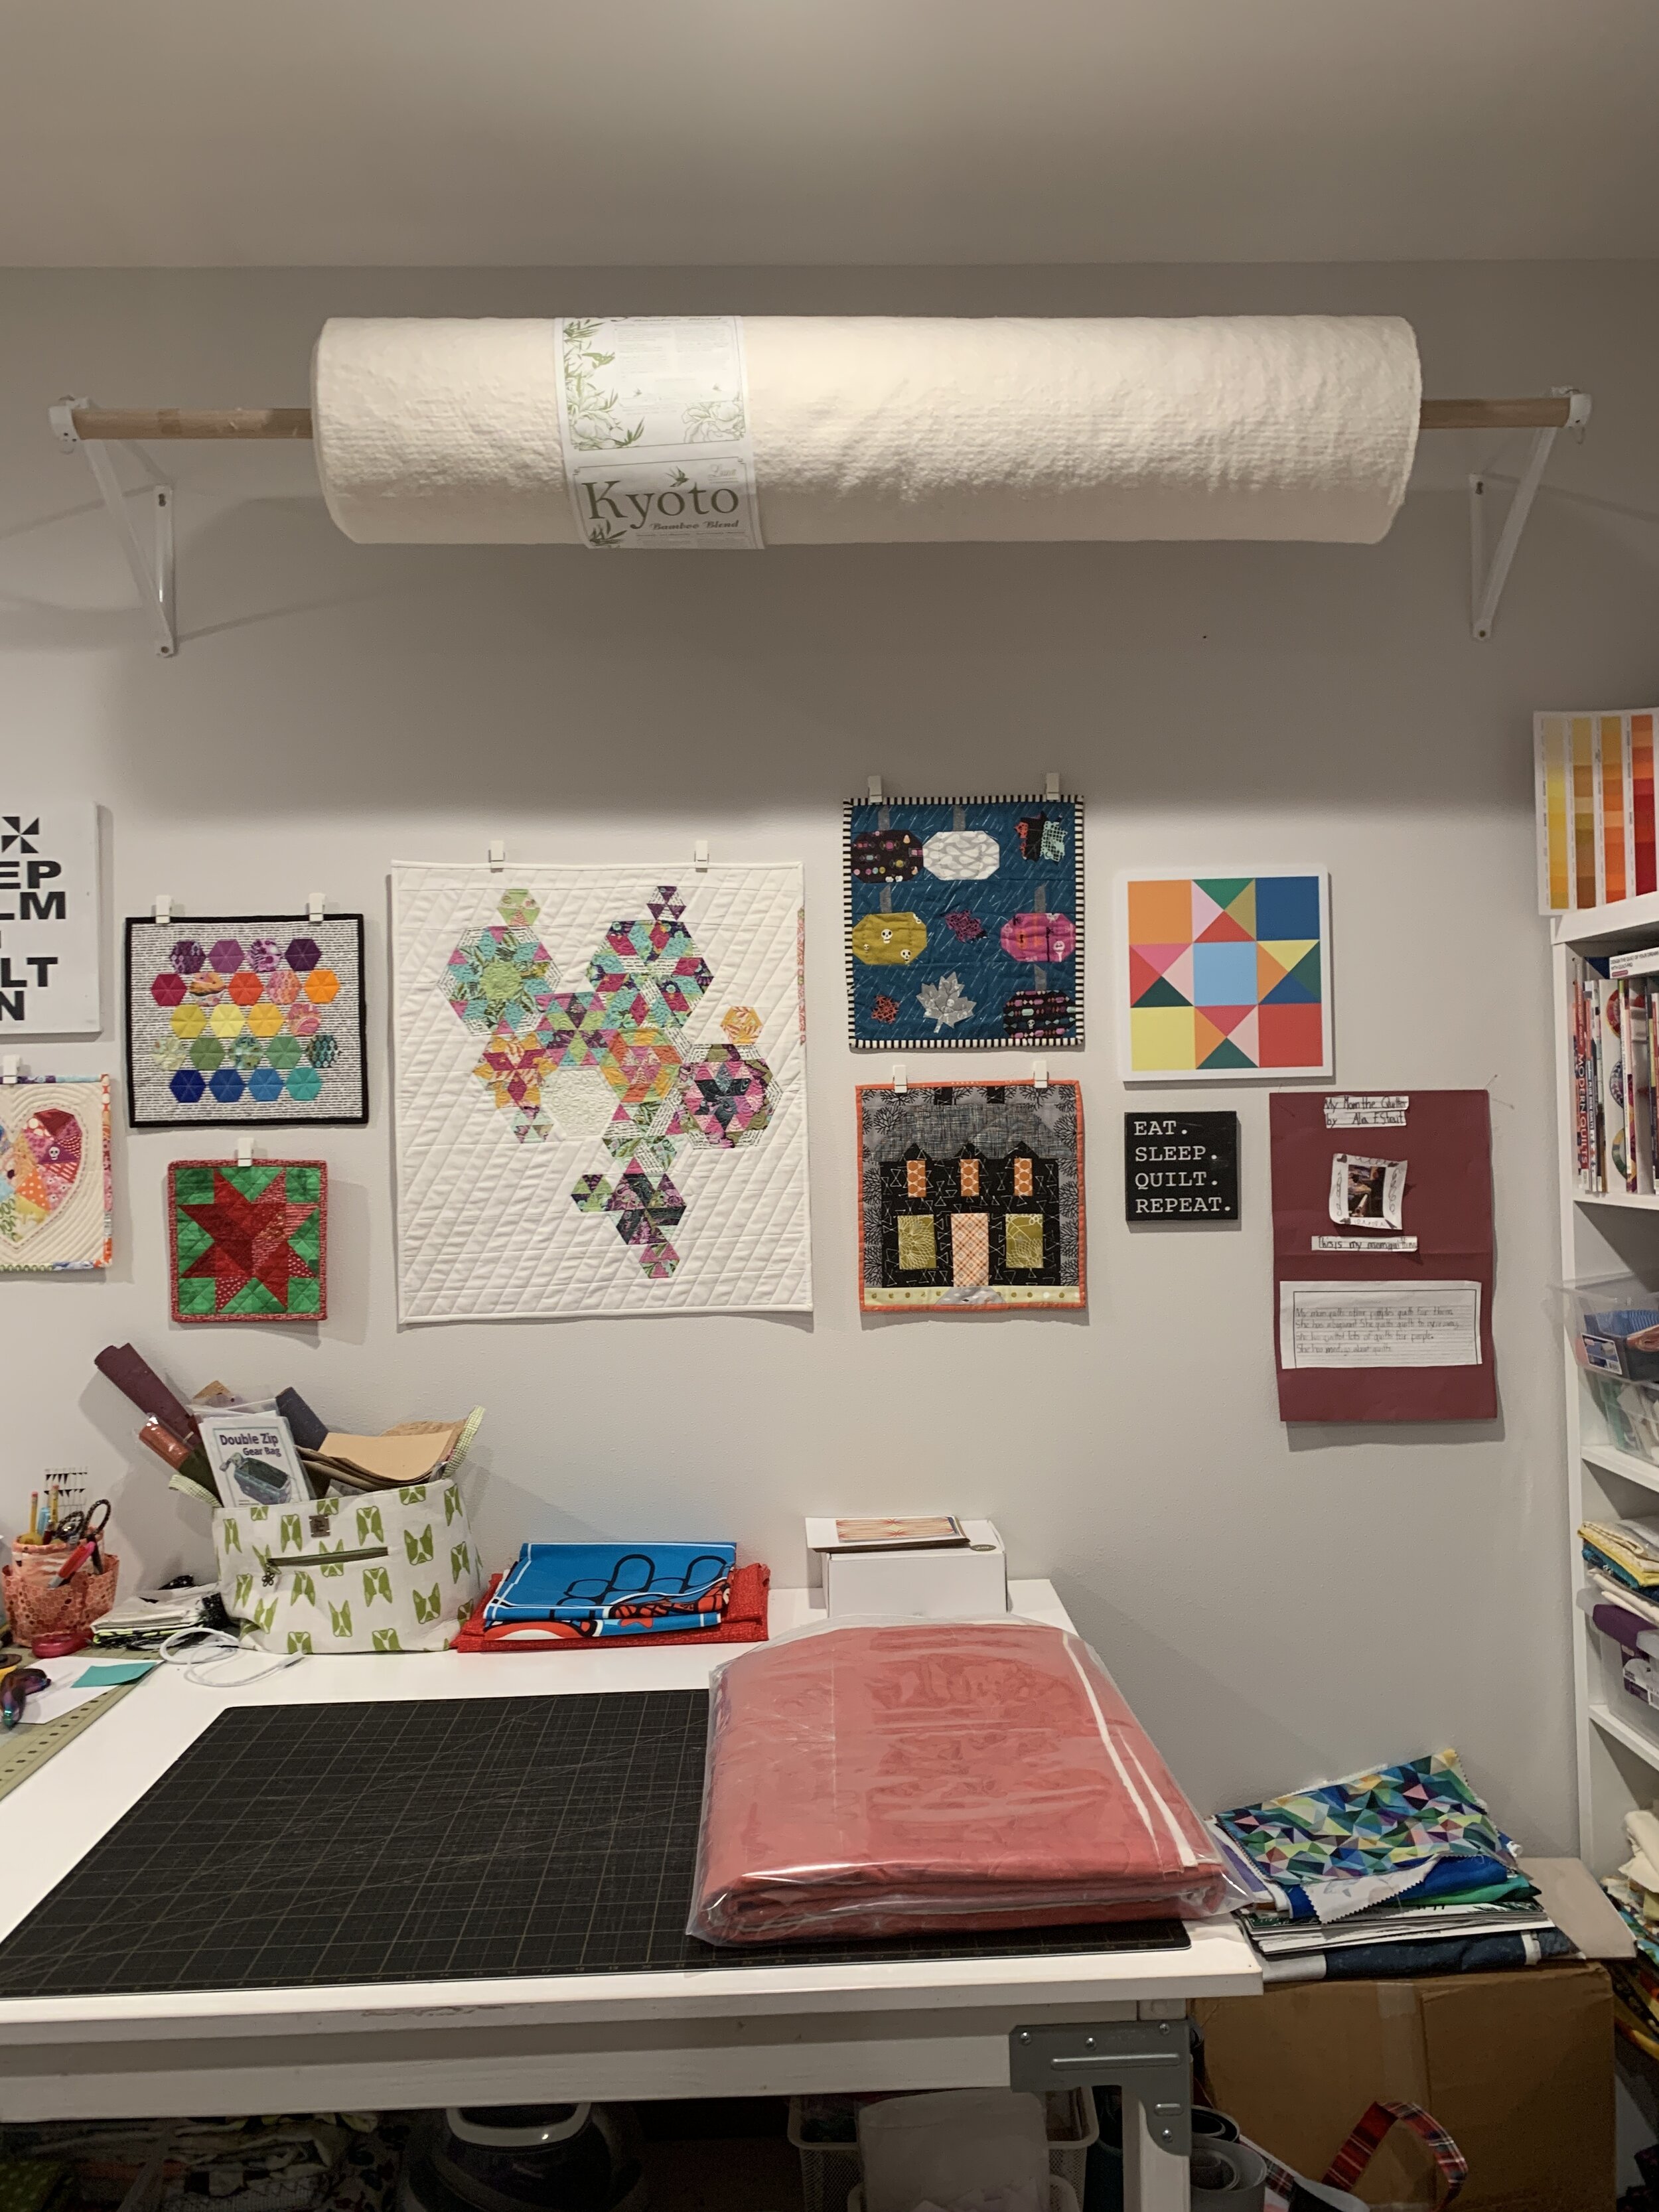
How I store my rolls of batting, this is my Kyoto roll above my cutting table!
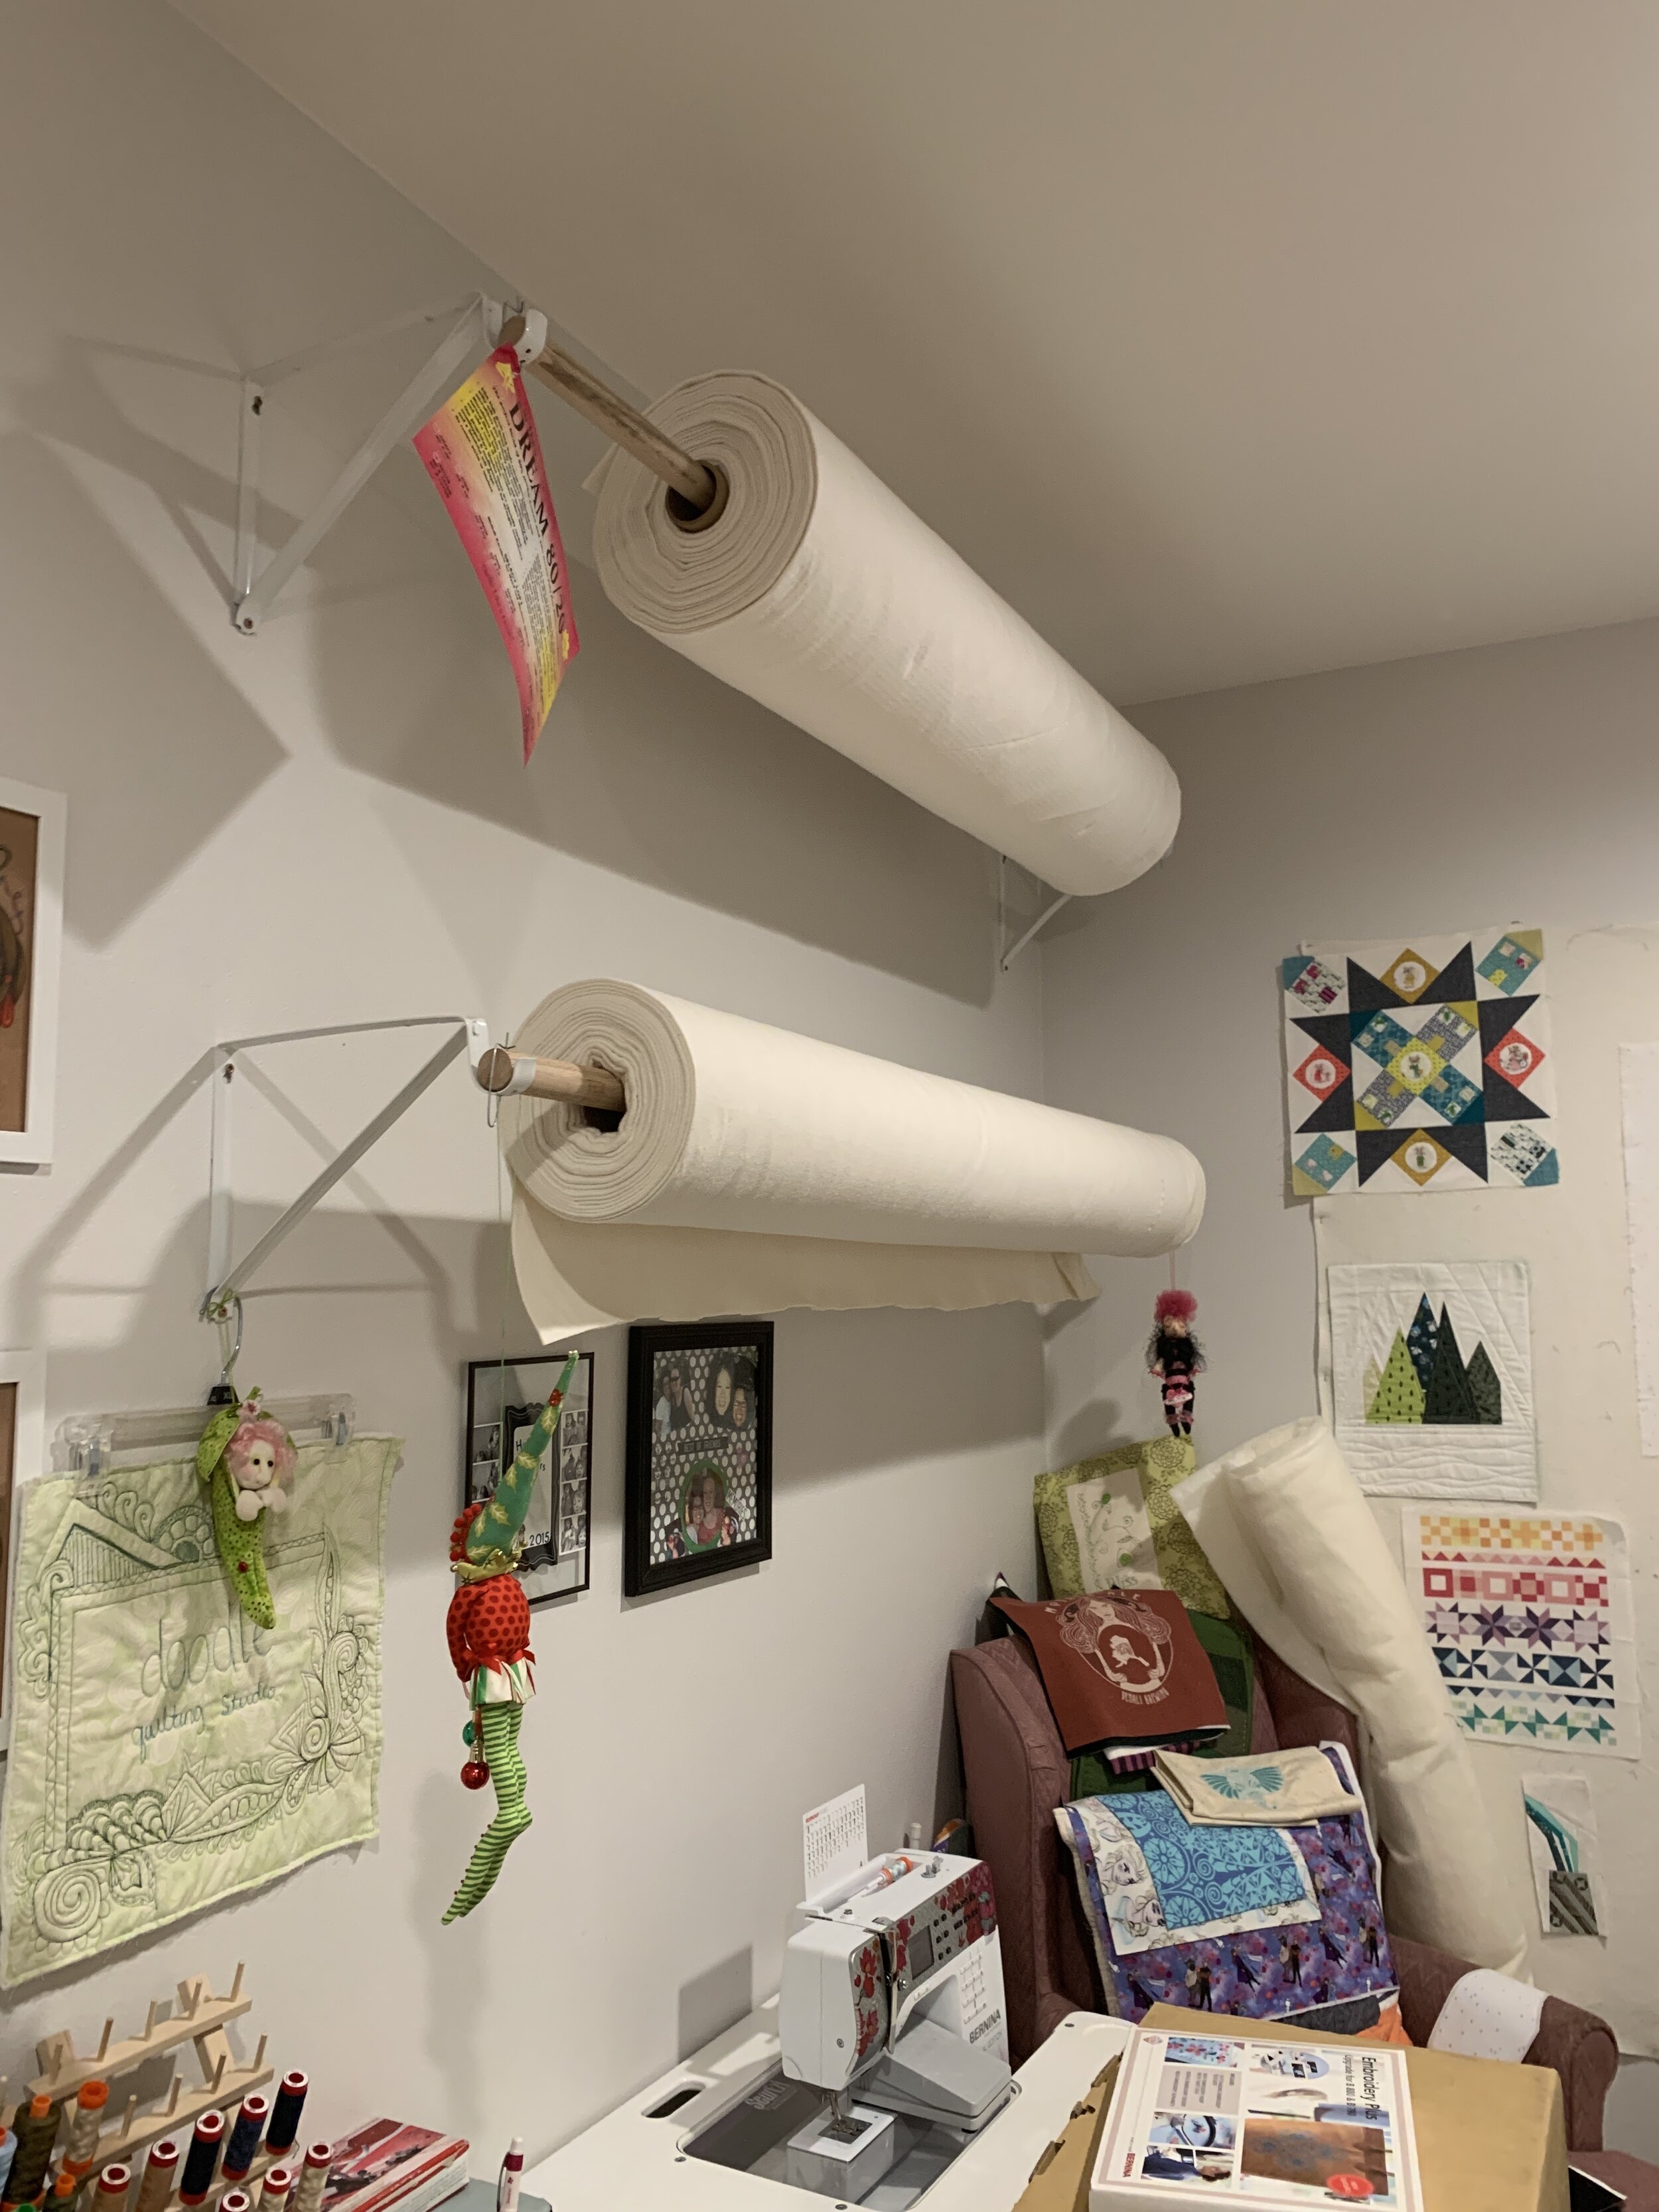
Two more rolls stored in another corner of my studio! Quilters Dream Cotton & 80/20!

Extra rolls stored on the batting bar on my Bernina Q24 frame! Quilters Dream Orient and Quilters Dream Wool.
What's on my Thread Wall?!
Hey Quilters,
If you’re like me, your second love (second to quilting that is) is THREAD!! And why stop at just one kind of thread? There are literally hundreds of different types out there! :P
I happen to have a few favorites (It’s just like with the kids..I know, you don’t have a favorite kid.. but I bet you do! ;P) depending on the day! So, what is on my thread wall? Quite a bit actually…
I have (and use most of them):
Superior King Tut (a variegated 40wt cotton thread)
Superior OMNI (a solid 40wt polyester thread)
Superior OMNI-V (a variegated 40wt polyester thread)
Aurifil 40/3 (a solid 40wt. 3 ply cotton thread)
Superior Fantastico (a variegated 40wt polyester thread)
Superior SoFine 40 (a variegated 40 wt polyester thread)
Superior SoFine 30 (a solid 30wt polyester thread)
Superior SoFine 50 (a solid 50wt polyester thread)
Superior Bottom Line (a solid 60wt polyester thread- used exclusively in my bobbins)
Wonderfil Glamore (a 12wt rayon/metallic thread - used for some bobbinwork)
Fil-tec Glide (a solid 40wt polyester thread)
Superior Metallic (a solid-ish metallic thread)
Aurifil Cotton (a solid 50wt cotton thread)
Umm.. there is a good chance I’m forgetting some too! I am beginning to think I might have a problem? Nah.. no problem..a girls gotta have her choices right?!
So, you’re probably wondering.. “Why do you have all that thread?” and “How do you get around to using it all?” (Me too! Nah just kidding)
Well I didn't buy all that thread at one time (I don’t make THAT much money longarming!) but whenever I saw some “new, shiny thread” I’d pick up a cone or two to try! Actually a funny story on how I got most of my collection of Bottom Line - I bought almost every cone from a friend whose longarm “didn’t like it”. Right, its a machine, how can it not like it - but OMG what a true statement. These machines have personalities and some just don’t like certain threads. So far Helga (thats my girls name) tolerates most of what I run through her, but (knock on wood) someday, there might come a thread she doesn’t like.
As far as “using it all”, there are of course some I use more than others.. like the OMNI and SoFine 50 and sometimes the Glide - ahh I love it all! Some of the thread I picked up because I wanted to try (insert a laundry list of techniques) that are all still on my quilting bucket list. One of these days I will get around to crossing some things off and using more of those more speciality threads. Though, I did do a fun client project with some of that Wonderfil Glamore thread for some awesome bobbinwork. I’ll put the link below for you to check out!
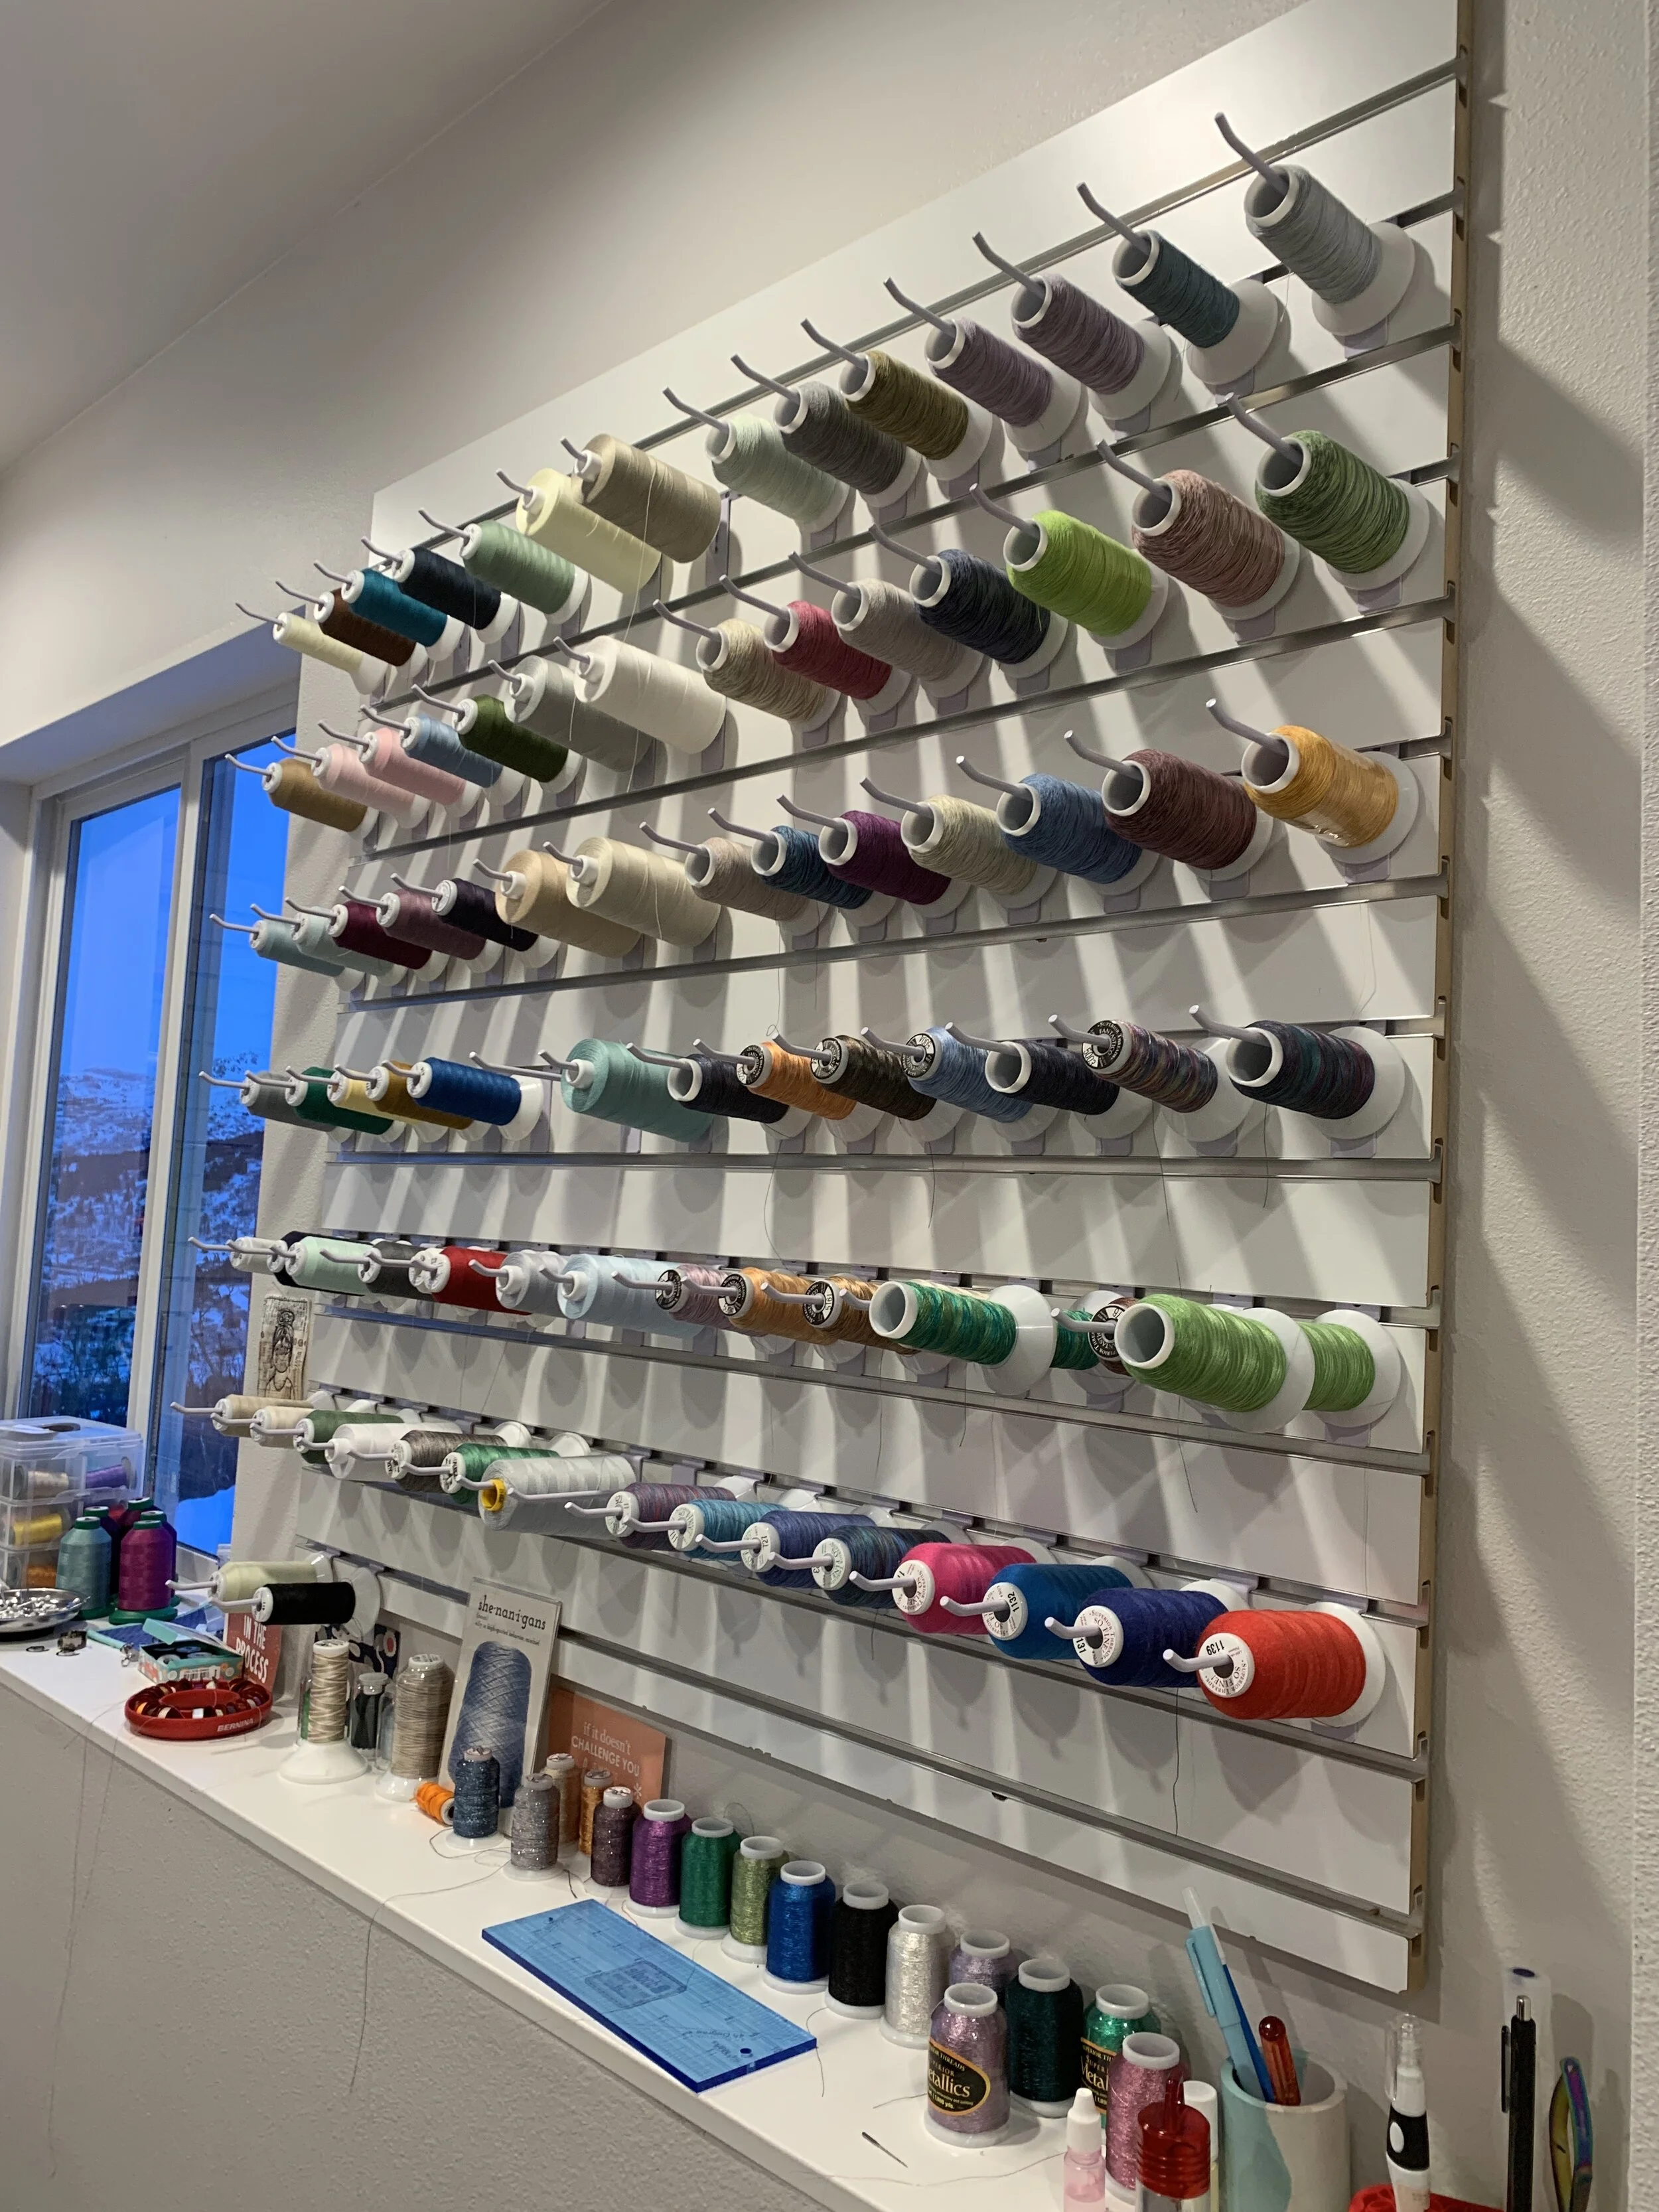
Speaking of photos.. because who doesn’t love a little thread eye candy?! For your viewing pleasure, my thread wall:

This is the majority of my coned threads!

My (mostly) 40wt threads, with some 30wt. at the bottom!

These are my SoFine50 threads, basic colors for quilting that blends!

Ahh.. my beautiful BottomLine 60 wt threads - this is where I pull from to fill bobbins!

Gorgeous Glamore 12wt - I use this for bobbinwork and also to look at because it’s so pretty!

My “mini” cones of Glide, which seem like they’re hiding but they’re not - just ran out of wall space!

Metallics -AHHH I LOVE these - by far the best metallic on the market!
This is one of my favorite threads - its Aurifil 40wt polyester. Sadly, it has been discontinued..*tears.

Part of my collection of Aurifil 50wt cotton thread - used mostly in my sewing machines, but quilts like butter!
You can check out the quilt I did bobbin work on, Lana’s City Sampler Quilt. I had a good time and could not wait to pull it off the frame to see the pretty thread!
For my everyday, “nothing too crazy” quilting I tend to use Superior SoFine50, OMNI and of course Bottom Line in the bobbin! I do make minor adjustments to my tension when I switch things up, but feel free to comment if you’re trying to figure out specifics on how to adjust for which thread weights!
Hope you enjoyed the pretties and are inspired to try some new threads!
Happy Quilting,
Enjoli

Why I LOVE Custom Quilting!
When I first started quilting, my mentor (Angela Walters - yes that one -I feel so lucky!) told me that all I really needed to do was figure out what I was good at and offer that. Well to be totally honest, I had no idea at first what that was. I could do all over designs fine, and offered that which was great, but soon realized that it wasn’t what I LOVED about machine quilting. Over time I developed my technique and realized what I really LOVED to do with machine quilting was “custom quilting”.
Now, for those that aren’t quite sure what that means - I define it as “the whole process of planning, designing and executing the quilting”. Of course the trouble with offering that type of quilting service is that it is different for every quilt. So, for someone coming to me with no previous experience with my style of quilting, there really isn’t an option to say “see this design, this is what i’ll put on your quilt”, it is more unpredictable and unique. It definitely requires a lot of trust from the client.
This is where every longarm quilters’ journey is different - I have been lucky enough to have clients that were willing to trust me with their masterpiece. I was able to add my interpretation to their quilt with thread, and as a result do some of the most fun and awesome work I’ve ever done!
Many longarm quilters tell me they do edge to edge or pantograph work because it is more profitable. Which is probably true - it is definitely faster! ;P Again, this is where we’re all different; the planning and time I spend putting myself into the quilt(ing) is really what makes it amazing for me! Not to mention, dreaming up the quilting to best compliment the quilt and then getting to show it to the client is THE BEST!
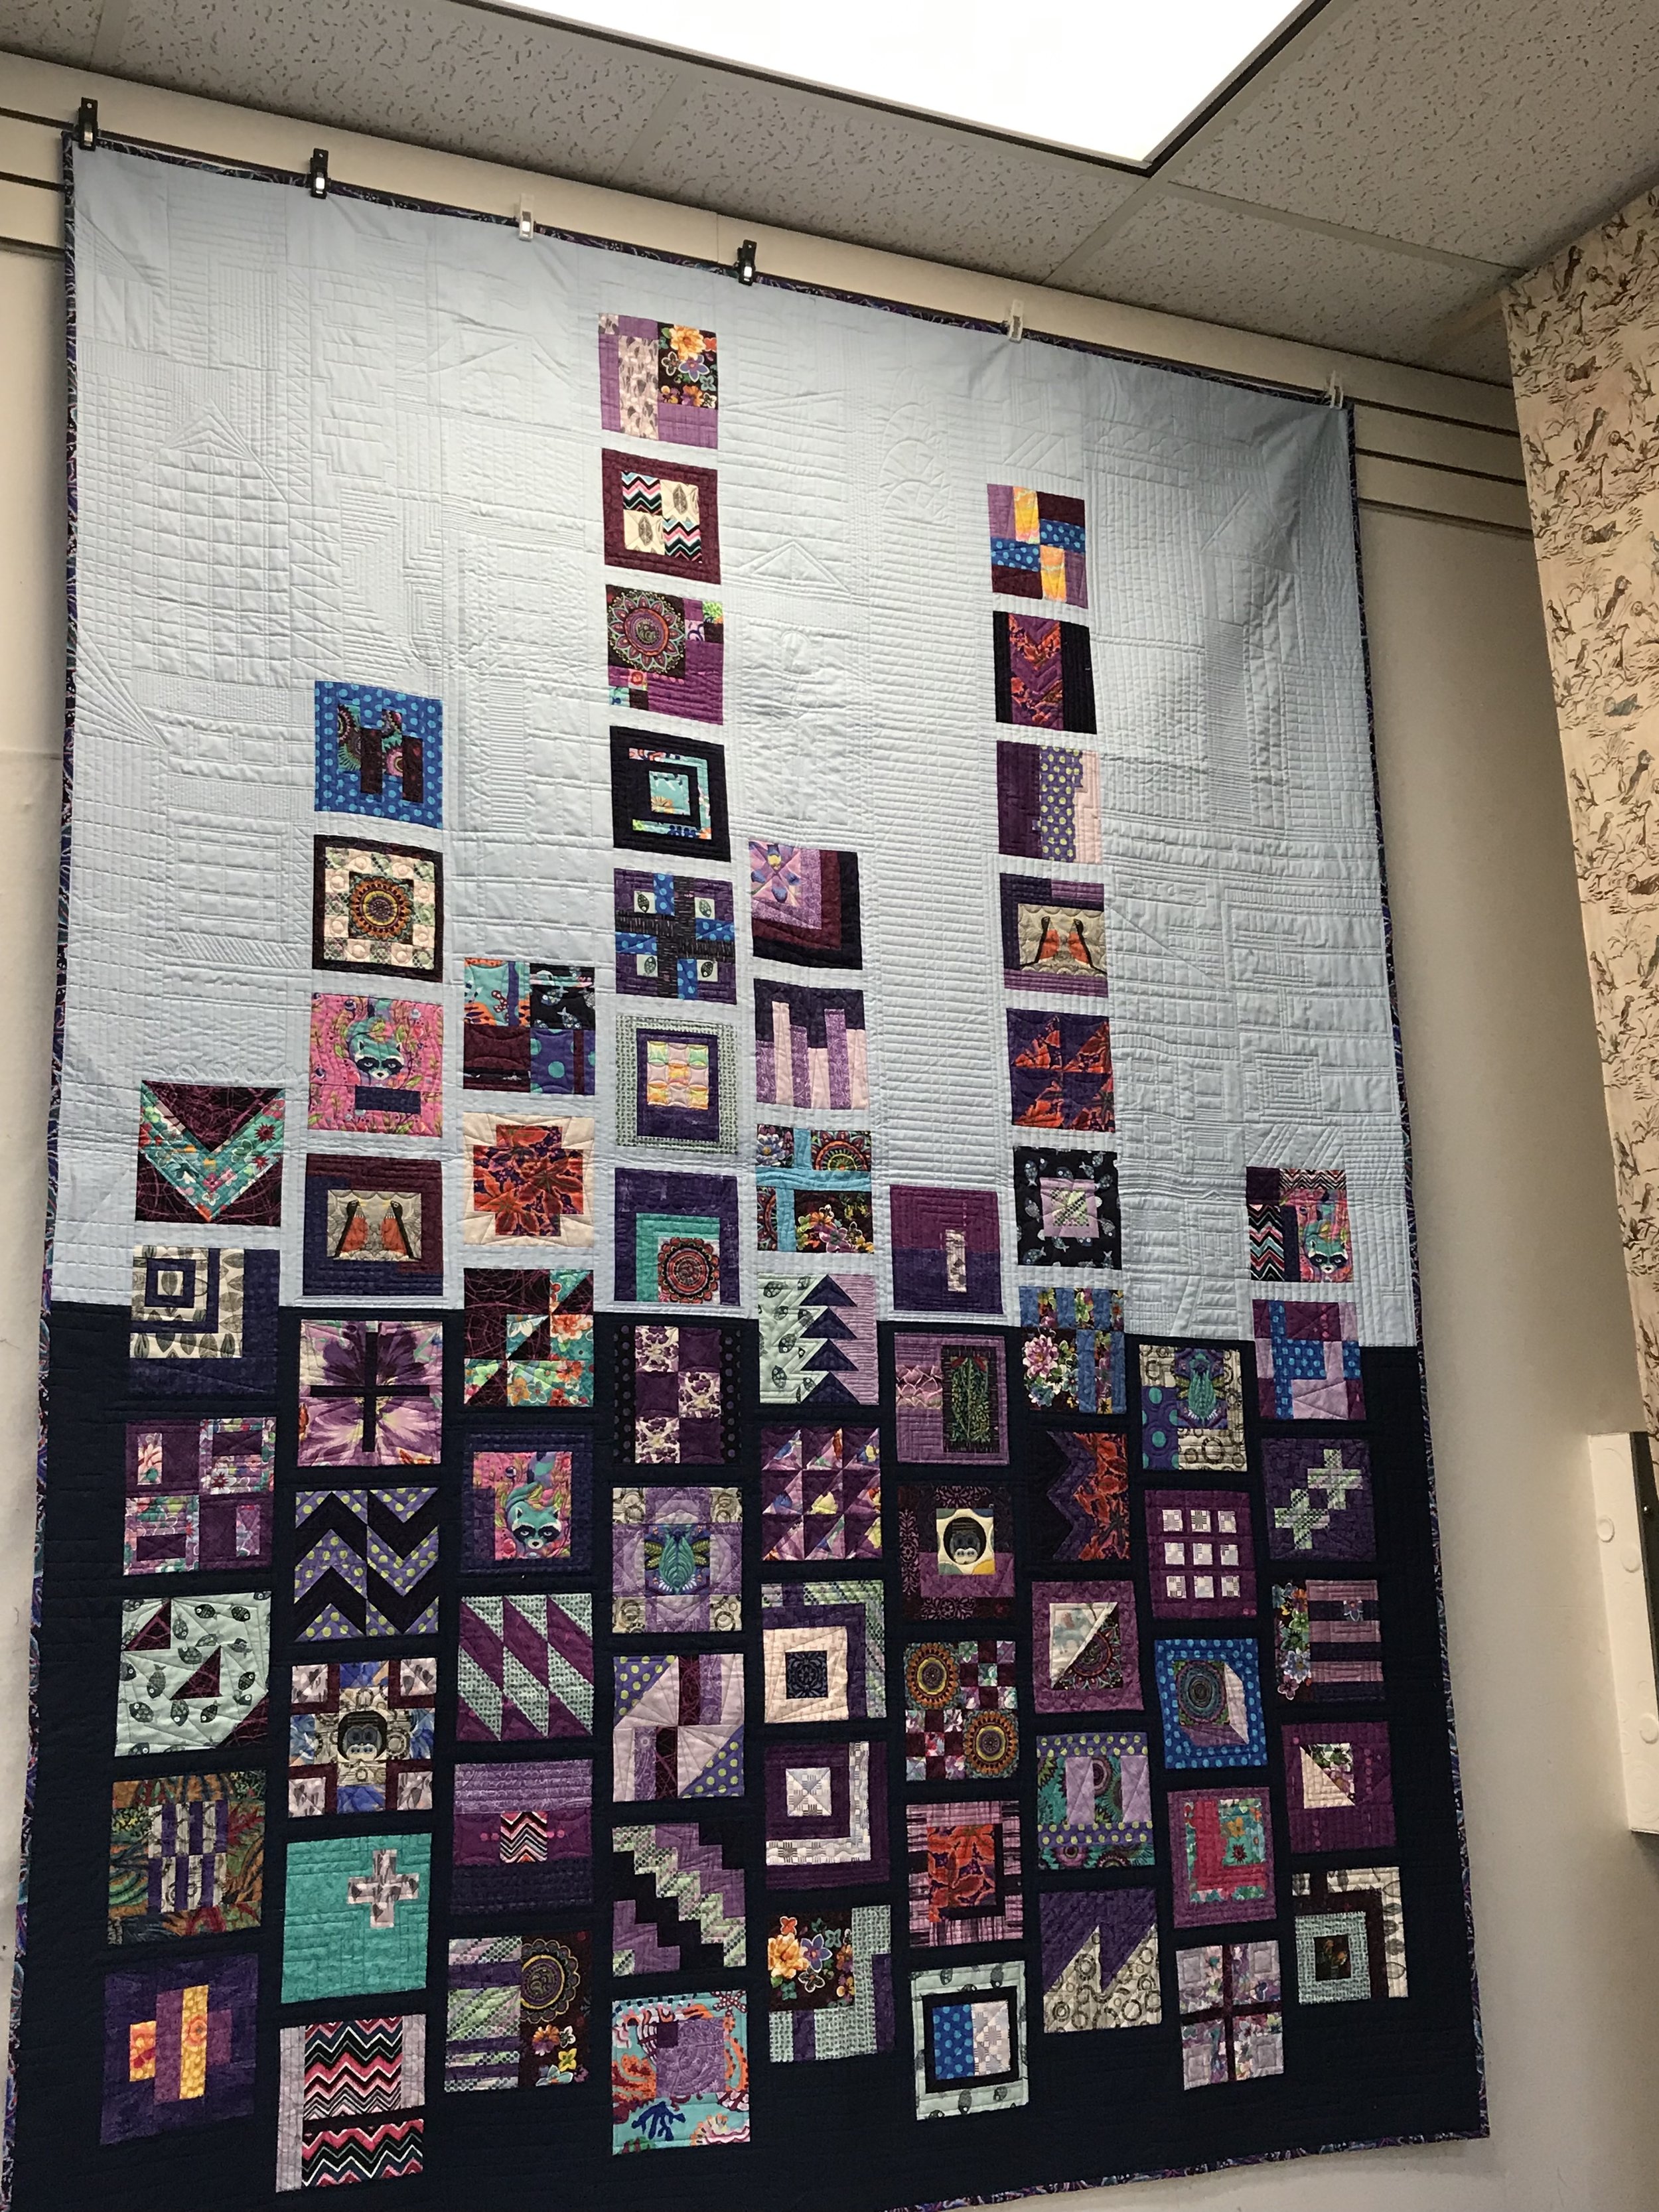
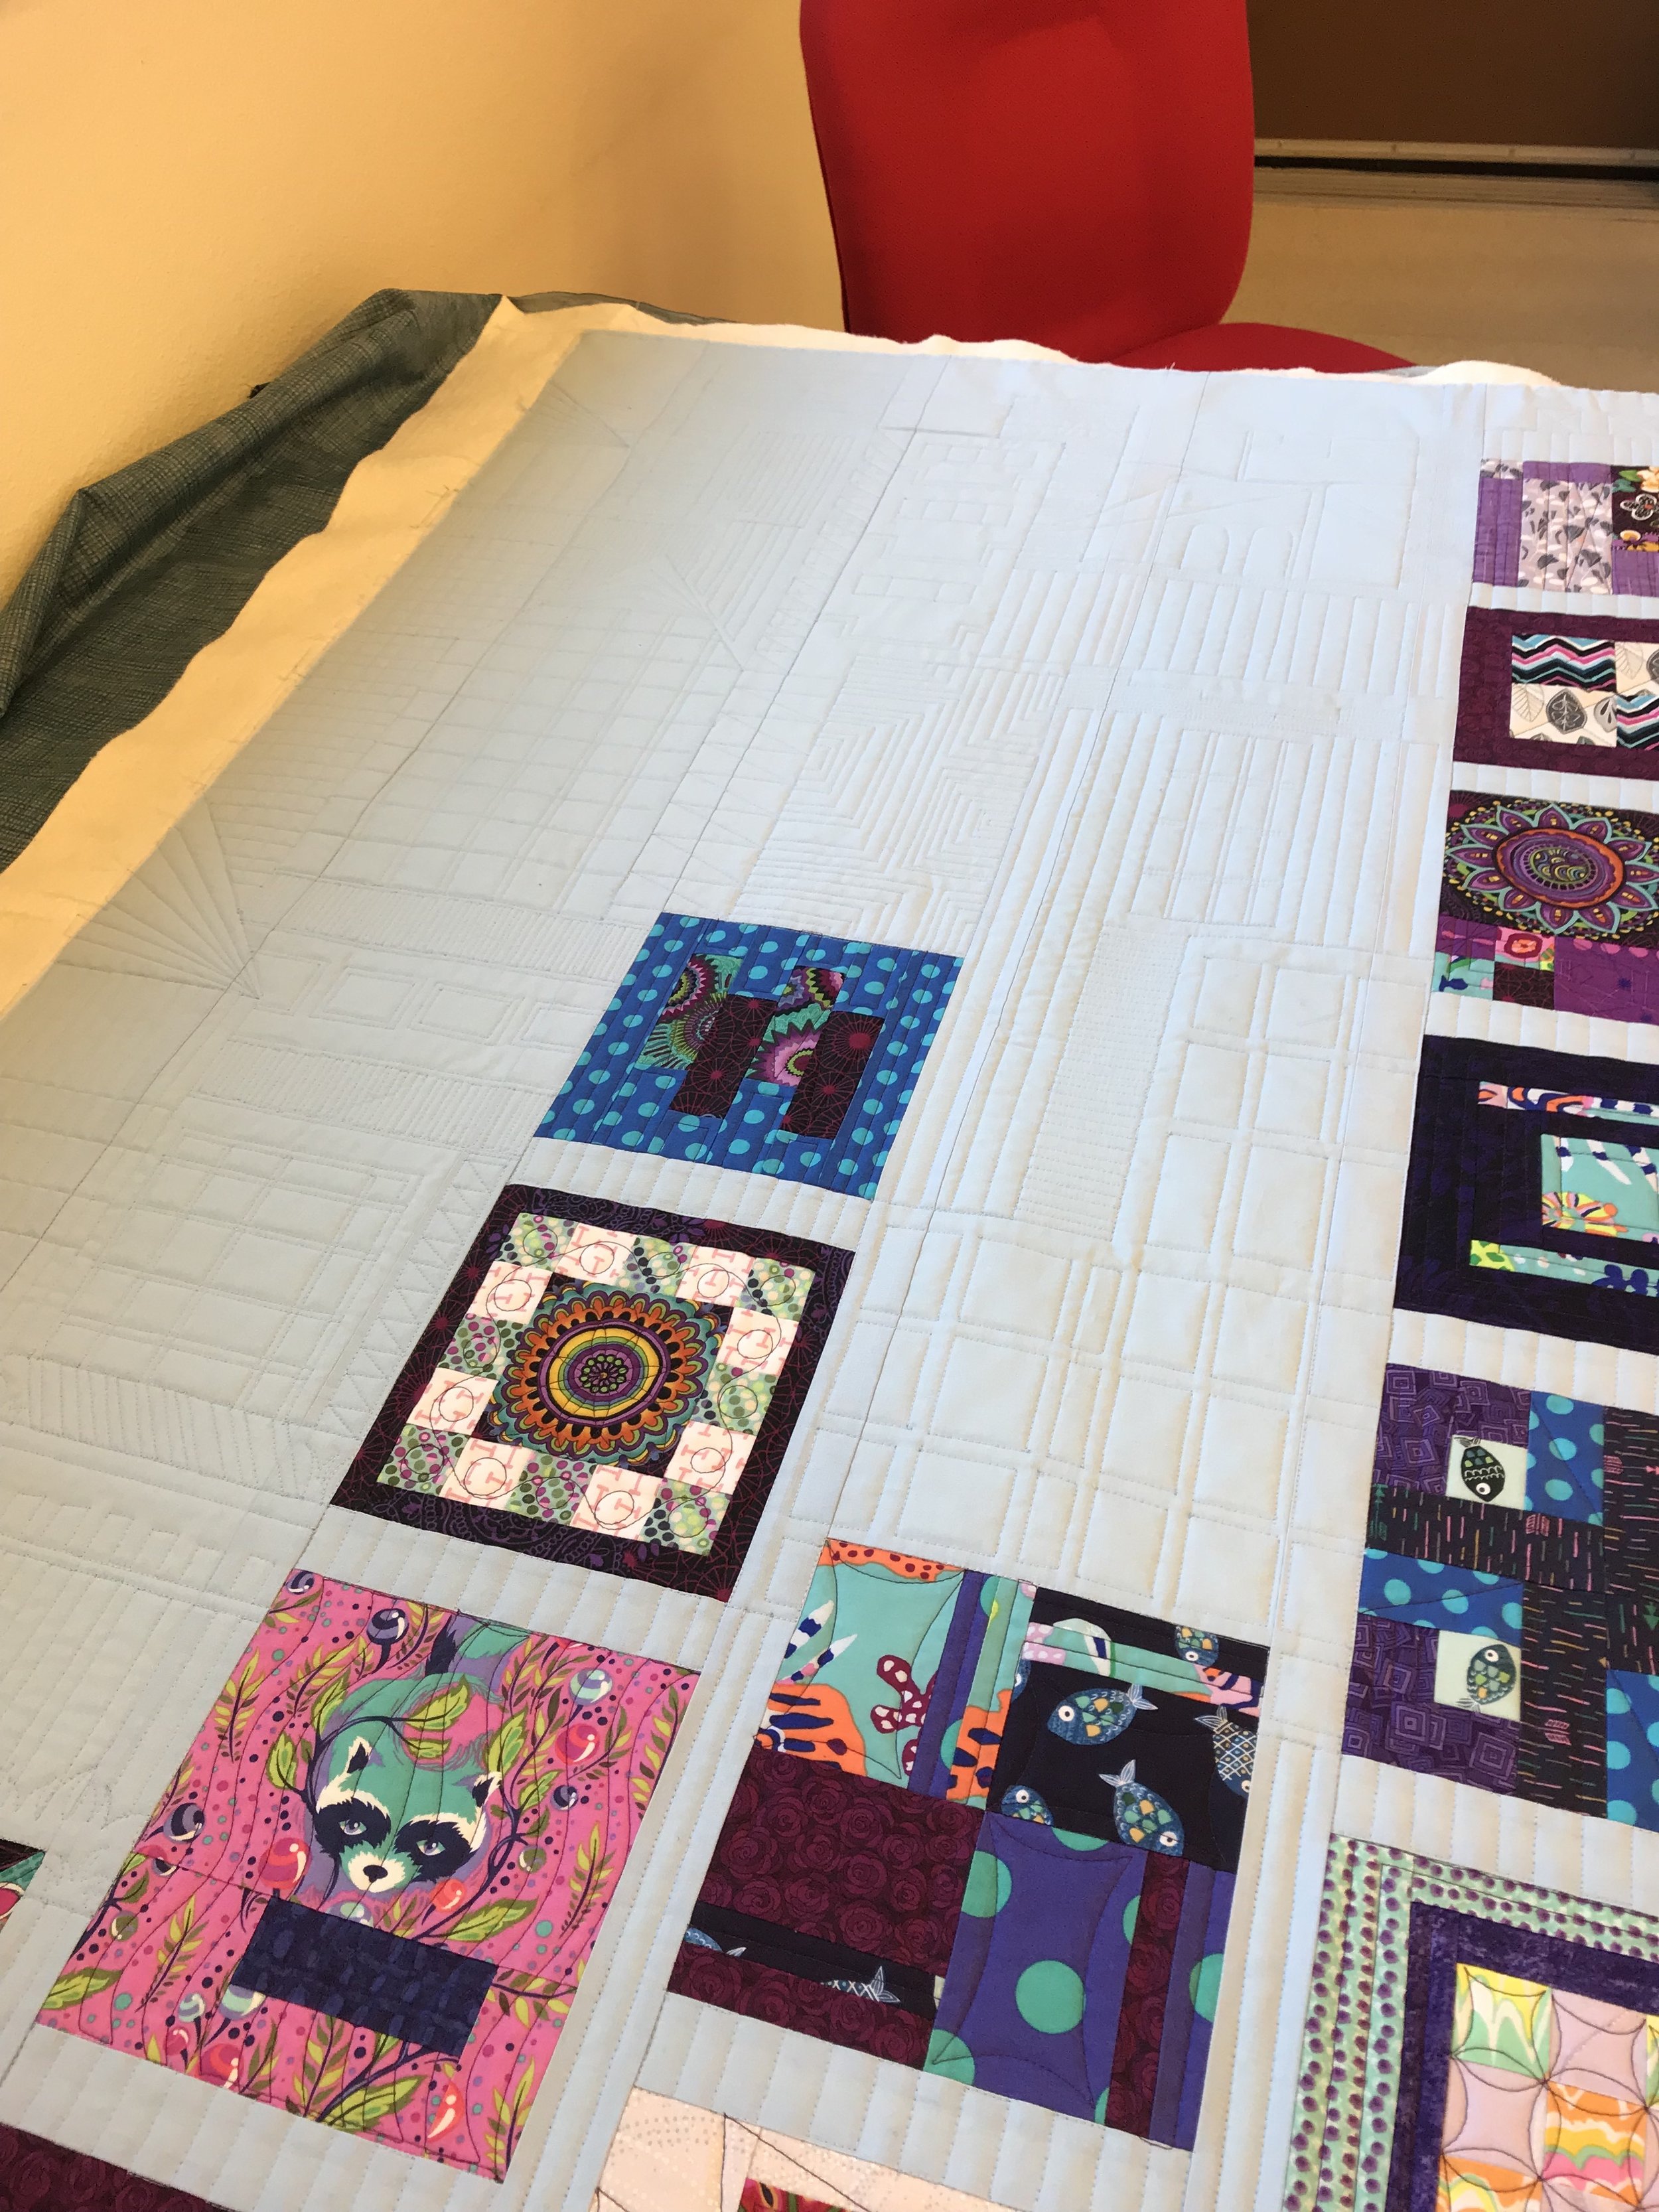
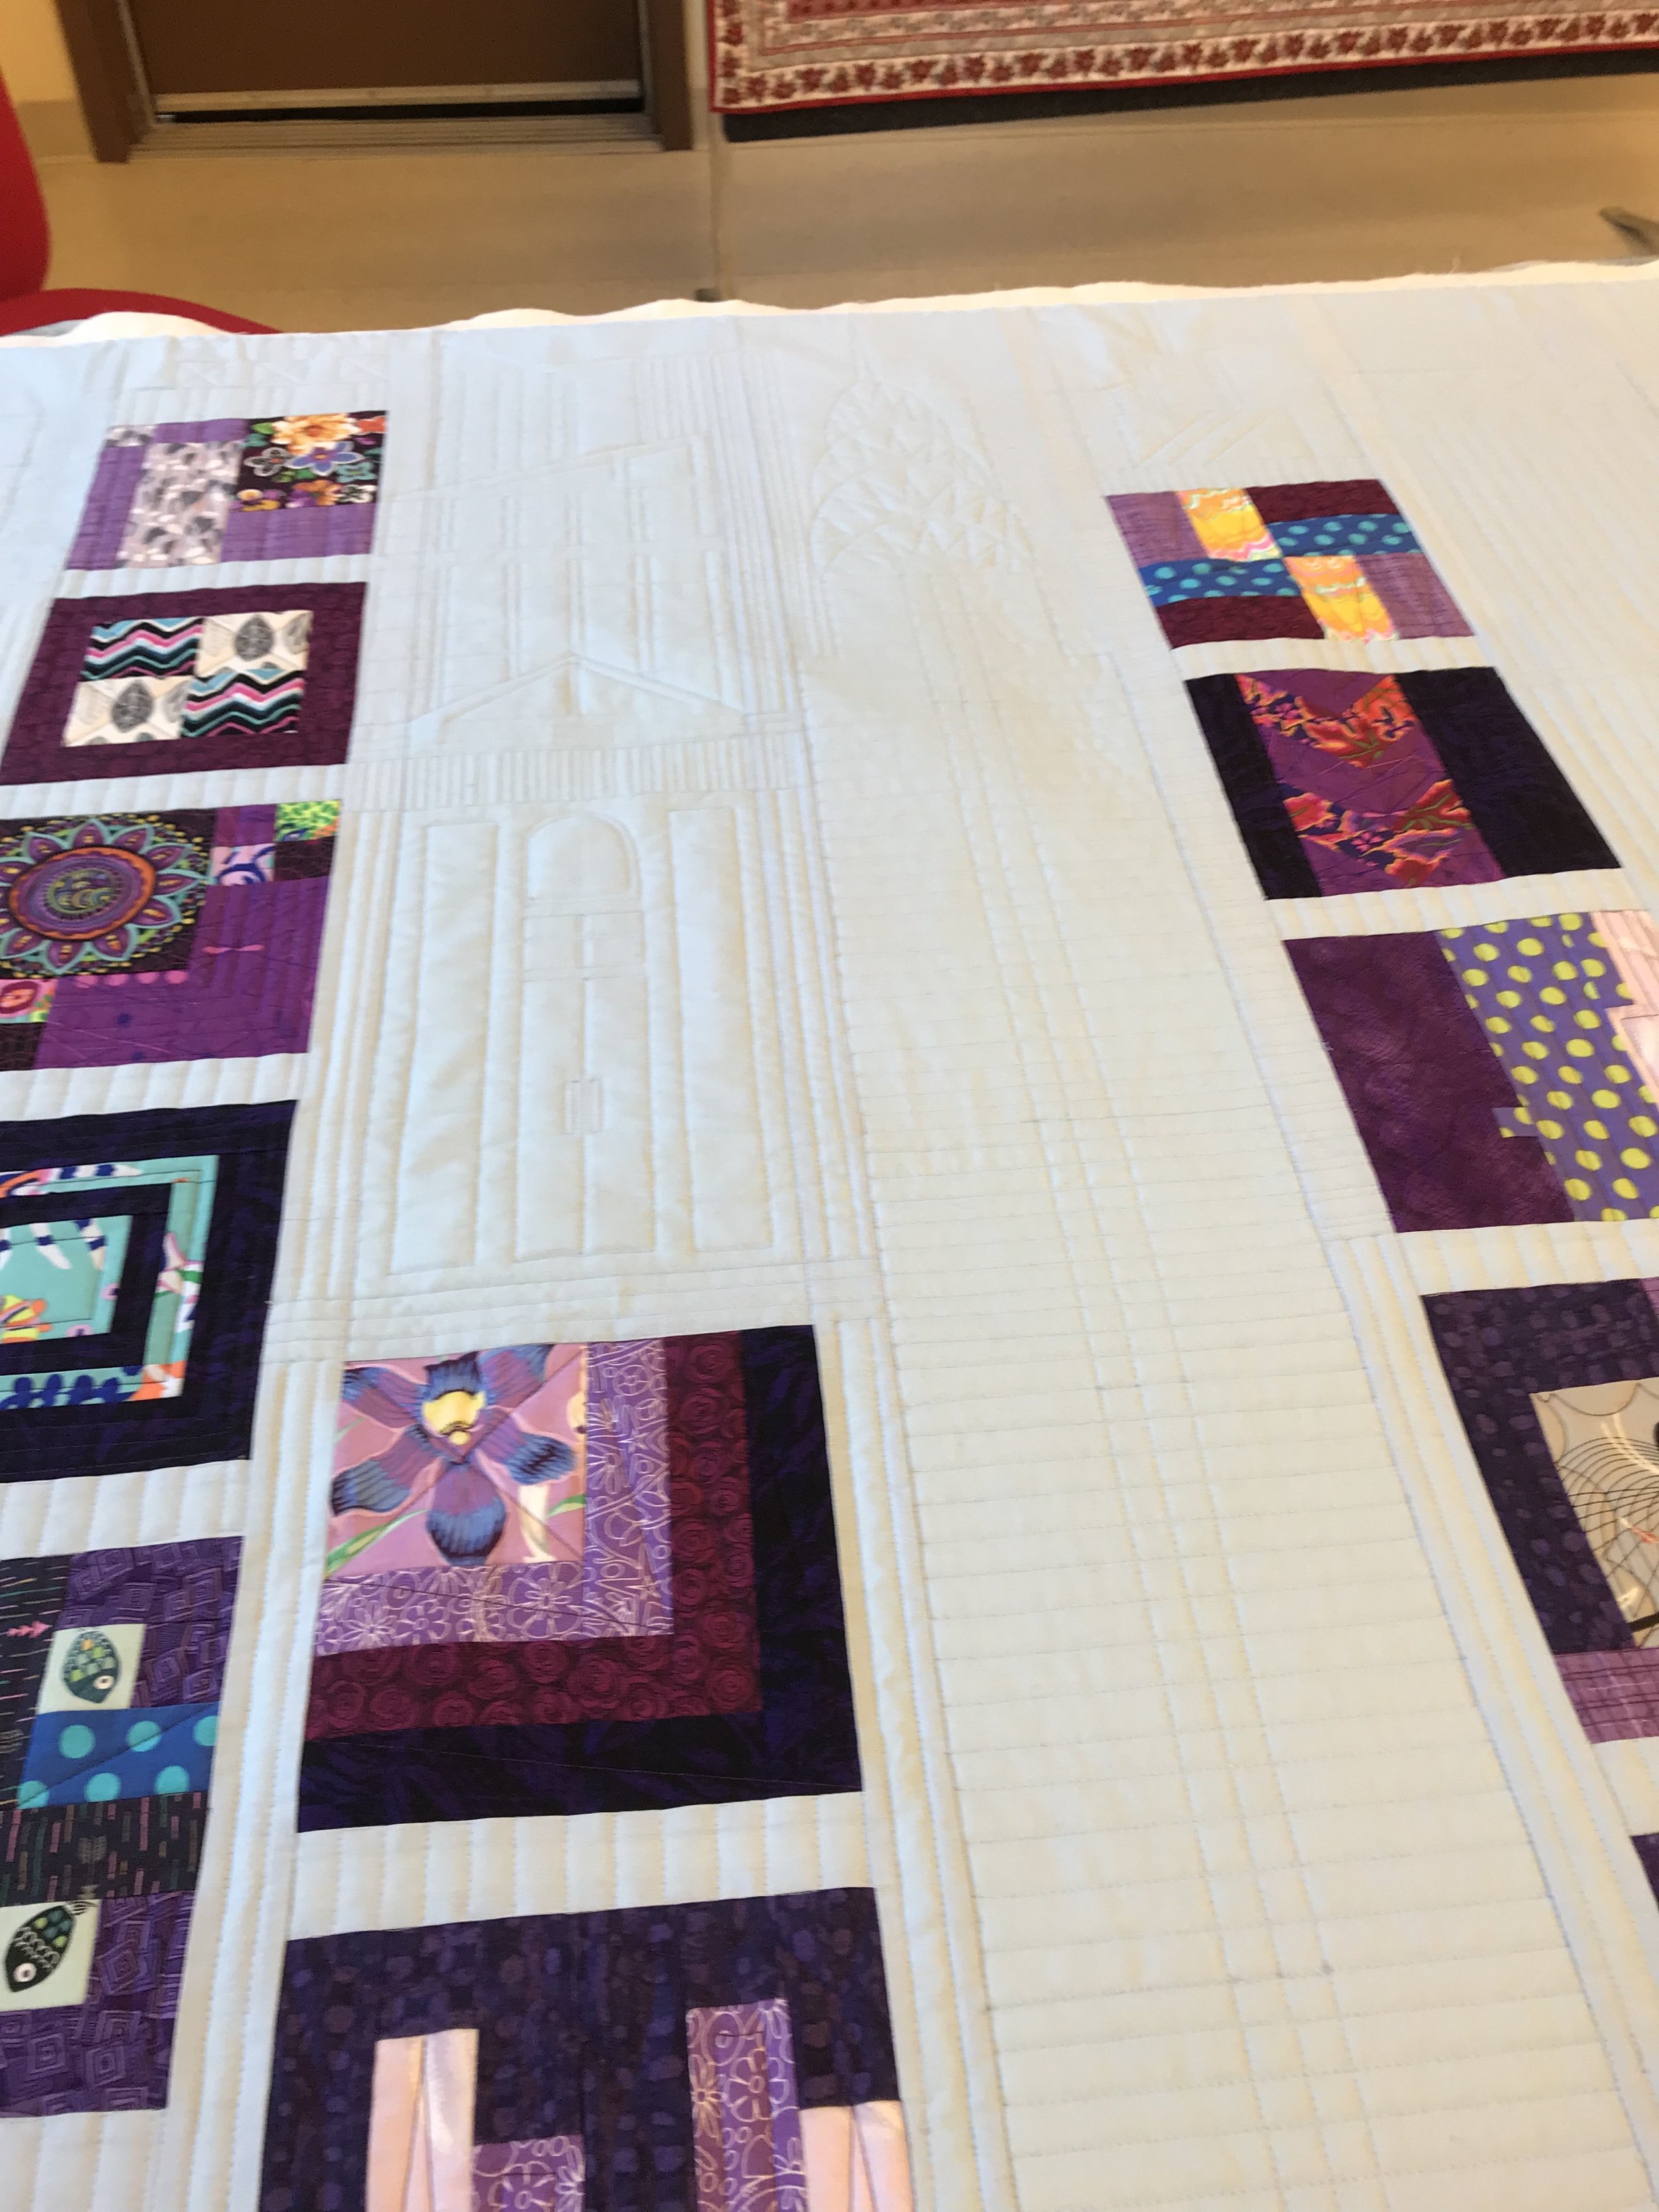
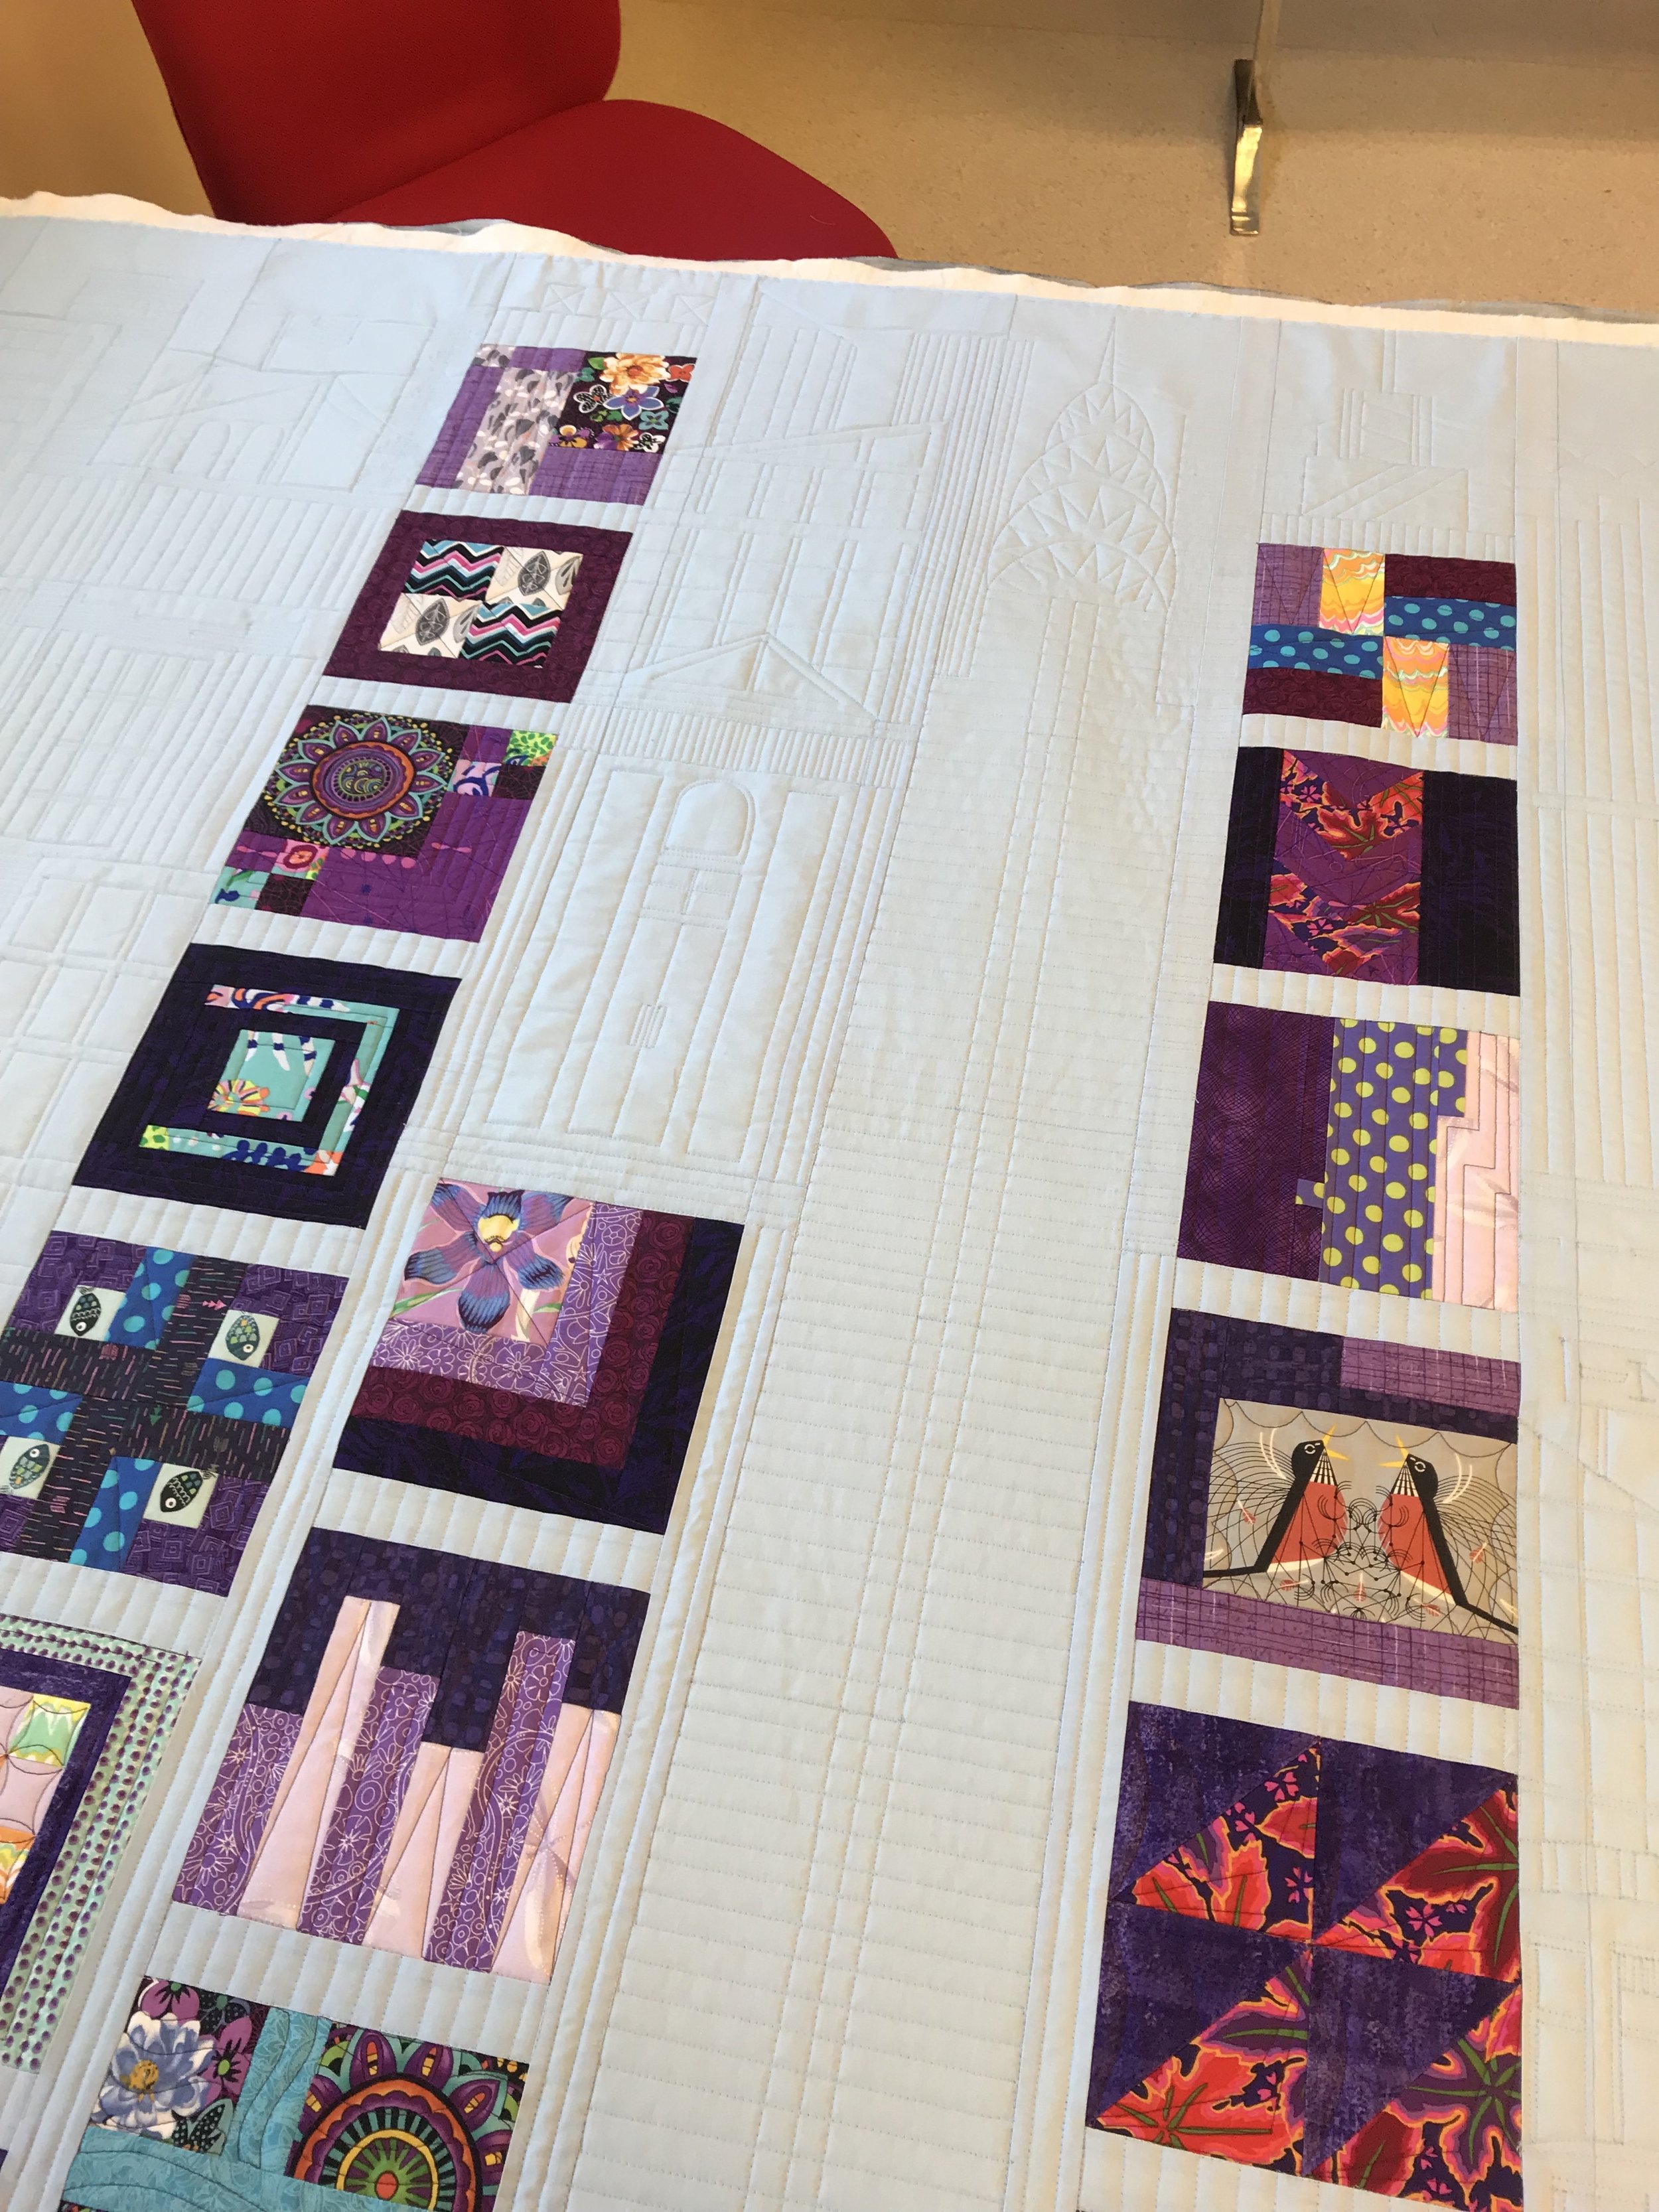
One of the most fun projects I’ve had the pleasure of working on recently is a quilt for a new client of mine, who put an amazing amount of trust in me to bring a city to life in her quilt! Many quilters have heard of the amazing Tula Pink and her 100 modern block book - you can find quilt-a-longs on Instagram and folks all over the world working on this quilt. The version of the quilt I was lucky enough to work on was the “Skyline” layout, which she asked to resemble the New York Skyline, having been inspired to make the quilt on a trip to New York!
I can’t even tell you how excited I was for this project, I started scheming right away and used that quilt to “motivate” me through a few other projects before I could get it loaded on my longarm! ( I know you other longarmers out there know what I’m talking about!)
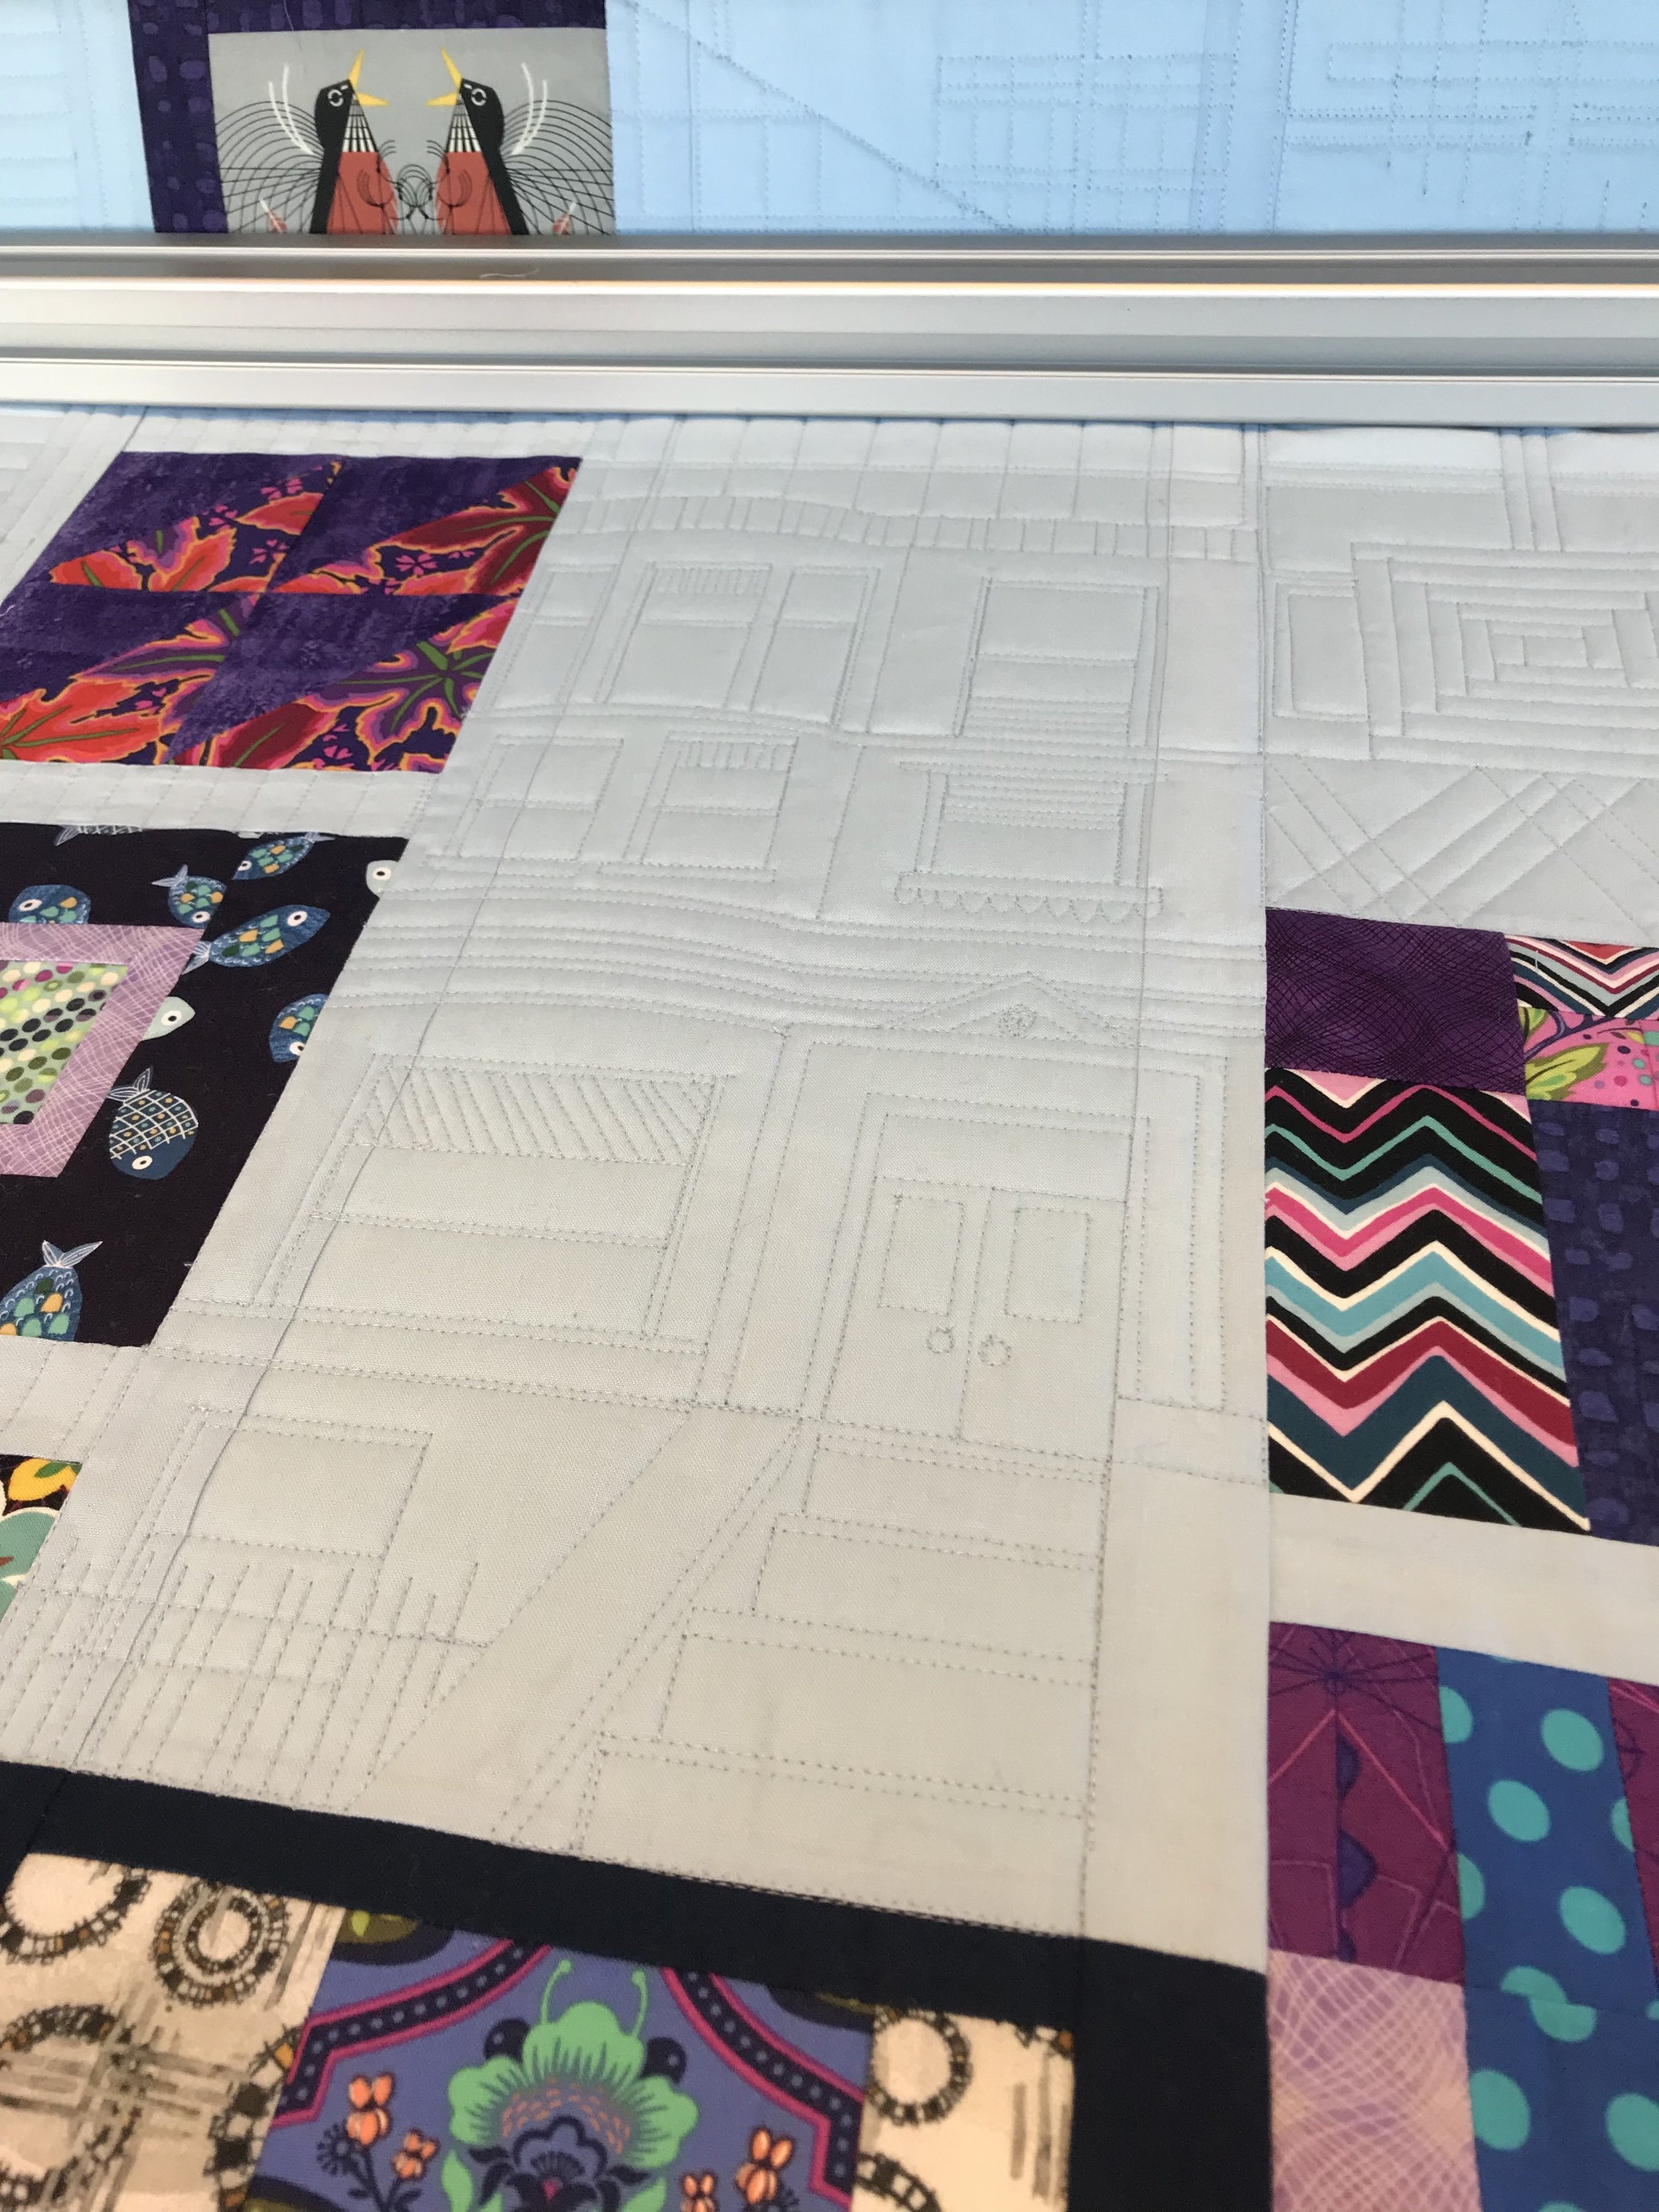
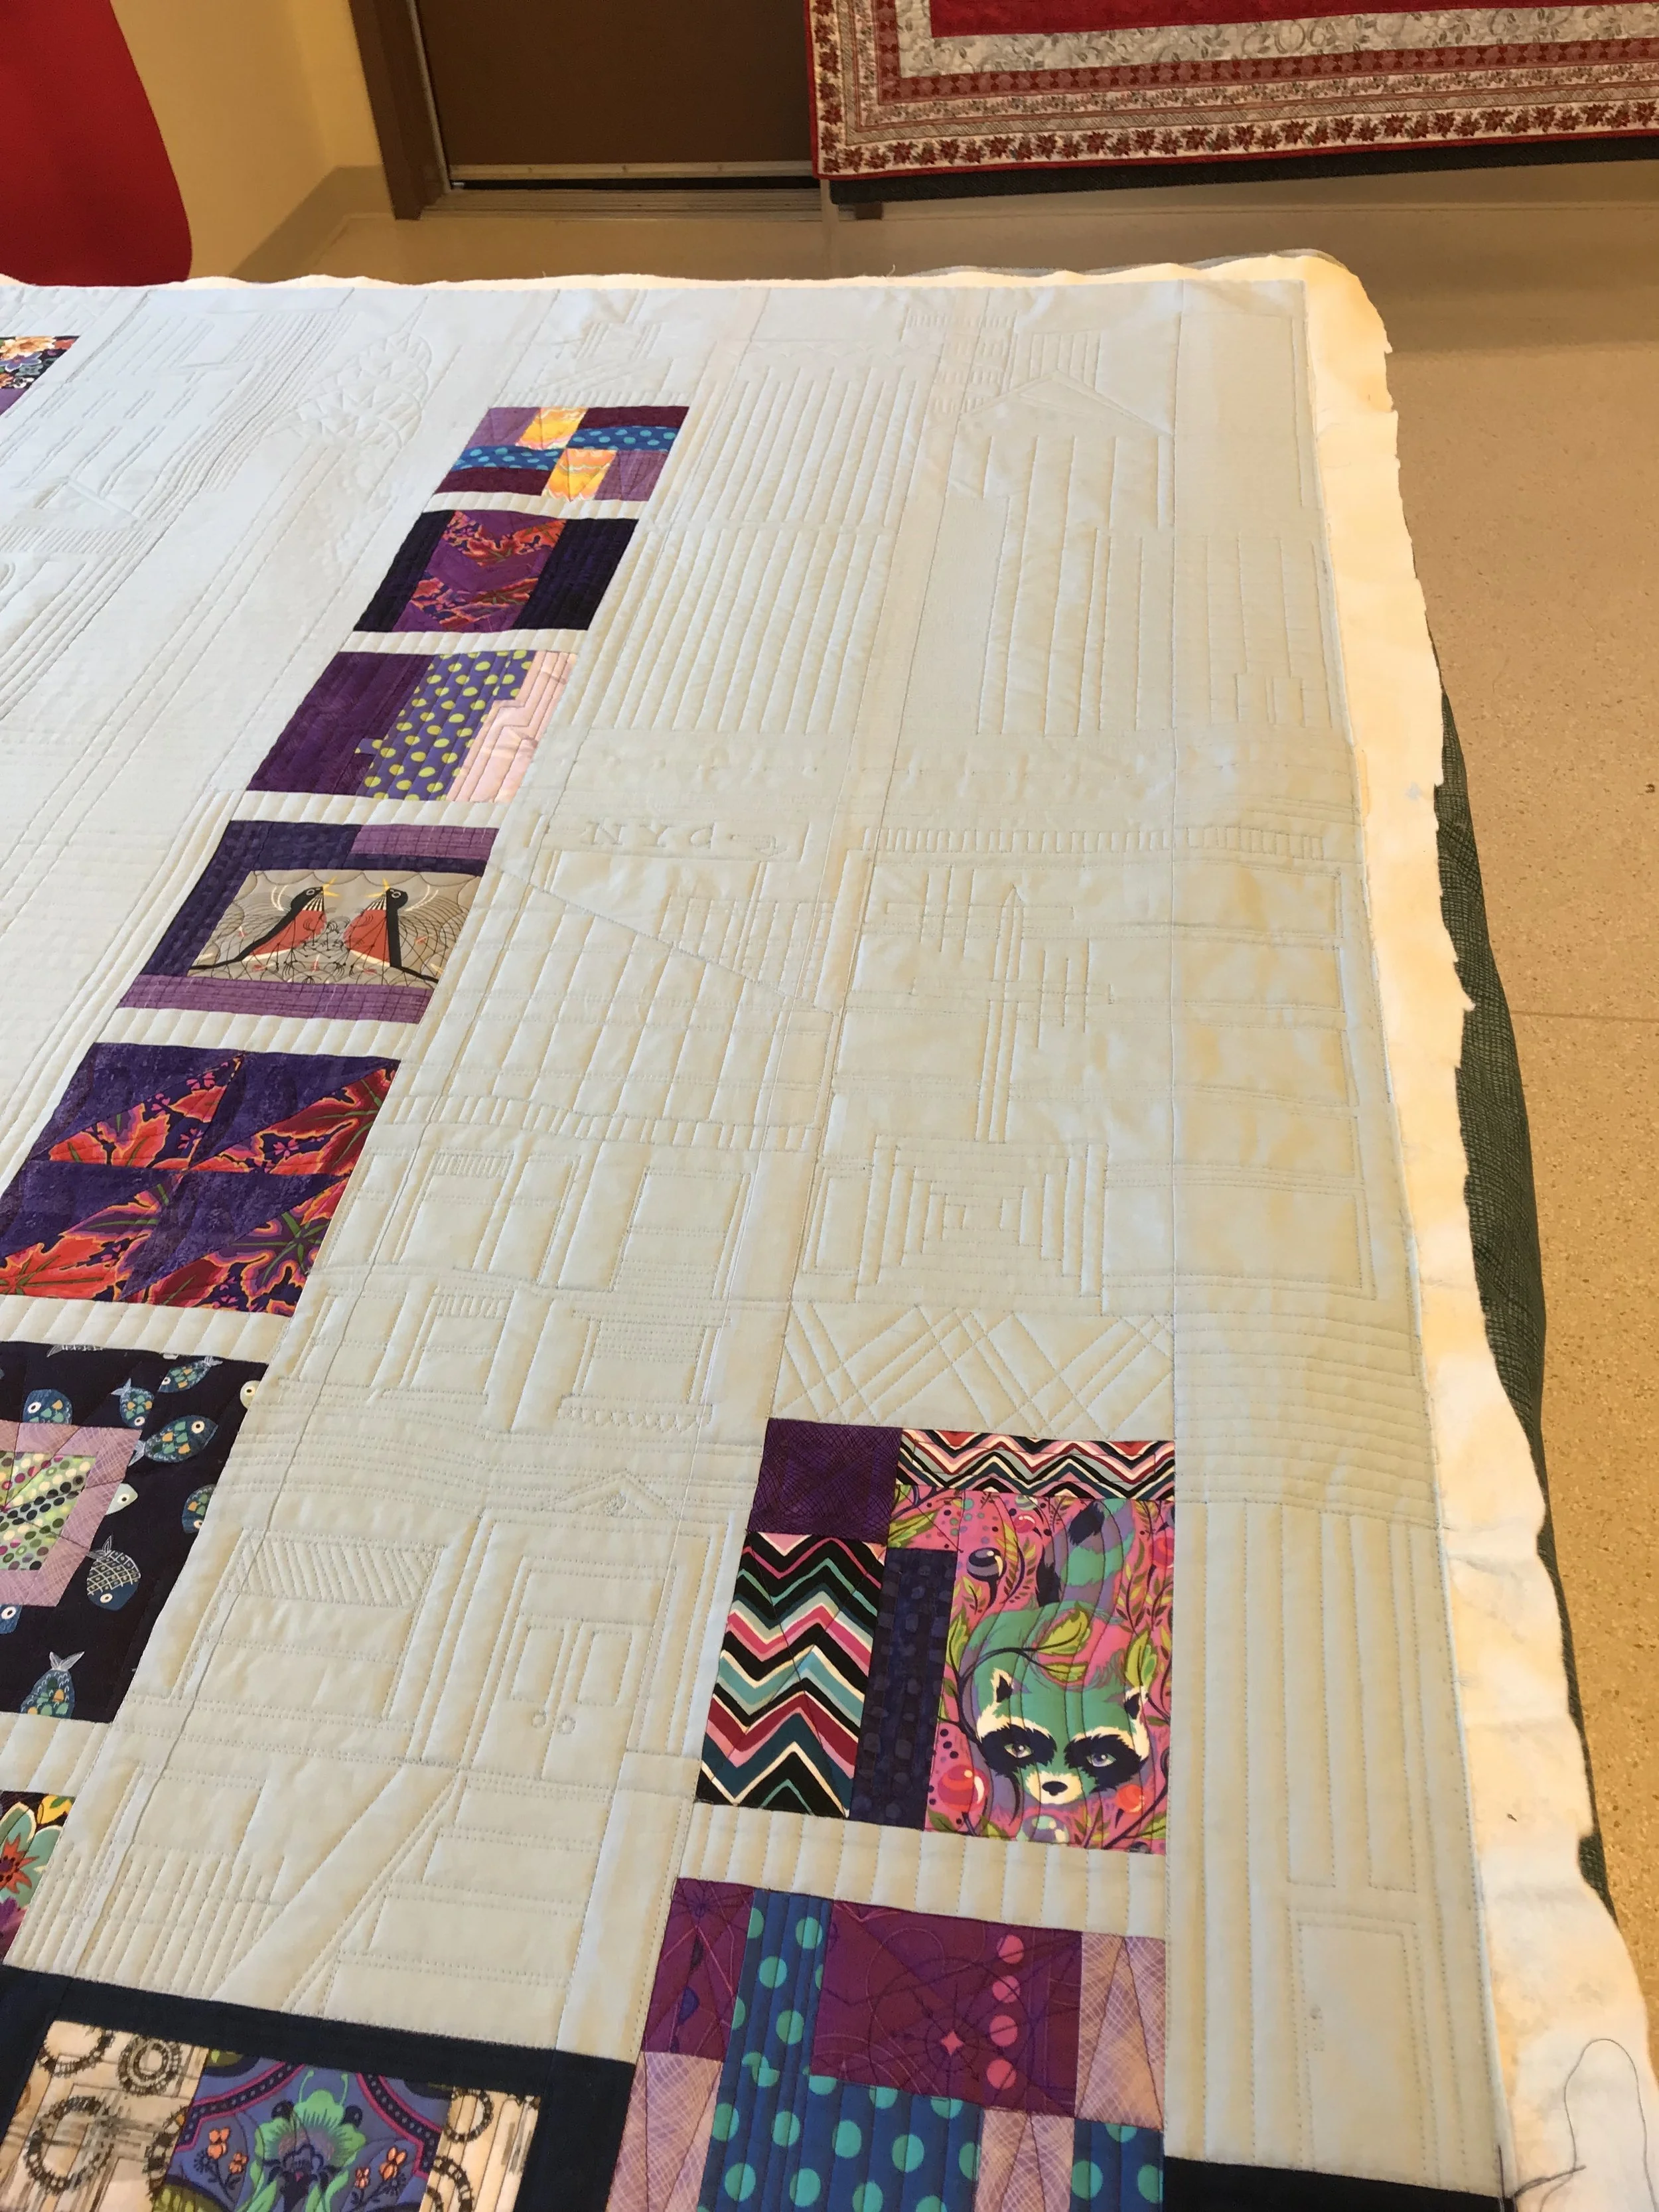
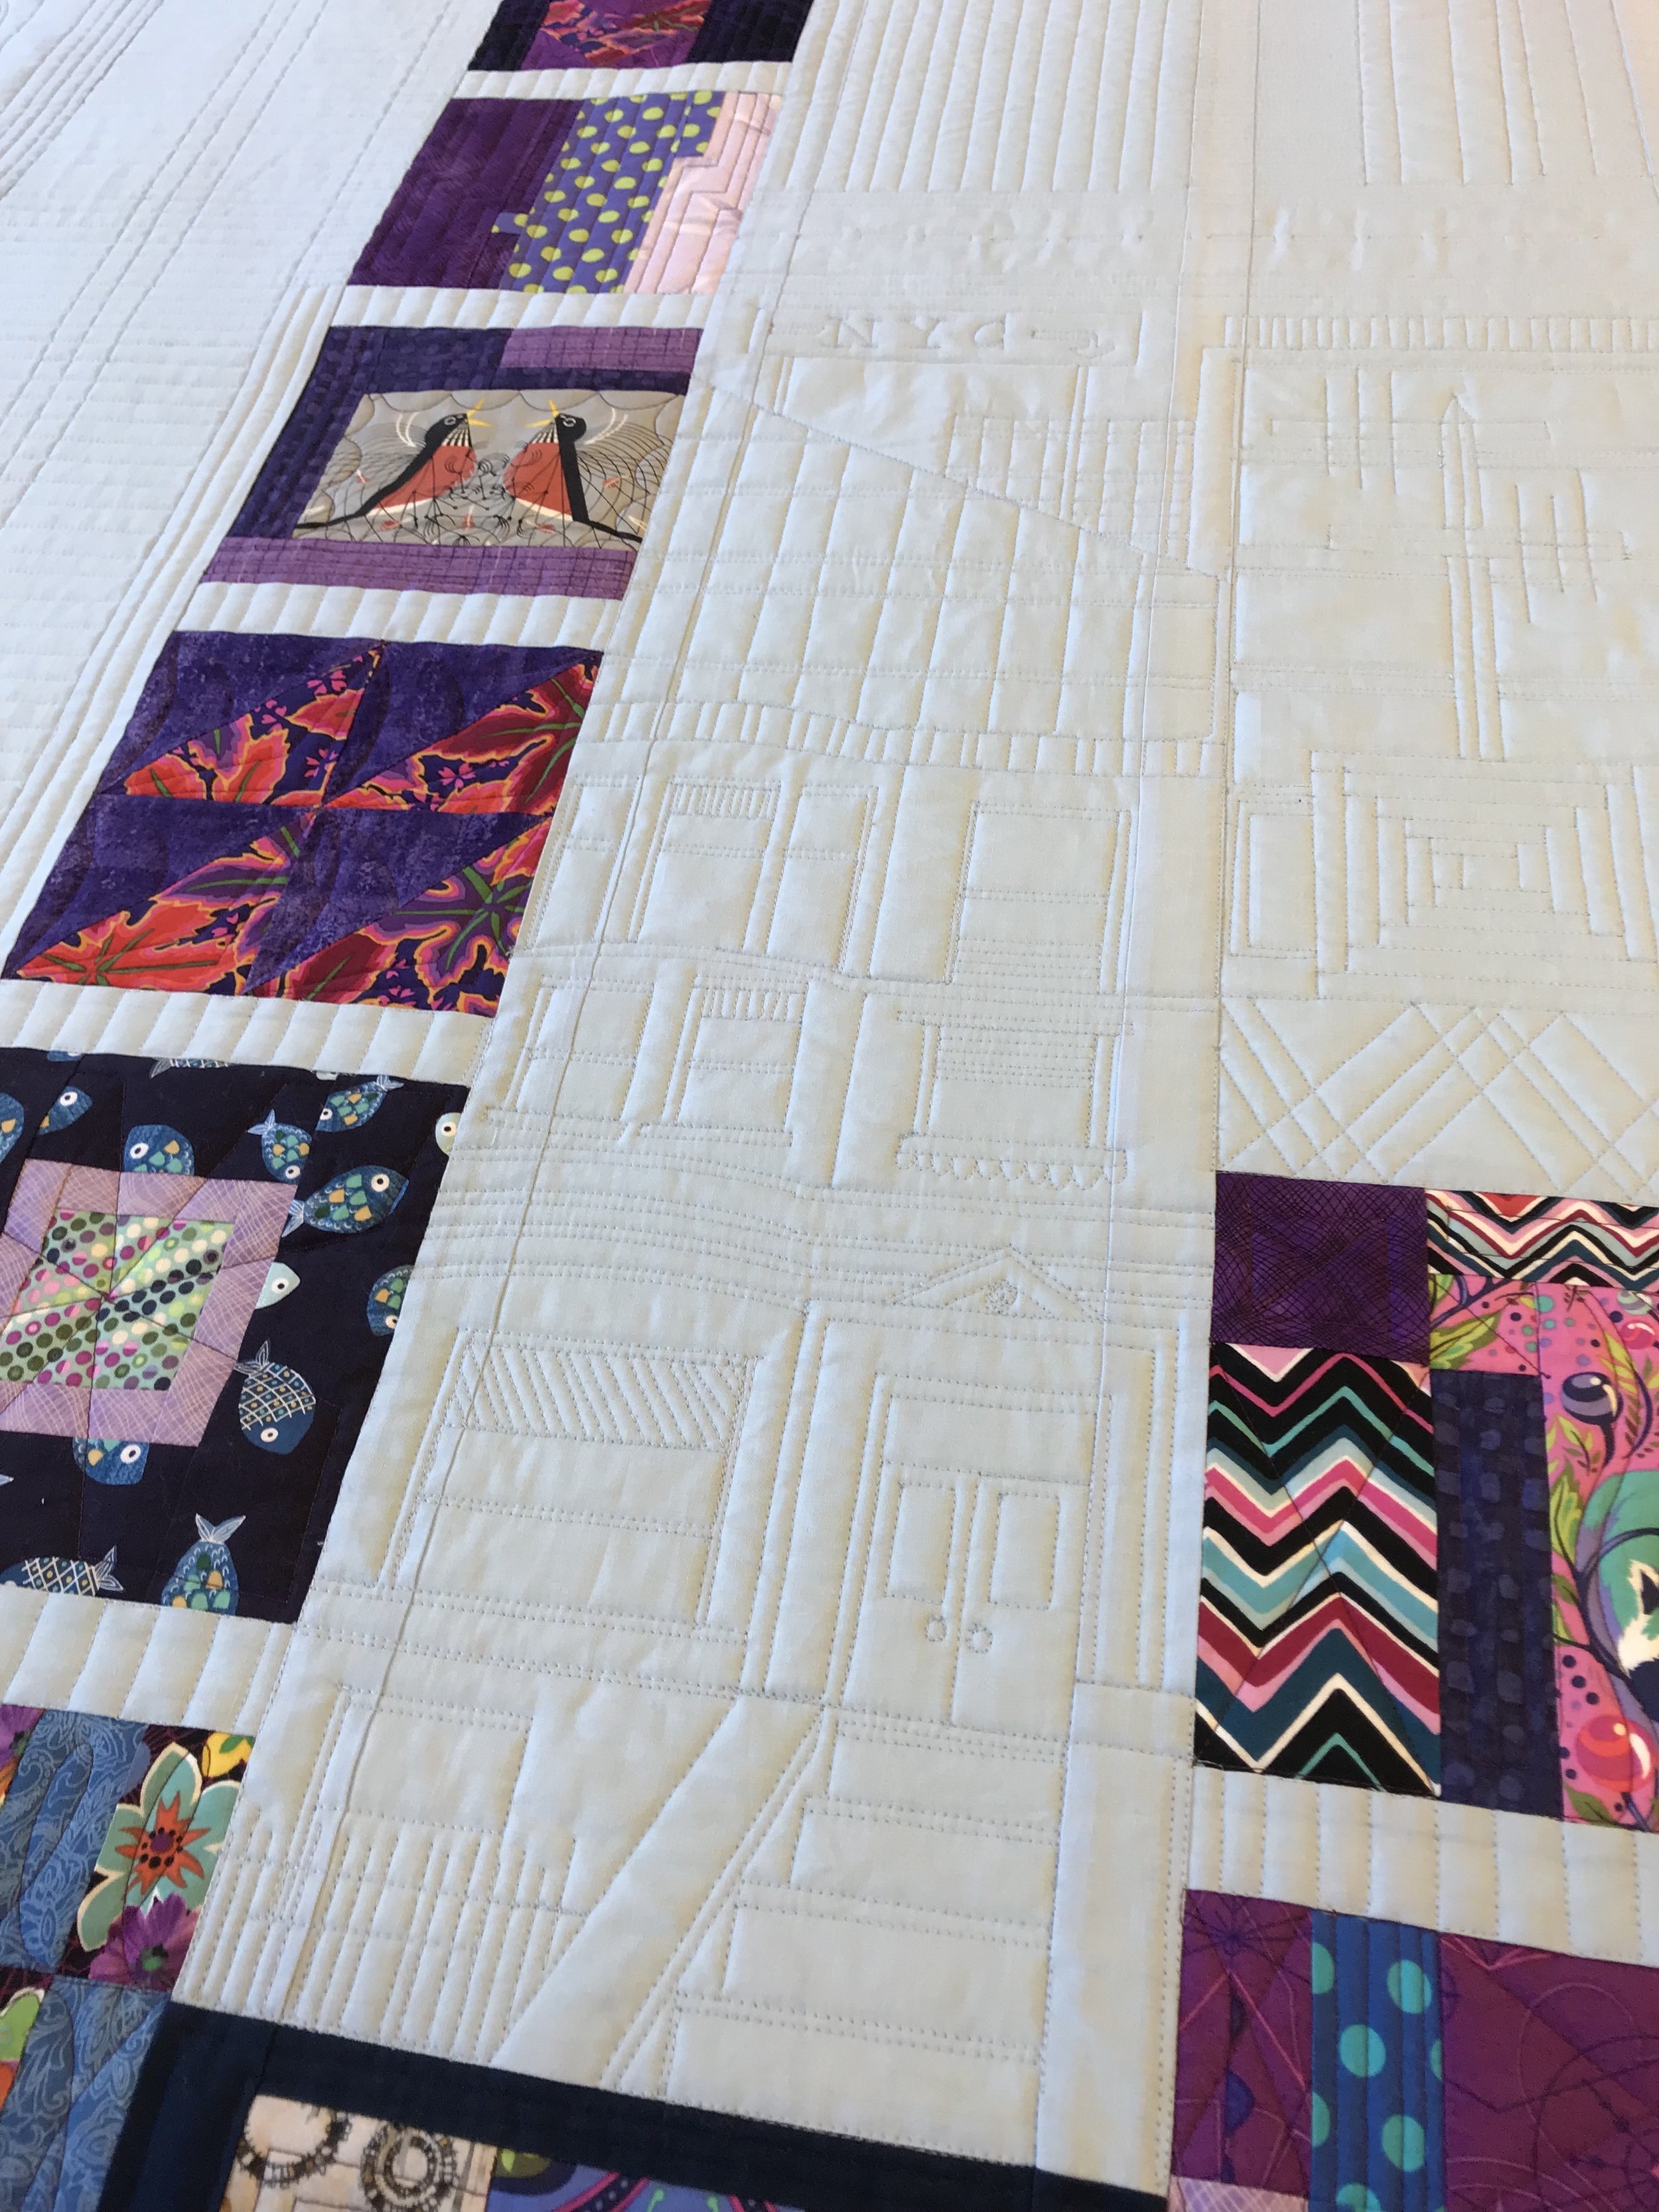
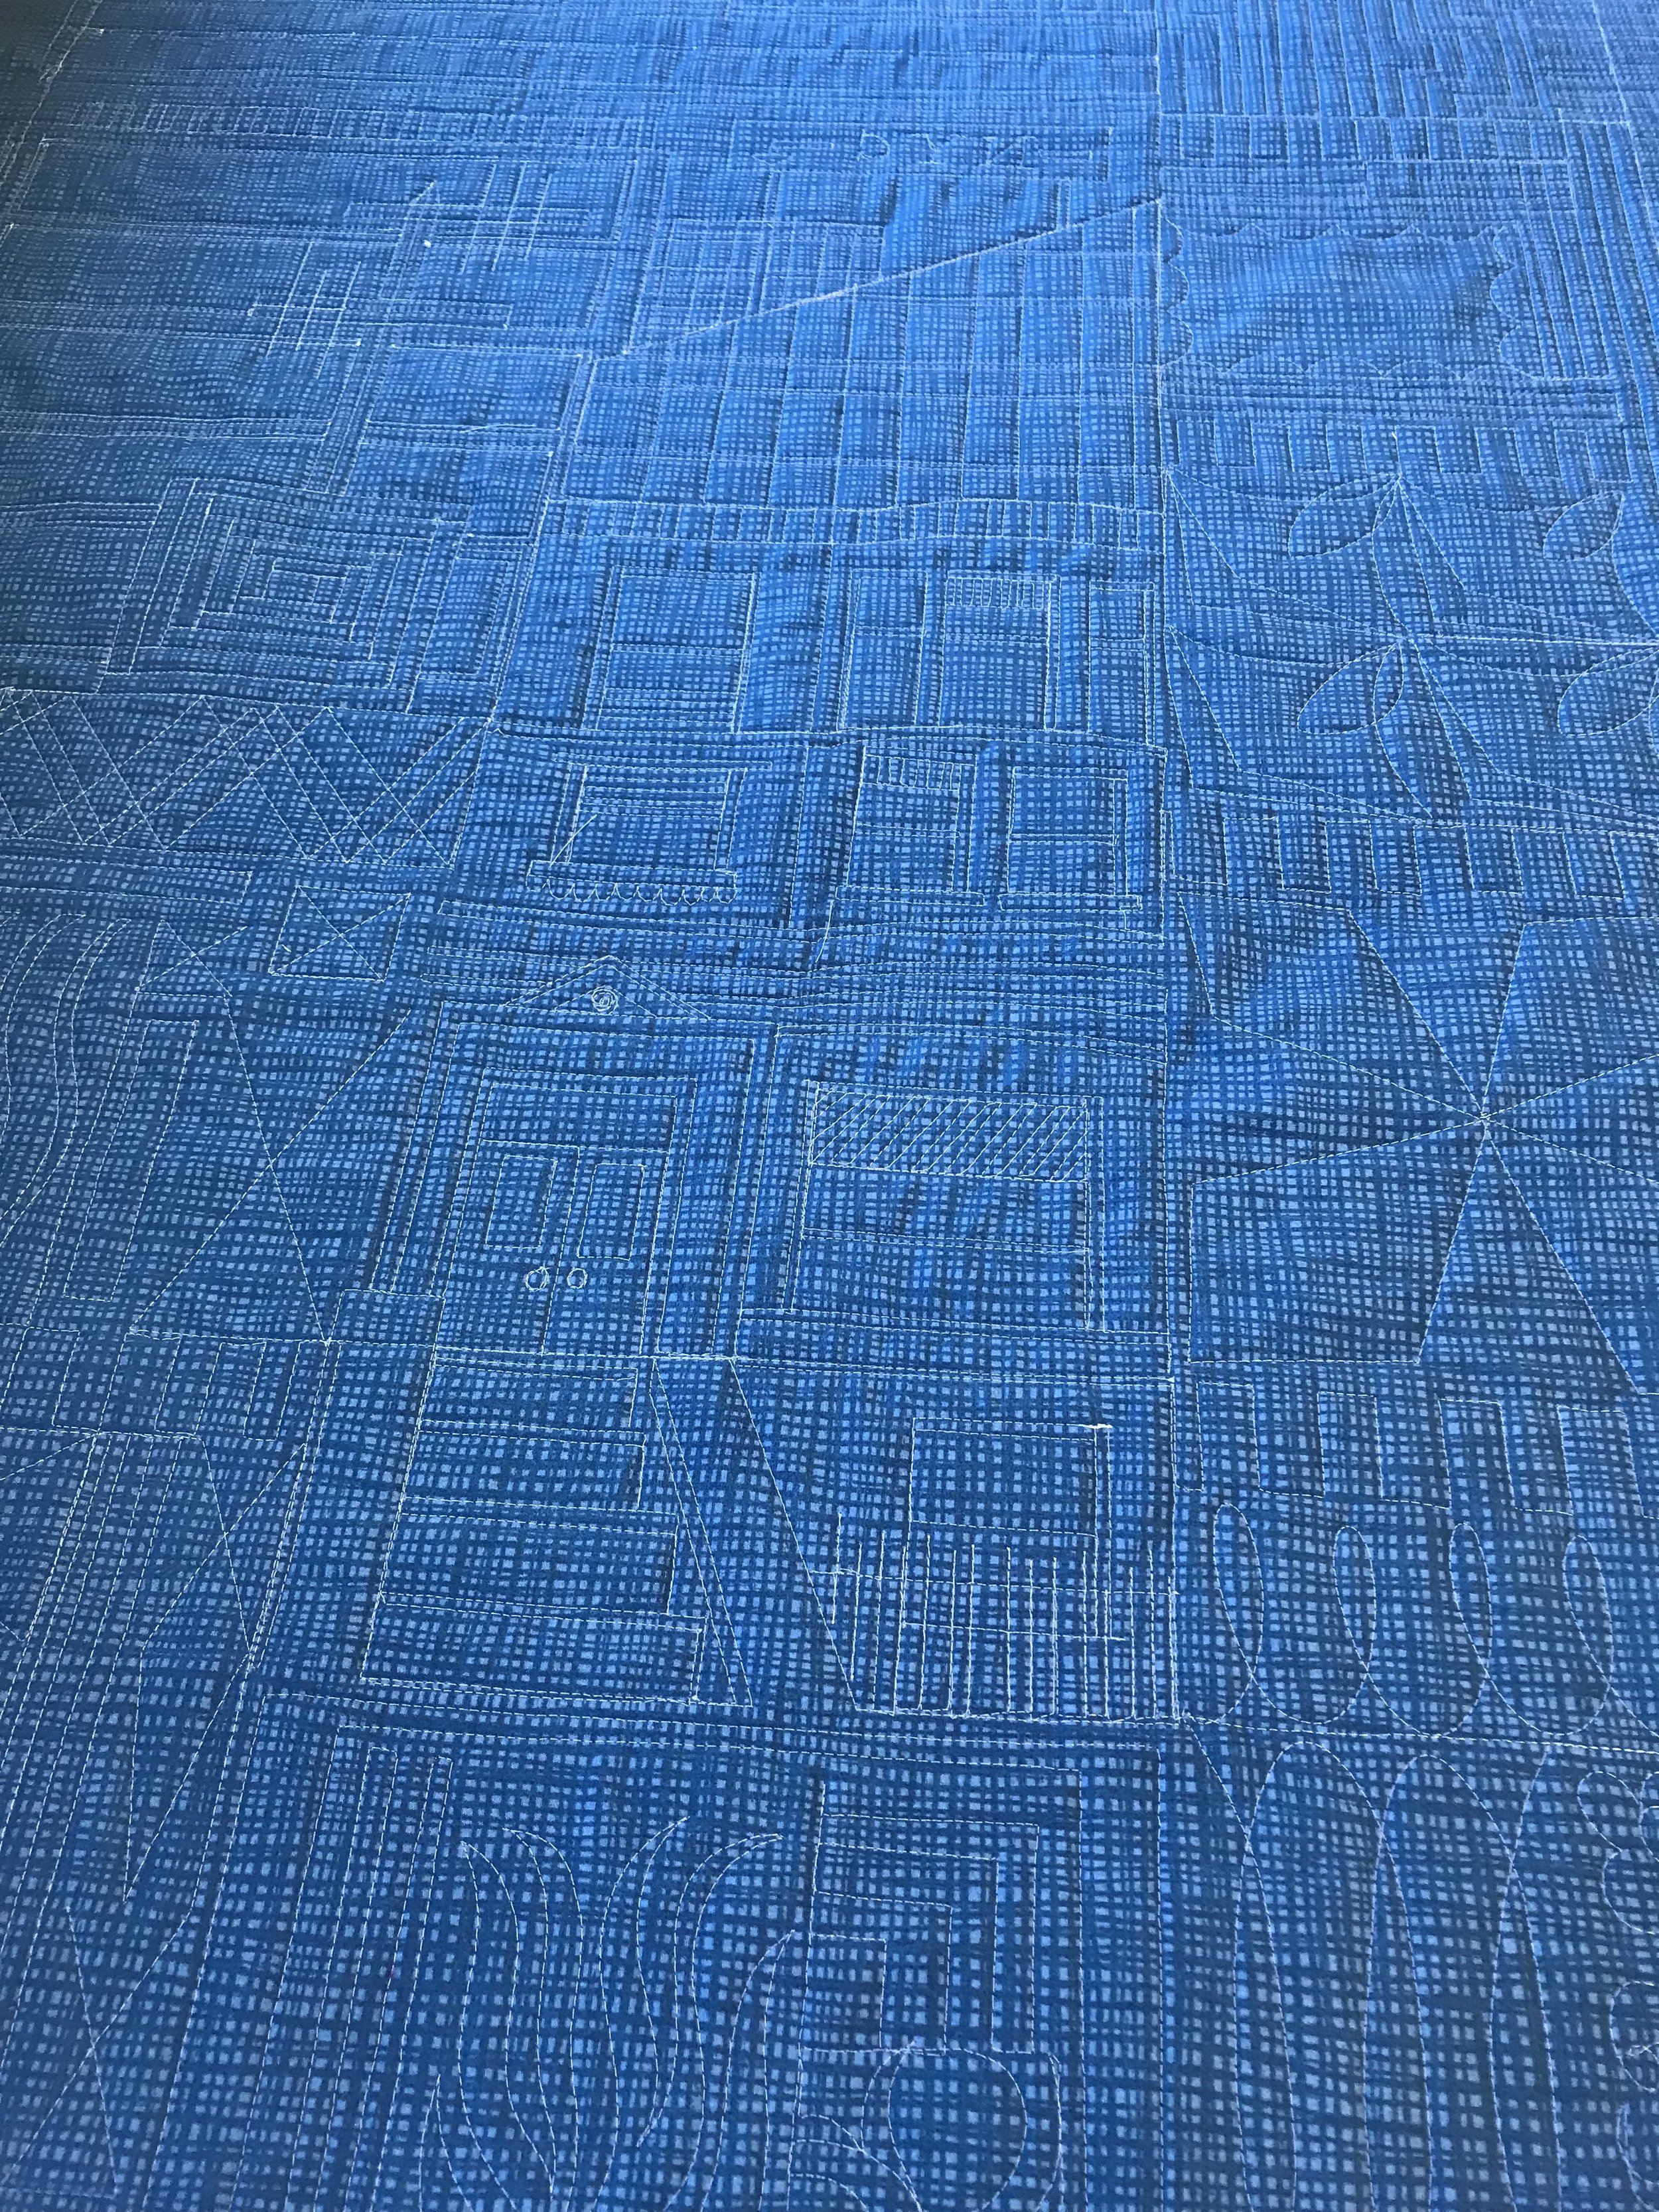
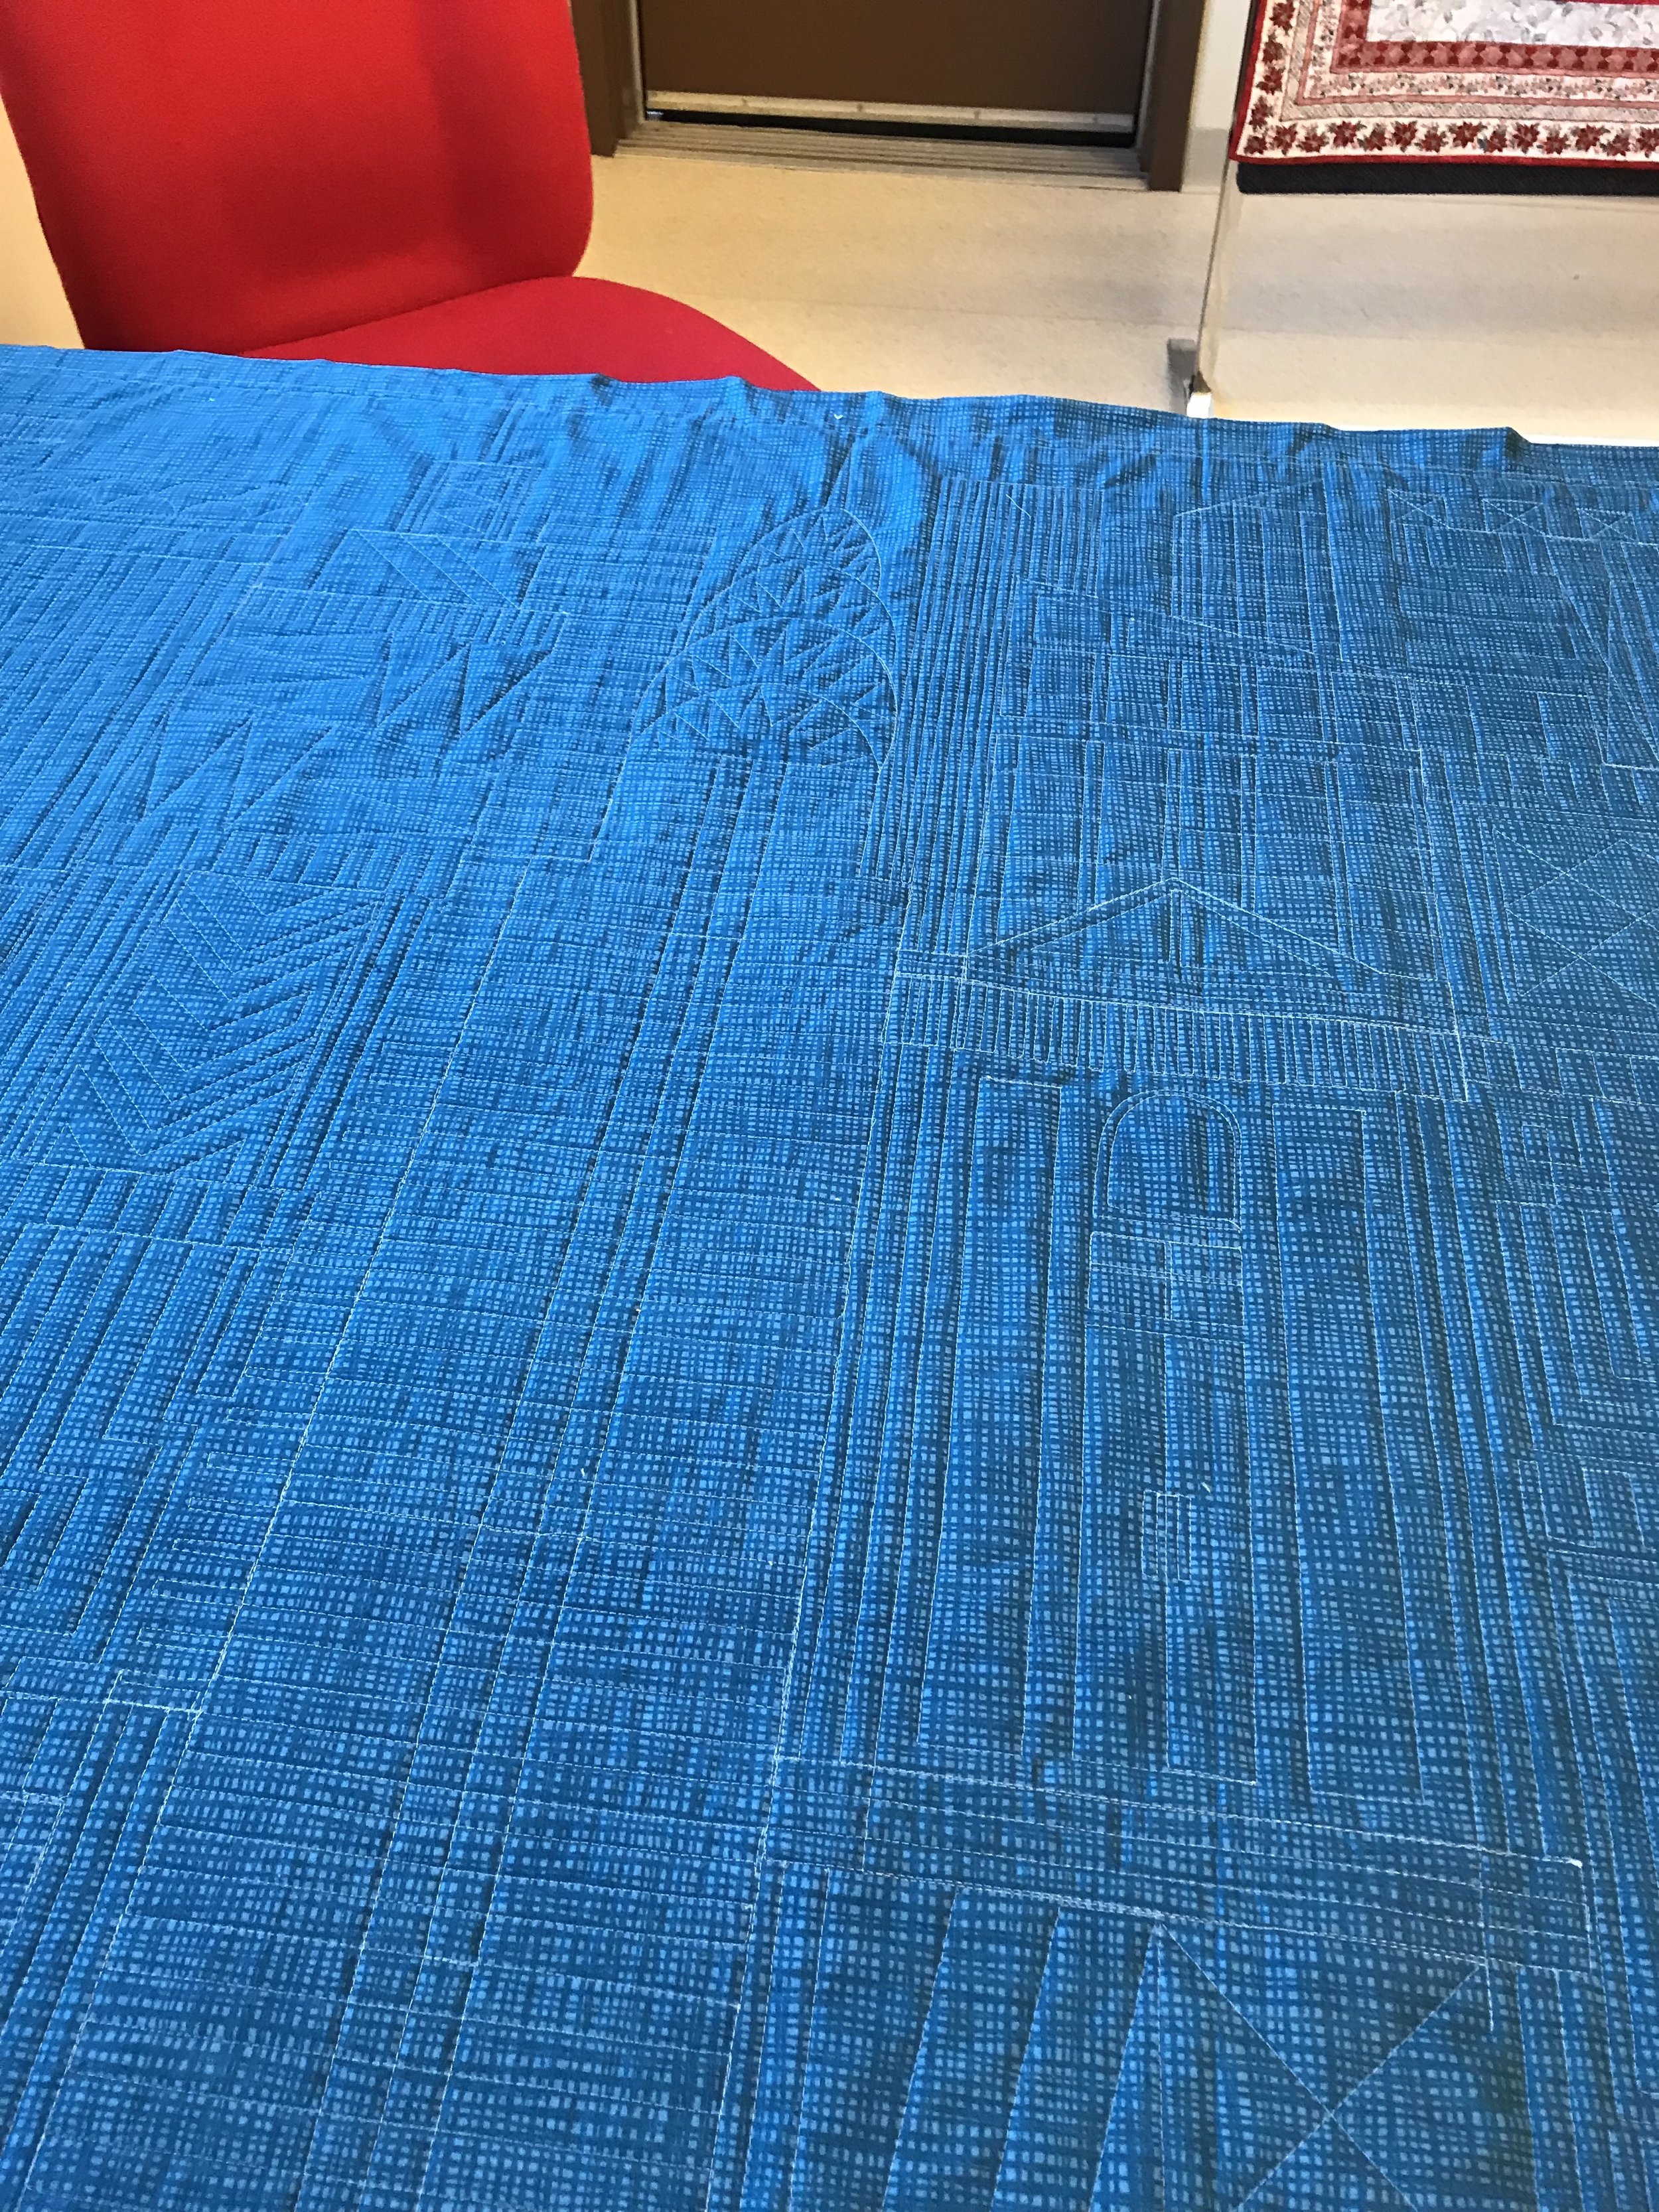
Often times with projects like this, I will take a photo of the quilt and “sketch” out my ideas on the photo before I even take a single stitch. It often helps me figure out my plan of attack so I’m not just standing staring at a “blank quilt” wondering where I should start! I sketched and researched and looked at about a BILLION photos of the New York skyline over the course of a few weeks. However, this quilt didn’t really come to life until I started stitching - but once it did, I couldn’t get enough of it. For the few weeks I worked on this quilt I felt like everyday I “lived in New York” and bonded with buildings and landmarks! After completing a few buildings, I texted my friend and fellow longarmer, Bridgett and asked her, “What does this look like to you?”, hoping that what I had quilted was identifiable as what it was supposed to be! She replied back, “the Brooklyn Bridge!”. YES! YES! YES! I felt like I was on the right track now and just kept going!
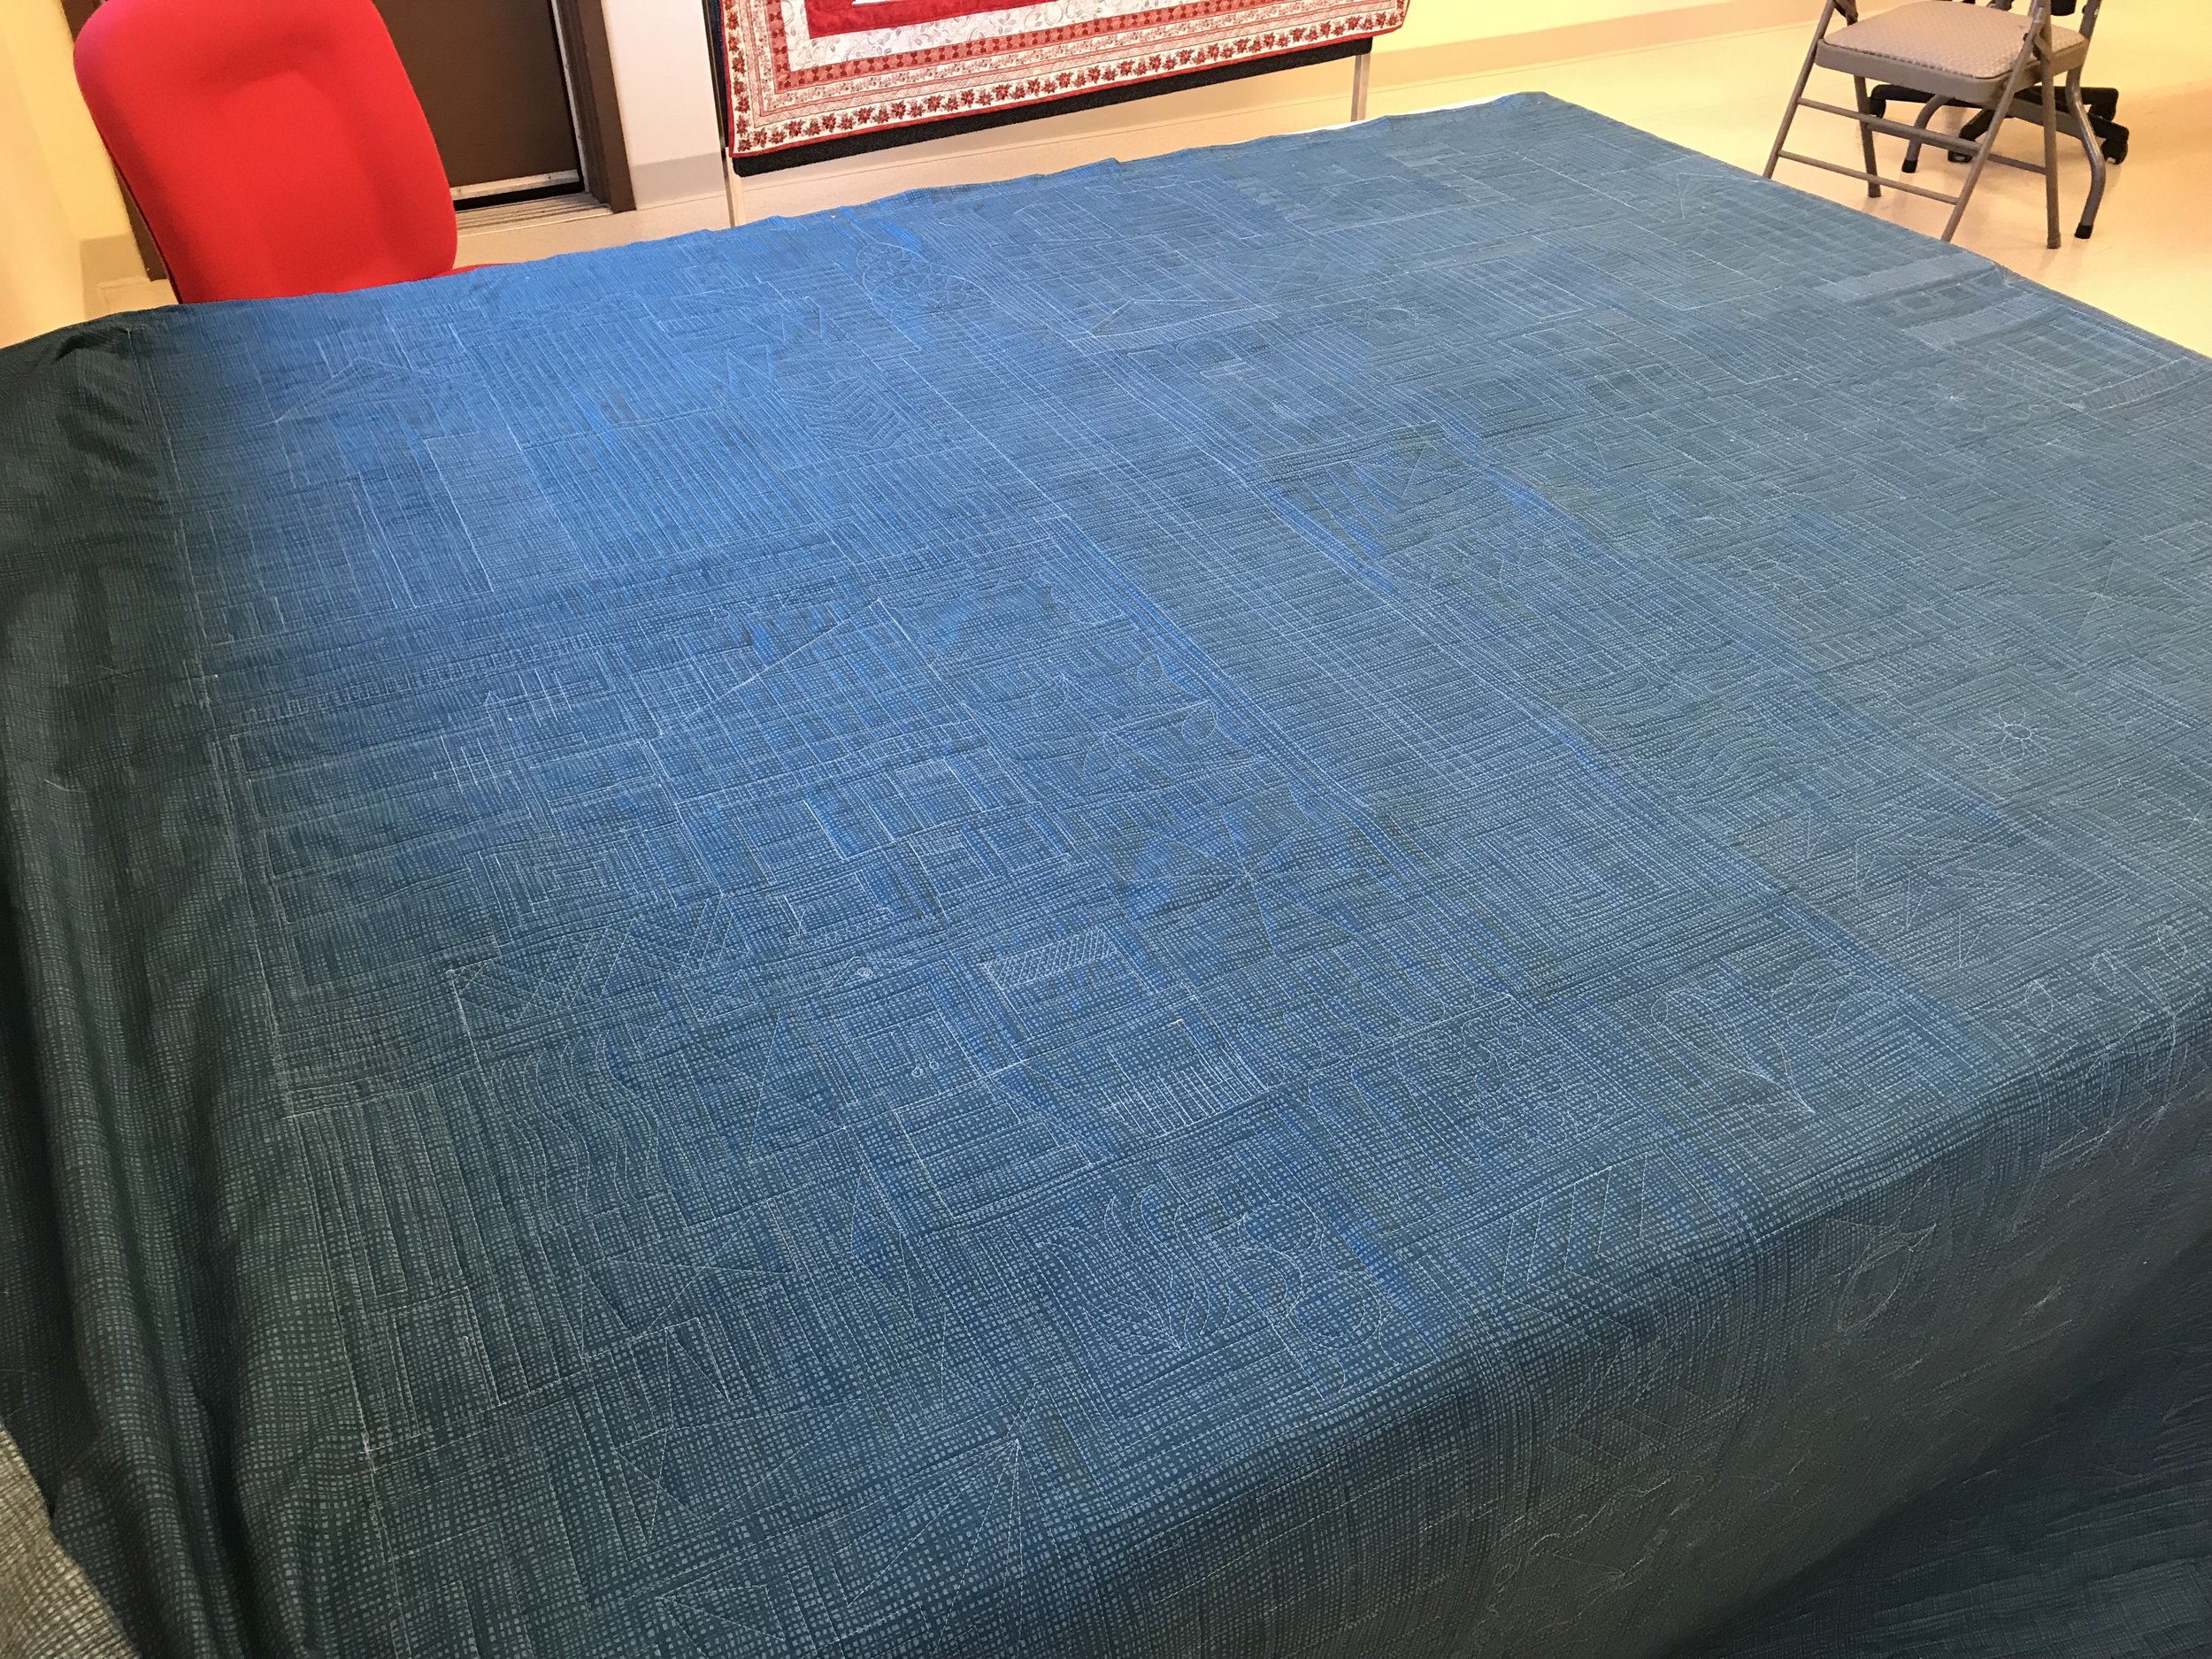
During almost every project, I start to get antsy wanting to see the quilt as a whole and the effect the quilting creates. Boy did I have it bad with this one - I could not wait to see how everything looked together. I pulled it off the frame, laid it out and quickly realized . . . photographing quilts laying flat is a challenge. I couldn't see the dimension, or really get far enough away from it to see the “whole picture”. Lucky for me the client was going to hang it at a local quilt shop as a teaching sample, so I did get that dimension shot!
With custom quilting, I think there is always a period of uncertainty for the quilter because, “what if the client doesn’t like it?”, “what if I didn’t understand their vision?”, what if.. what if.. what if?!! My heart always races a little bit unfolding quilts for clients when they pick up! I’ve been lucky so far that I’ve never been too far out in left field - I’m sure it is a matter of time. With each project I learn something, stretch my skills and understand my art a little bit better.
Custom quilting can be challenging, frustrating and scary, but it is also rewarding, fun and inspiring! I’m heading into 2019 looking forward to many more days spent creating custom work for my amazing and trusting clients!
I hope your 2019 brings you happiness and time spent doing what you LOVE!
:) Enjoli
P.S: Thank you Sharon for trusting me! (And Janet for encouraging her to trust me!)
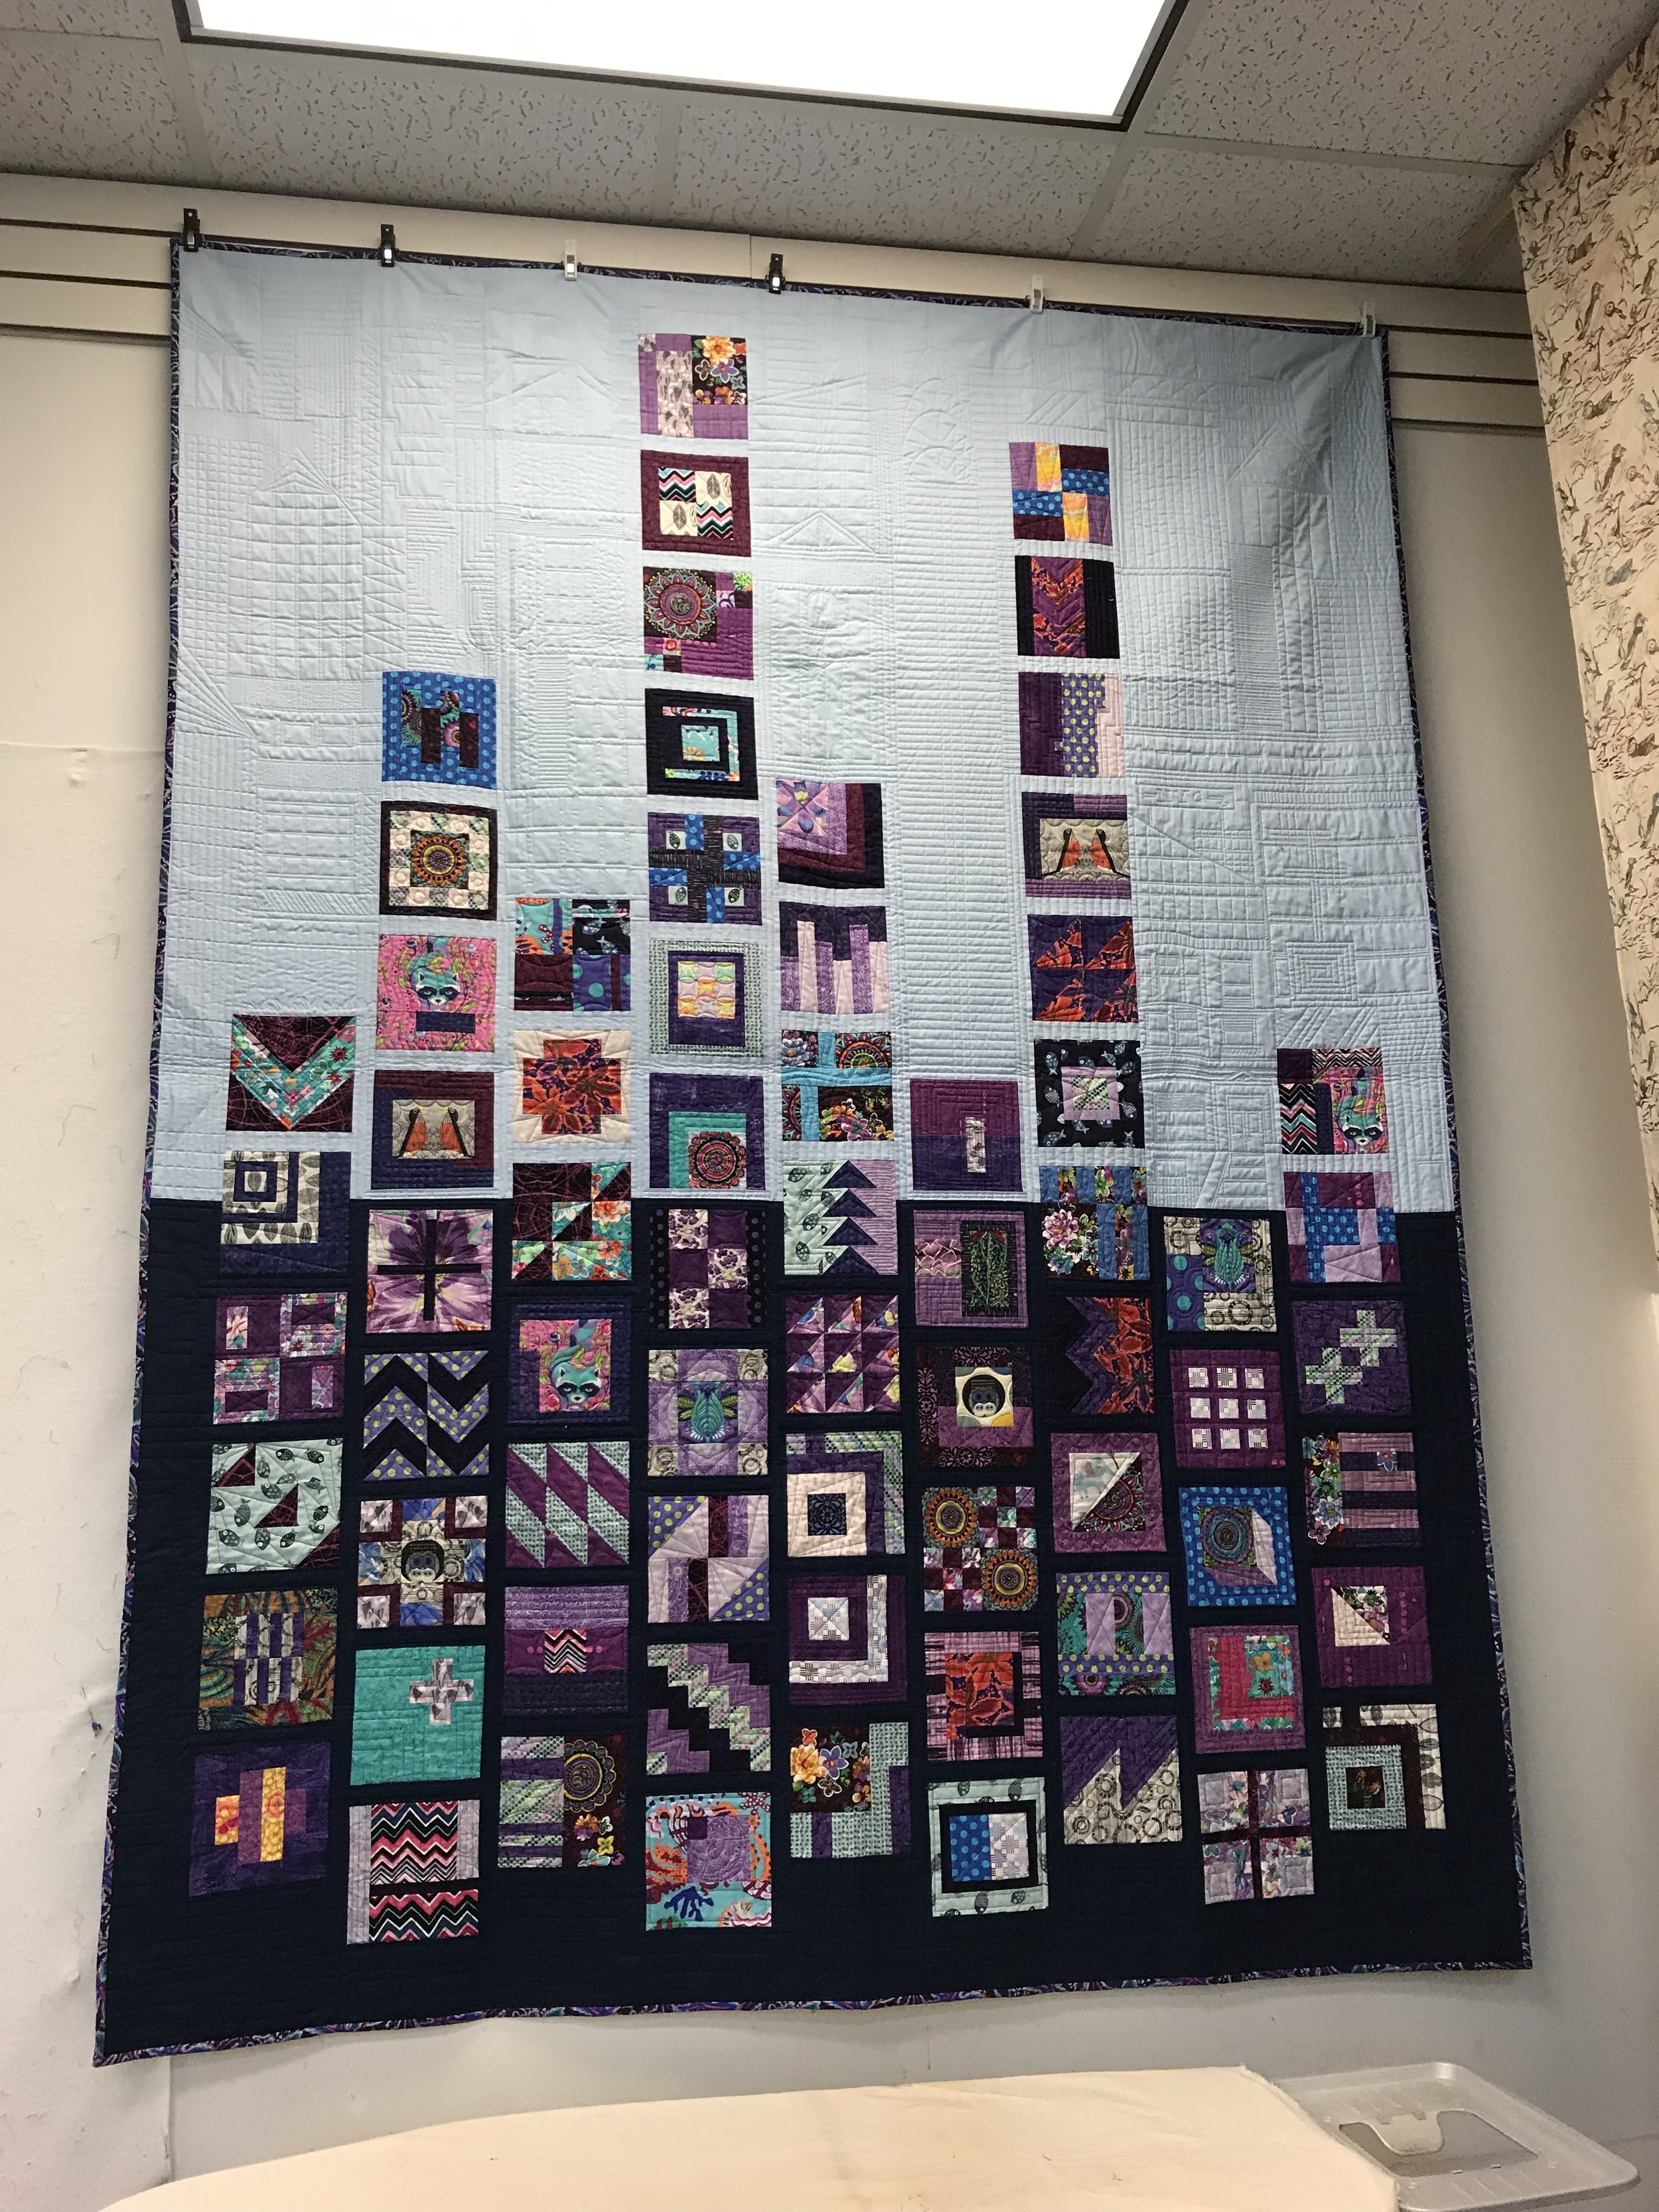
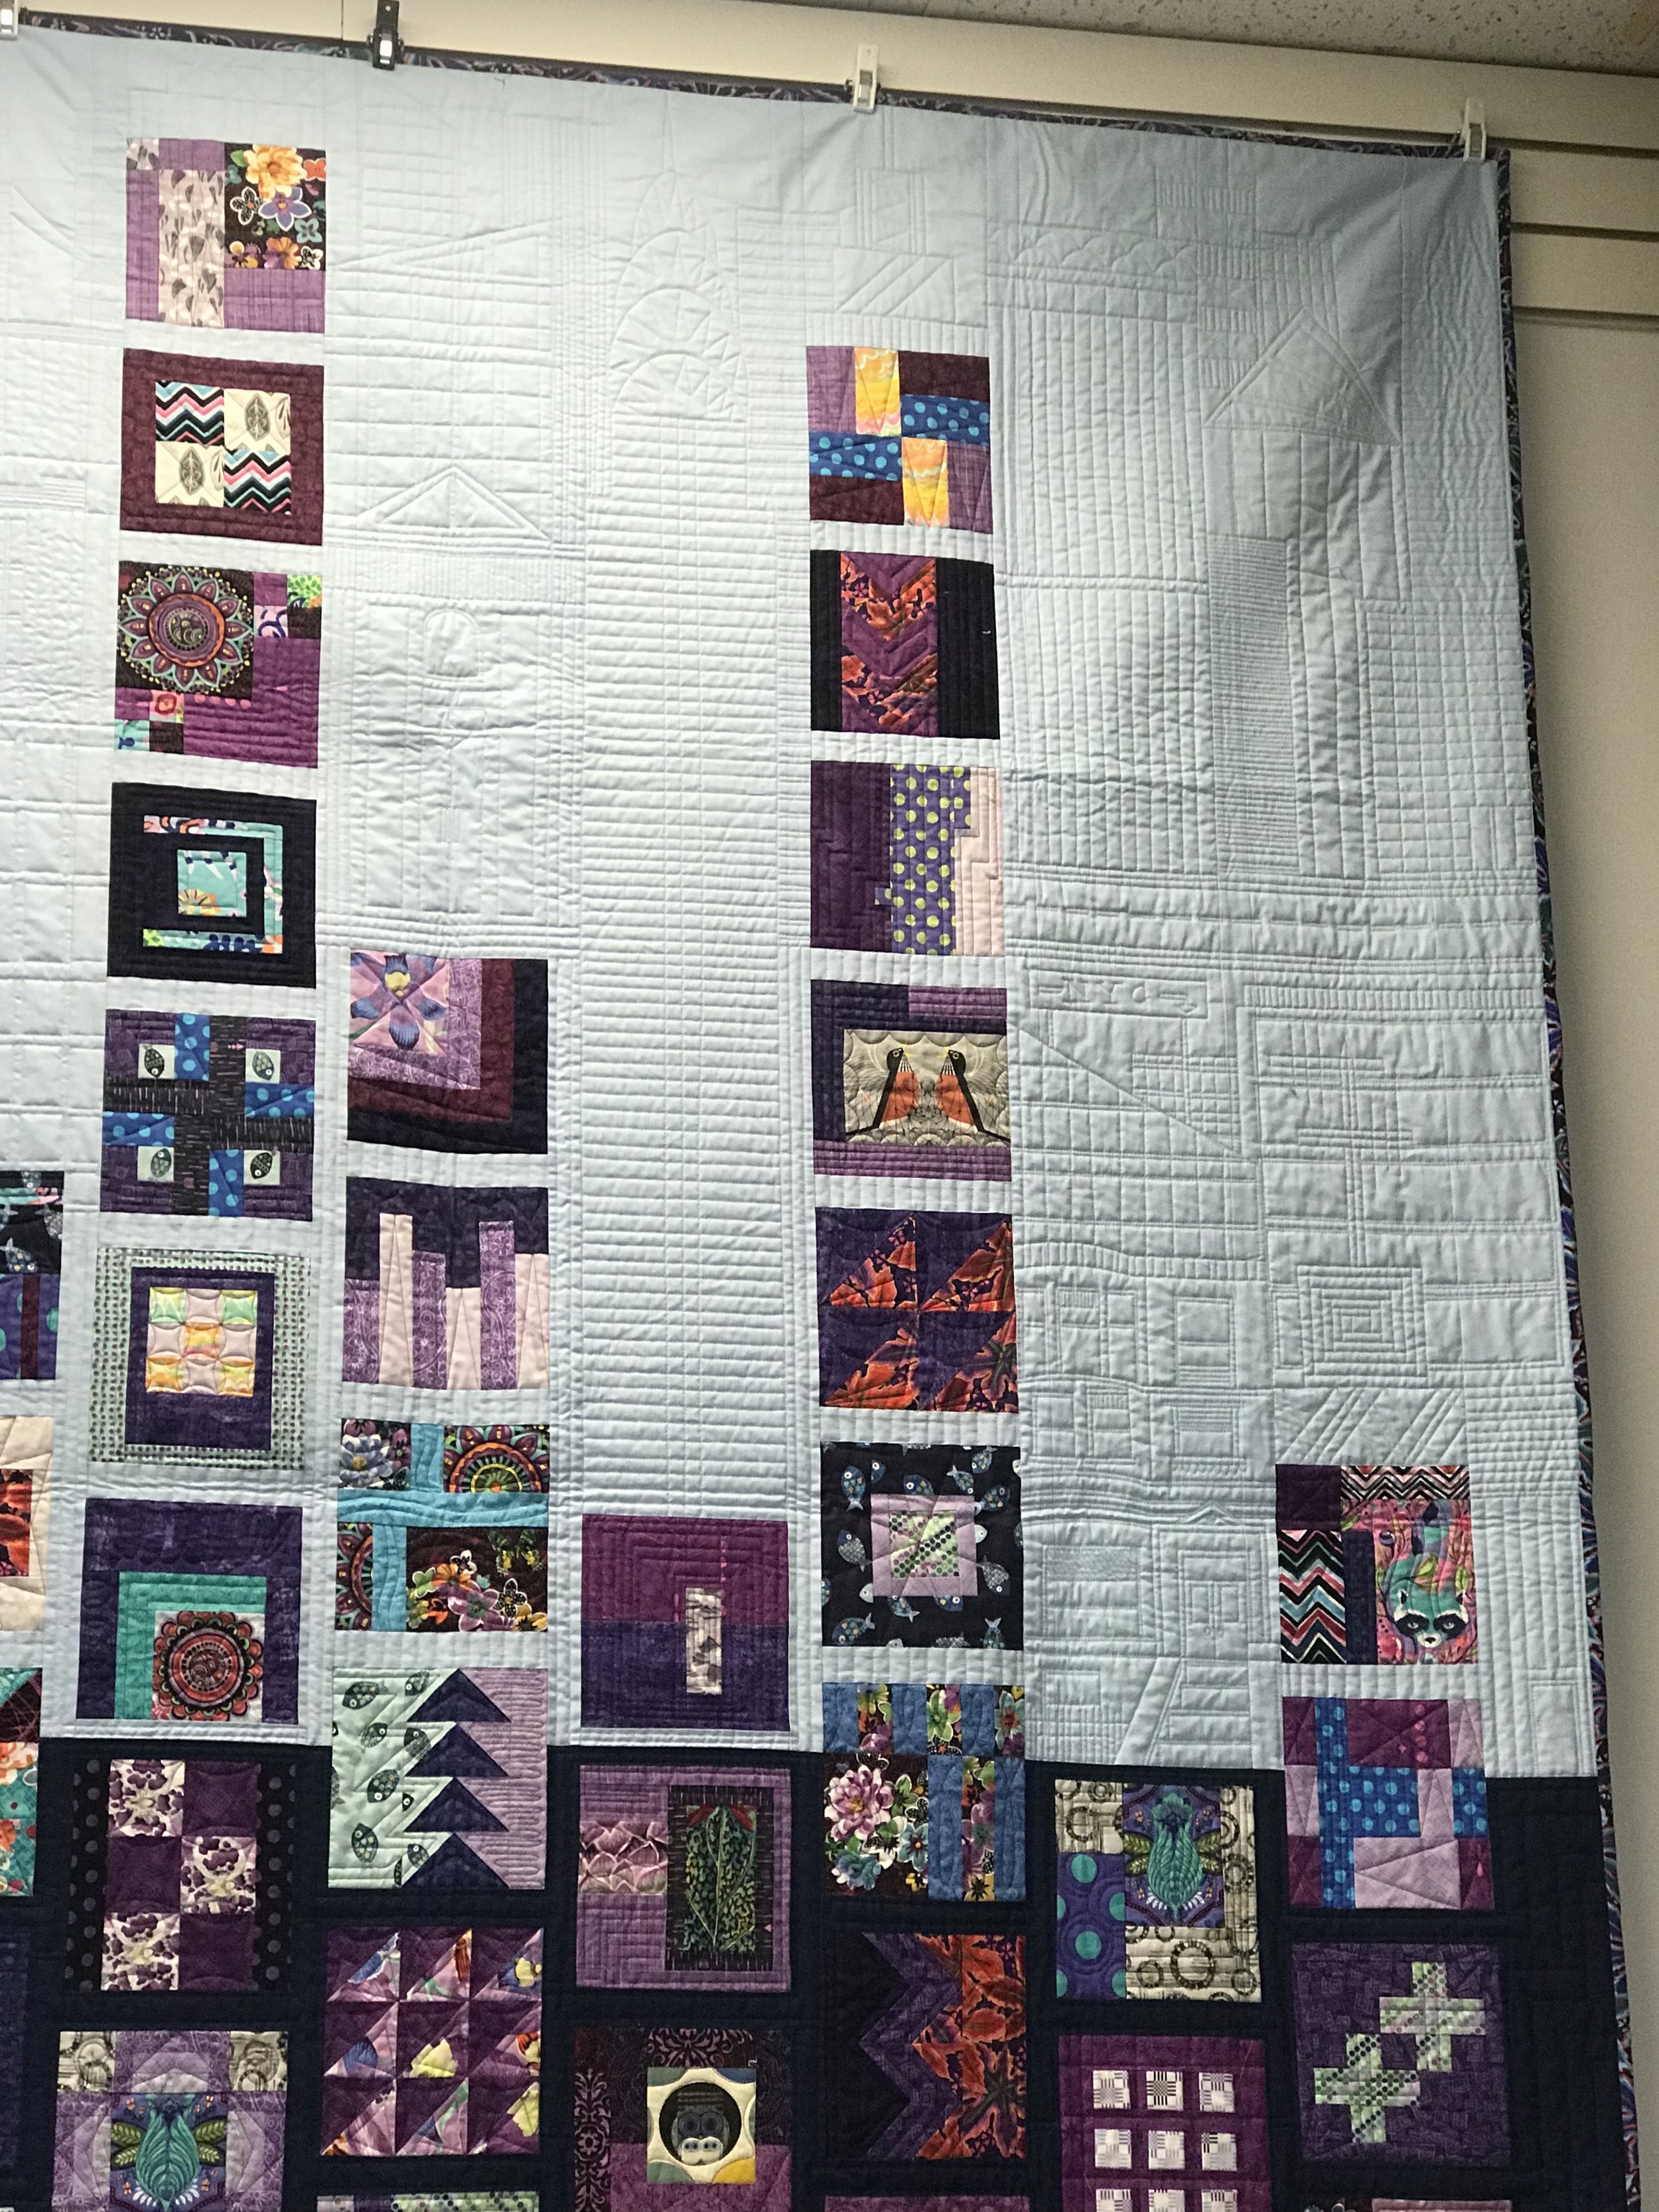
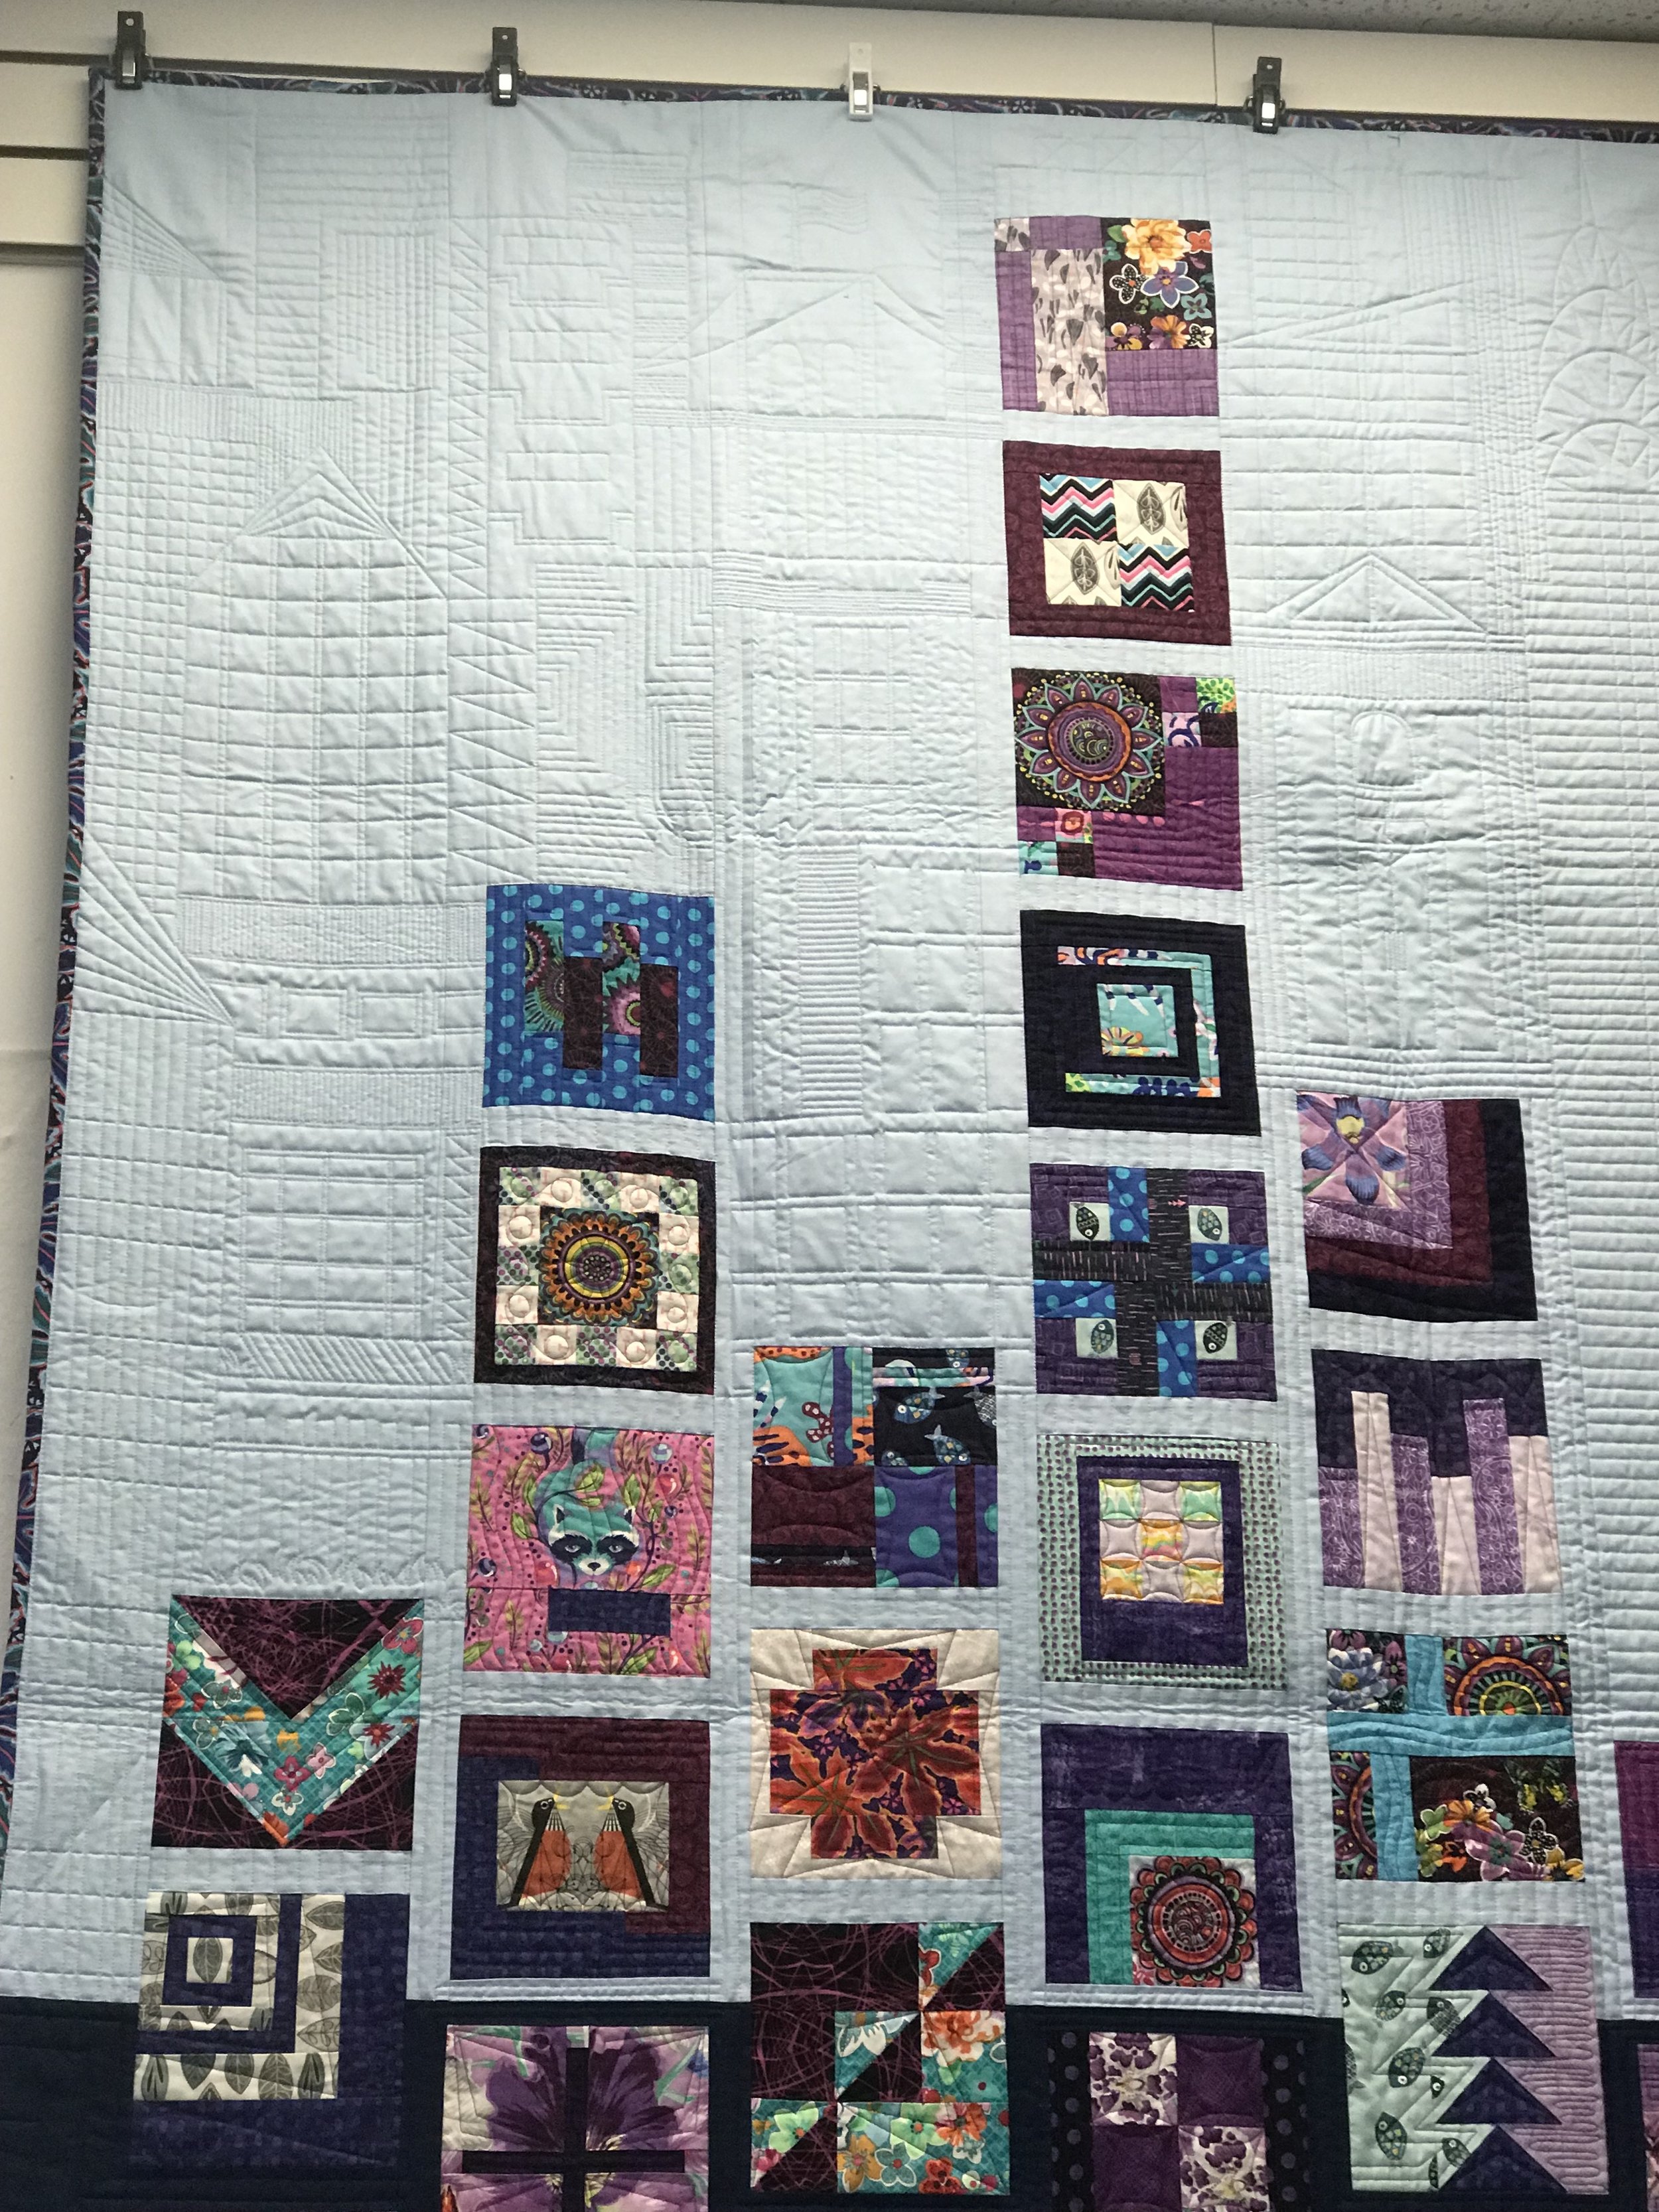
Detail shots of the quilting are below…see if you can spot some NY landmarks!


Bernina Q24 Love
Hey Quilters,
It has been awhile since I’ve chatted about Why I love my Bernina Q24 Longarm (and why I’m thinking about buying a second one - don’t tell my hubby!), so I figured now was a great time to give you a few more reasons why I feel like the Bernina Q24 is one of the top of line longarm machines to buy! I think maybe we’ll chat about a few things to consider when looking for a longarm, plus some ideas on how to get your hands on a few to try before you commit to purchasing one!
So, let me start with a few more reasons why I LOVE my Bernina Q24:
Set & save top tension settings for multiple threads, and the ability to alter them on the fly - this means I can save settings for my most commonly used threads - or alter them slightly for those once in a while weird combo of factor times!
All the AMAZING add-on accessories - yes, of course I’ll share my favorites
Ruler work base - super easy on and off
Laser Light - umm hello precise placement at the needle!
Twin Needle - OMG what a cool effect!
Basting Mode! (Need I say more?!) Maybe, so; the machine has 3 (yes 3) basting settings: 1, 2 or 4 SPI (stitches per inch) so you’re basically set for every situation!
OK, so that is definitely not a conclusive list, because I haven’t even begun to tell you about the Qmatic - Bernina’s automated component! (That will come - I promise!)
My honest to goodness hope and goal for 2019 is to get you guys some more videos on what the machine can do, plus some fun tutorials on techniques, etc. But for now hopefully this will help a little bit if you’re considering the Bernina Q-series longarm!
AND if you’ve just started your process, here are a few other tidbits to think about:
How to shop:
Price - how much can you/do you want to pay? Remember quality costs money!
Size/Space - how much space do you have and how much machine can you fit into it?
How to try before you buy:
Shows - if you live in the states (the 48 of you that are connected), traveling to a Quilt Show might be a good option - usually multiple longarm manufacturers are there.
Local Dealers - check out the local brands in your area, if they have a machine on their sales floor you should be able to go in and get your hands on it!
Other Users/Friends/Guild Members, etc. - this is one I’d love to see open up more; sometimes it is less intimidating to go over to a friends house or a friend of a friend and see what they have, hear why they like it and how they use it. (AND what kind of support they get from their dealer!) OR look for a Longarm Group, typically there are a couple of brands represented in groups like that! And if you’re a lucky one that has a longarm already - be open to sharing with others why you love your machine!
PHEW - anyone overwhelmed with decisions? :P Hopefully this will give you a starting point - but in all honesty, if I had to do it again … I would still buy a Bernina Q24, mostly because the machine (and automation) are very user friendly and FUN to use!
Happy Quilting & Happy Holidays!
Enjoli :)